
Technical data
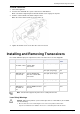

Installing and Removing Memory
Customer Replaceable Parts Page 26
Caution- To protect the appliance and the memory modules from electrostatic
discharge damage, make sure you are properly grounded before you touch these
components. Use a grounding wrist strap and follow the instructions provided with
the wrist strap before you handle the components or open the appliance.
The grounding plug on the rear of the appliance ("Check Point 21400 VSX Rear
Panel" on page 19) provides a chassis grounding point. If you do not have a
grounding wrist strap, make sure you are properly grounded before you touch any
electronic component.
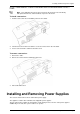
To add or replace DIMMs:
1. Power down the appliance and remove the lower tray:
a) Use the CLI to shut down the appliance.
b) Press the power switch at the rear of the appliance to turn off power to the appliance.
c) Remove the power cords from the appliance.
d) Loosen the two retaining screws for the lower tray ("Check Point 21400 VSX Rear Panel" on page
19).
e) Pull hard on the extraction handles, and fully remove the tray from the appliance.
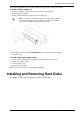
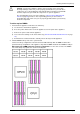
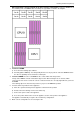
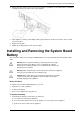
2. Find the DIMM memory slots on the system board.
The basic memory configuration of the Check Point 21400 VSX ship with six DIMMs installed. The
optional memory configuration of the appliance ships with 12 DIMMs installed. Each DIMM is 2 Gbyte.
When replacing a DIMM in the basic memory configuration: Use the same six slots. The DIMMs
slots must always be populated as shown in the diagram.