
User`s guide


©Microcontroller-café & Checkpoint LAB M35160 ERASER/PROGRAMMER User’s Guide
6
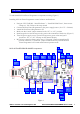
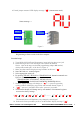
AU mode jumper mounted. LED display message:
“AU“ (Autonomous mode)
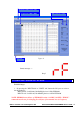
Figure 3
4.1 ERASE : PC mode
Programming software resides in the host computer.
Practical steps:
1. Turn ON the M35160 Eraser/Programmer, insert jack plug into power jack
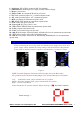
2. Install the target device into the target socket (M35160 marked)
Notice: 1-pin on the target socked and programming adapter "◙" marked,
which point towards pin 1 of the device (Figure 3)
3. Make sure that numeric display message matches to this one:
“ PC“
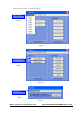
4. Start "M35160.exe" control program
5. Select appropriate serial port
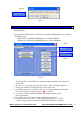
6. By pressing "ERASE - M35080
" or "ERASE-M35160" button incremental area
bytes are erase according to the target device:
"ERASE-M35080
" for M35080-3; M35080-6 devices
"ERASE-M35160
" for M35160; D160D0WQ; D80D0WQ devices
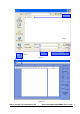
7. Numeric display message will change to: “ P1“ i.e. pass one procedure,
waiting window will display progress bar and terminate button (Figure 7)
8. “ P2“ ”pass two” procedure follow after “pass one” procedure
9. Then numeric display will change one by one numbers of incremental registers
recovered to factory settings :
“ PC“
“ P1“
“ P2“
” 01”
” 02”………
” 15”
” 16”
“ PC“
The internal buzzer will duplicate every change by sound signal
10. In the end of erase procedure you’ll see on the numeric display message: “ PC“
PIN # 1
PIN # 1
PIN # 1
Status message -->