Introduction Table of Contents Chapter 1 Introduction ............................................................................. 1-1 1.1. Document Overview.......................................................................................................1-2 1.2. Intended Audience..........................................................................................................1-3 1.3. Related Documentation .....................................................................................
Introduction Chapter 4 Application Server................................................................... 4-1 4.1. The Application Server Control Screen .........................................................................4-1 4.2. System Status .................................................................................................................4-2 4.3. Task Scheduler ...............................................................................................................4-4 4.4.
Introduction Table of Figures Figure 1-1: Sample Intelligent Library System Components .......................................................1-1 Figure 2-1: ILS Multiple Language Welcome Screen ..................................................................2-1 Figure 2-2: ILS Single Language Welcome Screen......................................................................2-2 Figure 2-3: Patron Identification Screen......................................................................................
Introduction Figure 4-13: Calendar ...................................................................................................................4-9 Figure 4-14: Sample Checkout Discrepancy Report...................................................................4-10 Figure 4-15: Patron Discrepancy Report Button.........................................................................4-11 Figure 4-16: Patron Discrepancy Report Menu ........................................................................
Introduction NOTES Page vi Intelligent Library System (ILS) 2.
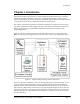
Introduction Chapter 1 Introduction The Intelligent Library System (ILS) is a product designed to help libraries protect collections, streamline operations, and improve patron service. Through ILS, libraries can reduce losses, enhance staff productivity, increase circulation, and improve patron satisfaction. The ILS operates in conjunction with the library’s Automated Circulation System (ACS).
Introduction 1.1. Document Overview This manual provides a general overview of the ILS technology and illustrates the use and operation of each component. This manual has been designed specifically for the patron, librarian, and administrator. It contains all the information necessary to take full advantage of the system capabilities. Whether you are a student or a library staff member, the Intelligent Library System will enhance your library experience.
Introduction Button Name - This describes a button or selection on the screen. For example, the button is represented in this document as Done. Key Name - This describes a keystroke on a keyboard. For example Ctrl represents the control key. A sample screen illustration from the Patron Self-Checkout Station, Application Server, or a picture of a device represents each activity you may perform. Under each picture is a short description of the activities to be performed.
Introduction Checkpoint field service personnel by setting a table parameter on the Application Server. If using the Bridge Interface (described earlier), off-line processing should never be turned on at the same application server. The Intelligent Library, Patron Self-Checkout Station, Intelligent Sensor, Staff Station Reader, and Handheld Portable Reader all have a Radio Frequency (RF) antenna and transceiver system (interrogator) designed to detect and read the Intelligent Circulation Circuits.
Introduction matches one in the list the user receives an audible alert and the ID is displayed on the data terminal. The ILS Intelligent Sensor protects Exit/Entry aisles against unchecked library materials leaving the secured area by determining whether tagged items have a checked (authorized/no alarm) or unchecked (non-authorized/alarm) events. Patron Self-Checkout Stations combine patron card readers, a RFID Circulation Circuit interrogator, touch screen monitor, and printer in one compact unit.
Introduction configured to support multiple languages. With multiple languages, a language selection screen is presented to the patron to select a language for the self-checkout transaction. Additionally the system may report patron or item messages if there is a problem conducting the checkout transaction. A typical scenario for a patron to check out a book would be as follows. A patron comes to the Patron Self-Checkout Station and selects a language (if using multiple languages).
Introduction The Application Server interfaces to the library circulation system and other subsystem components using the 3M protocol (SIP2) over an Ethernet Network Interface Card (NIC). The Ethernet NIC uses the TCP/IP protocol and session. The physical cable is 10BaseT. 1.5.7. Intelligent Circulation Circuit The Intelligent Circulation Circuit provides a method of assigning 96 one time programmable bits of information to an item that can be read at a single radio frequency, 13.
Introduction Page 1-8 Intelligent Library System (ILS) 2.
Patron Self-Checkout Station Chapter 2 Patron Self-Checkout Station The Patron Self-Checkout Station is used by library patrons to check out library materials without the assistance of library staff. The Patron Self-Checkout Station is the main device used by the general public. It is designed to deliver ease of use and foolproof operations.
Patron Self-Checkout Station If the Patron Self-Checkout Station is configured to use a single language, the first screen shown is the ILS Single Language Welcome Screen (Figure 2-2). Figure 2-2: ILS Single Language Welcome Screen Once you touch the screen to begin or select a language for the self-checkout, you will continue through the checkout process using screens in the selected language (if multiple languages are used).
Patron Self-Checkout Station 2.2. Patron Identification Screen Figure 2-3: Patron Identification Screen You should have your patron ID card ready and follow the instructions shown on the screen. This is illustrated in Figure 2-3: Patron Identification Screen. Watching the right side of the screen, you are given visual instructions on how to present your patron ID card for authorization. Your ID card may be different than the type of ID illustrated in Figure 2-3: Patron Identification Screen.
Patron Self-Checkout Station 2.3. Patron Identification Failure Screen Figure 2-4: Patron Identification Failure Screen If there are ever any questions concerning your authorization, go directly to the librarian desk for assistance. After a short time period the Welcome Screen will be displayed again. At that time you may attempt to checkout items again. 2.4. Item Identification Screen - Begin Figure 2-5: Item Identification Screen - Begin Page 2-4 Intelligent Library System (ILS) 2.
Patron Self-Checkout Station Now that you have been authorized for checkout, the visuals on the screen advance and you see instructions on how to checkout each item. On the left side of the screen you see your name at the top and the heading Items Checked Out This Session. Once you have checked out items a list of those items is displayed as shown in Figure 2-6: Items Identification Screen - Item List.
Patron Self-Checkout Station 2.6. Item Identification Screen - Scroll Figure 2-7: Items Identification Screen - Scroll If you have a several items to check out and the listing of those items fills the item area on the screen, you will see a scroll bar with arrows at the top and bottom. Use these buttons to move the list up or down to view all of the items you have checked out.
Patron Self-Checkout Station 2.7. Item Identification Screen - Failed Figure 2-8: Item Identification Screen - Failure This screen displays if any item you presented for check out is not accepted. On the left side of the screen you will see a message telling you the system was unable to process the item you presented for checkout. The screen lists the Title (if available) of the item and identifies the reason for denied access.
Patron Self-Checkout Station 2.8. Item Identification Screen - Failed - Scroll Figure 2-9: Item Identification Screen - Failed - Scroll If there are numerous items that have been rejected so that all cannot be fully displayed on the left, a scroll bar will display to the right of the list. The Continue button now displays on the right side of the screen. Use the scroll buttons to view the list. Touch Up Arrow to scroll up the list. OR Touch Down Arrow to scroll down the list.
Patron Self-Checkout Station 2.9. End Session Screen Figure 2-10: End Session Screen When you have finished checking out all your items and touched Done, the End Session Screen displays, instructing you to collect your printed receipt and showing you the total number of items you have checked out. Collect the printed receipt from the receipt dispenser. Your receipt will list the items you have checked out as well as the return due date for each item.
Patron Self-Checkout Station Important Information to our Users in North America FCC Regulatory Compliance Statement Checkpoint Systems, Inc., offers Radio Frequency Identification Products that have been FCC certified or verified to 47 CFR Part 15 Subparts B/C and/or 47 CFR Part 18. Appropriately, one of the following labels will apply to the approval: NOTE: This equipment has been tested and found to comply with the limits for a class A digital device, pursuant to Part 15 of the FCC Rules.
Patron Self-Checkout Station I m p o rt a n t I n f o r m a ti o n t o o u r Us e rs i n E u r o pe CE Compliance Statement Where applicable, Checkpoint Systems, Inc., offers certain Radio Frequency Identification (RFID) products that have CE Declarations of Conformity according to R&TTE Directive 99/5/EC.
Patron Self-Checkout Station NOTES Page 2-12 Intelligent Library System (ILS) 2.
Handheld Portable Reader Chapter 3 Handheld Portable Reader 3.1. Overview The Intelligent Library System (ILS) Handheld Portable Reader is a key component in Checkpoint's family of ILS products. Consisting of a lightweight, handheld sensing unit, the Handheld Portable Reader combines convenience with versatility.
Handheld Portable Reader 3.2. Powering Up the Handheld Portable Reader Prior to using the Handheld Portable Reader for any significant inventory collection or inventory search session it is imperative that its battery is fully charged. Connect the battery to the battery charger and plug the adapter into an outlet to begin charging. The estimated charging time is 4-6 hours. When the battery is completely charged, connect the Handheld Portable Reader battery to the top of the Handheld Portable Reader.
Handheld Portable Reader Figure 3-3: Charging the PPT 2700/2800 Insert the PPT 2700/2800 terminal in the cradle. Figure 3-4: Docking the PPT 2700/2800 The Terminal Charge LED turns red to indicate charging, then green when the battery is fully charged. The terminal's battery is fully charged after approximately 2 1/2 hours. 3.3.3.
Handheld Portable Reader Figure 3-5: Charging the Spare Battery 3.3.4. Using the PPT 2700/2800 In this section the word tap is used instead of click because the stylus supplied must be used to tap the touch screen. The stylus is stored in a silo on the back of the PPT 2700/2800. Please refer to the Symbol PPT 2700/2800 Series Quick Reference Guide for information regarding use of this device. 3.3.5.
Handheld Portable Reader Figure 3-6: Settings Panel 4. Tap the Power icon on this screen. The Battery Status screen (Figure 3-7) displays. This screen shows you the power status of both the main and the backup batteries. A warning will display if either battery is low. Figure 3-7: Battery Status 3.4. Collecting Inventory Data and Scanning Library Materials Now that the Handheld Portable Reader has been initialized you are ready to start collecting inventory information.
Handheld Portable Reader Figure 3-8: Connecting Cable to PPT 2700/2800 Turn the PPT 2700/2800 on. To do this, press the red button in the lower-left hand corner of the device. Figure 3-9: Turning PPT 2700/2800 On Once you have started the PPT 2700/2800, you will be presented with the ILS Inventory Main Menu Screen (Figure 3-10). Figure 3-10: ILS Inventory Main Screen Note: If you are not presented with this screen, tap the start button in the upper-left hand corner of the screen.
Handheld Portable Reader file. If you wanted to transfer the previous file, you can immediately tap done to initiate a file transfer. Figure 3-11: Inventory Collection Begin to scan the tagged items. Hold the wand in your hand about three inches from the material you wish to scan. Notice that the red light on the wand is now blinking. This indicates that the wand is detecting tagged materials. The wand can detect circulation circuits up to a distance of 8 inches.
Handheld Portable Reader Figure 3-12: Inventory Collection In Progress 3.5. Transferring the Inventory Data Collected Once you have completed scanning the tags, you are ready to transfer the data. A pop up screen will display asking you if you want to transfer the data collected. Tap OK to do so. Note: If you wish to continue the inventory collection progress after you have pressed Done, press Cancel to prevent file transfer and reenter inventory collection mode.
Handheld Portable Reader Figure 3-13: Handheld Portable Reader Operations The PPT 2700/2800 will read Transfer Complete. Tap OK. This will return you to the ILS Inventory Main Screen. You may begin another inventory collection by selecting Start, or exit to the main screen by clicking OK found at the top-right of the screen. 3.6. Searching the Inventory To begin searching the inventory, tap the - button located in the bottom right hand corner of the ILS Inventory Main Screen.
Handheld Portable Reader Figure 3-14: Select the Search List File Screen Transferring and Selecting the Search List File To transfer a search list file (or files) from the Application Server, it must be placed in the synchronization directory for your PPT 2700/2800. There should be a shortcut to this directory on the desktop of the Application Server. Once the file is in the correct location, dock the PPT 2700/2800 and the file(s) will be automatically transferred.
Handheld Portable Reader Tap the Start button to begin searching for the barcodes. You will notice that the barcode display field(s) will begin to reflect changes in the status of the search items, depending on the search option you chose. Items found will be listed as you find them. Items not found will be removed from the list as you find them. Figure 3-15: Item Search Screen Begin to scan the inventory items. Hold the wand in your hand about three inches from the material you wish to scan.
Handheld Portable Reader Figure 3-16: Item Found Alert When you are finished searching tap Done at the bottom of the screen. If all of the items are found, an alert screen will notify you. Tap OK to continue. At this time, the Item Search result files will be generated. A pop-up will display asking you to Please dock the PPT 2700/2800 unit and press OK to begin transfer of the Search Results file. Tap OK. (Note: In Wireless mode the file transfer is automatic.
Handheld Portable Reader 3.7.1. Selecting a Shelf Order Search File A Shelf Order Search file is identified by the.pso file extension. The file can be transferred from the Application Server to the PPT 2700/2800. The file can be created by a running a Shelf Order report on the circulation system.
Handheld Portable Reader The Offset in use display indicates the current setting for the offset used to determine when an item is considered to be in shelf order. An offset is needed because the wand can read items in a random order within its read range. The offset may be adjusted by changing the number and tapping the button. This allows for adjustment when items of different thickness are being scanned. Tap the Start button be begin the Shelf Order Search.
Handheld Portable Reader 3.7.3. Shelf Order Alert When a Shelf Order Alert is displayed for an item that is not in the list, only the barcode will be displayed. The Item Status field will indicate Not in List. The button will display the previous item read. You can tap this button to display the last item in order to assist in locating the item on the shelf. This item should probably be removed from the shelf, since it is not in the shelf order list.
Handheld Portable Reader Tap Continue when you are ready to resume the scan. Be sure to start at the position you were in when the alert occurred. Figure 3-20: Shelf Order Alert – Out of Range Remember that the Offset in use and the Alert enable settings may be changed once the search is resumed. 3.7.4. Shelf Order Results When the shelf order search is completed, the Shelf Order Results screen is displayed. You can create result files of various types, including a new search list file.
Handheld Portable Reader • Items out of order – the number of items that were read that are not in shelf order. (.poo) • Items not found – the number of items in the Shelf Order file that were not found. (.pmi) • Items not in file – the number of items read that were not in the Shelf Order file. (.pnl) • The File Created field shows the path of the file that was last created when either the or button was selected.
Handheld Portable Reader Figure 3-22: Shelf Order View List Screen Tap Done when you are finished with the Shelf Order Results screen. The Shelf Order screen will be displayed. Tap OK at the top-right of the screen to return to the ILS Inventory main screen. Or, you may tap the Start button to repeat the last Shelf Order search. 3.8. Wireless Operations The Wireless PPT 2700/2800 offers the ability to transfer files to and from the Application Server using the Wireless network.
Handheld Portable Reader Figure 3-23: Wireless PPT 2700/2800 ILS Inventory Main Screen The top line of the screen indicates the direction of the file transfer currently selected. The down arrow to the right of the All Files (*.*)line allows you to choose the file type to be displayed. When a new selection is made, the file list displayed below will be updated. To transfer a file, tap the file name, then tap the button. Only one file at a time is transferred.
Handheld Portable Reader Figure 3-24: Wireless File Transfer Screen 3.9. Hints on Using the PPT 2700/2800 There are no double-clicks on the PPT 2700/2800 unit. All actions are accomplished by a single tap. If you have not used the PPT 2700/2800 within the configured time, the device will go into Power Save mode. This means that the device will turn off. To turn it back on, press the red power button. You will be returned to the last screen presented prior to shut off.
Handheld Portable Reader Figure 3-25: Running Programs Intelligent Library System (ILS) 2.
Handheld Portable Reader NOTES Page 3-22 Intelligent Library System (ILS) 2.
Application Server Chapter 4 Application Server The Application Server is the core-processing component of the Intelligent Library System. The Application Server handles multiple functions including the following: • • • • Storing transactions performed at the Patron Self-Checkout Stations. Downloading inventory data from the ILS Handheld Portable Reader. Generation of reports. Connectivity to the host library circulation system.
Application Server system feature without using the menu bar. If you move the mouse pointer over a button, a popup screen (fly-by-help) will display describing what system function each button will perform. 4.2. System Status There are multiple ways to navigate to the System Status Screen. The first is by clicking System Status button as shown in Figure 4-2: System Status Button.
Application Server Just beneath the Checkout Stations status is the Host Status, which tells you if the host (library circulation system), is on-line or off-line. The Off-line Processing feature allows libraries to configure the Application Server and Patron Self-Checkouts to continue to operate while offline with the library’s circulation system. While the circulation system is offline, the Application Server records significant events.
Application Server 4.3. Task Scheduler Use Task Scheduler to schedule Checkout Cache Synchronization and Host Reconnections to be performed automatically at any time of day. The menu selection is shown in the figure below. Figure 4-5: Task Scheduler Navigation After selecting Task Scheduler from the System Configuration pull-down menu, a dialog box is presented with buttons to view the current schedule or to modify the current schedule.
Application Server A check box is available to disable execution of the current task. When this box is checked, all scheduled times will be ignored and the task will never run until the box is unchecked. The Task Period can be set to Weekly/Daily or Monthly. When Monthly is selected a text box will display to accept the day of the month on which the task should be run. A time can then be entered under Scheduled Time. To accept changes, select Save, then Close at the bottom of the dialog box.
Application Server 4.4. Inventory Download Operations The Automated procedure for downloading inventory information from the Handheld Portable Reader is enabled by the automatic transfer mode. This provides an automatic method of starting the download sequence without initiation from the Handheld Portable Reader Operations Screen. The transfer is automatically started by properly docking a Handheld Portable Reader base in the docking station.
Application Server 4.5. Reports This section includes information on the ILS reports available through the Application Server. The following reports are available: • • • • • Checkout Discrepancy Report (off-line processing) (Section 4.5.1) Patron Discrepancy Report (off-line processing) (Section 4.5.2) Generic Report Generation (Section 4.5.3) Exit Alarm Reporting (Section 4.5.4) Check In Exception Reporting (Section 4.5.5) 4.5.1.
Application Server Figure 4-12: Checkout Discrepancy List Screen The generated report can be filtered based on a number of criteria fields including time period and ID. However, if the Time Period of Interest fields are blank or not specified, the report can't be generated. There are three methods you can use to create a report: First method: 1. Choose the time period of interest by clicking on the drop down button. Choices are Today, Yesterday, This Week, Last Week, This Month, Last Month, and All Data.
Application Server Figure 4-13: Calendar 2. Select the month and year using the drop down buttons. 3. Select the day from the calendar table. 4. Specify the time at the upper right hand corner of the form. You can key in the time or select the time by pressing the up-down arrow buttons at the end of the field. 5. You can click on the Now button if you want to use the current time. 6. Click on OK to confirm the changes or the Cancel button to cancel the changes. 7. Verify the selection shown next to From. 8.
Application Server Figure 4-14: Sample Checkout Discrepancy Report Field Name Patron Identifier Possible Field Data ID Number Transaction Date Date/Time Item Identifier ID Number Station Name Name of Station Final Transaction Date Date/Time Screen Message Text message Data Description The patron ID number in this transaction. Date and time of the transaction. The item number in this transaction. Station where the transaction occurred.
Application Server Figure 4-15: Patron Discrepancy Report Button The second way to get to the Patron Discrepancy Report Screen is to select the Reports pulldown menu, and then select Patron Status Discrepancy as shown in Figure 4-16: Patron Discrepancy Report Menu. Figure 4-16: Patron Discrepancy Report Menu Figure 4-17: Patron Status Discrepancy List Screen Intelligent Library System (ILS) 2.
Application Server The generated report can be filtered based on a number of criteria fields including time period and ID. However, if the Time Period of Interest fields are blank or not specified, the report can't be generated. To create the report, do the following: There are three methods you can use to create a report: First method: 1. Choose the time period of interest by clicking on the drop down button. Choices are Today, Yesterday, This Week, Last Week, This Month, Last Month, and All Data. 2.
Application Server 9. Select the month and year from the drop down buttons. 10. Then select the day from the calendar table. 11. Specify the time at the upper right hand corner of the form. You can key in the time or select the time by pressing the up-down arrow buttons at the end of the field. 12. You can click on the Now button if you want to use the current time. 13. Click on OK to confirm the changes or the Cancel button to cancel the changes. 14. Verify the selection shown next to To. 15.
Application Server Field Name Patron Identifier Possible Field Data ID Number Transaction Date Date/Time Station Name Name of Station Final Transaction Date Date/Time Screen Message Text message Data Description The patron ID number in this transaction. Date and time of the transaction. Station where the transaction occurred. The date and time that an offline incomplete transaction was synchronized. Message return from the host for this transaction. 4.5.3.
Application Server Figure 4-21: Generic Report Screen Figure 4-21: Generic Report Screen shows the selections available for this report. The number of days of activity is displayed at the top of the screen just under the title bar. In the main body of the screen, you are instructed to click the down arrow for each category and highlight your choice. Each category is described below.
Application Server 4. To = 11:59:59 P.M. Second method: 1. Click From and the calendar form displays. Figure 4-22: Calendar 2. Select the month and year using the drop down buttons. 3. Select the day from the calendar table. 4. Specify the time at the upper right hand corner of the form. You can key in the time or select the time by pressing the up-down arrow buttons at the end of the field. 5. You can click on the Now button if you want to use the current time. 6.
Application Server Third method: 1. Key in the From date or a combination of date and time. Date formats can use 2 or 4 digit years: (MM/DD/YY or MM/DD/YYYY). Time should be entered using the 12hour format: (HH:MM AM or PM). 2. Key in the To date or a combination of date and time. Date formats can use 2 or 4 digit years: (MM/DD/YY or MM/DD/YYYY). Time should be entered using the 12hour format: (HH:MM AM or PM). Note: Any combination of the methods may be used.
Application Server Discrepancy OffLine-OnLine Offline OnLine Patron Status Transaction Type Checkin Checkout ItemStatus ExitAlarm Final Transaction Date Date/Time Item Identifier ID Number Patron Identifier ID Number The transaction was an off-line incomplete transaction that was subsequently rejected during offline synchronization. Transaction completed off-line. Transaction completed on-line to the host system. Patron scans their ID card at a Patron Self-Checkout Station.
Application Server Figure 4-24: Exit Alarm Report Button The second way to get to the Exit Alarm Report Screen is to select Reports pull-down menu and then select Exit Alarm as shown in the figure below. Figure 4-25: Exit Alarm Report Menu Figure 4-26: Exit Alarm Report Screen Intelligent Library System (ILS) 2.
Application Server The generated report can be filtered based on a time period. However, if Time Period of Interest fields are blank or not specified, the report can't be generated. There are three methods you can use to create a report: First method: 1. Choose the time period of interest by clicking on the drop down button. Choices are Today, Yesterday, This Week, Last Week, This Month, Last Month, and All Data. 2. The From and To date will automatically display. You can key in the time or leave it blank.
Application Server 9. Select the month and year from the drop down buttons. 10. Select the day from the calendar table. 11. Specify the time at the upper right hand corner of the form. You can key in the time or select the time by pressing the up-down arrow buttons at the end of the field. 12. You can click on the Now button if you want to use the current time. 13. Click on OK to confirm the changes or the Cancel button to cancel the changes. 14. Verify the selection shown next to To. 15.
Application Server 4.5.5. Check In Exception Reporting This report provides a list of exceptions that occurred when patrons returned materials. This report allows the tracking of items that failed check in, as well as items that require special handling. You can get to the Check In Exception Report by selecting Reports from the pulldown menu, and then selecting Check In as shown in the figure below.
Application Server 3. From = 12:00:00 A.M. 4. To = 11:59:59 P.M. Second method: 1. Click From and the calendar form displays. Figure 4-31: Calendar 2. Select the month and year using the drop down buttons. 3. Select the day from the calendar table. 4. Specify the time at the upper right hand corner of the form. You can key in the time or select the time by pressing the up-down arrow buttons at the end of the field. 5. You can click on the Now button if you want to use the current time. 6.
Application Server Third method: 1. Key in the From date or a combination of date and time. Date formats can use 2 or 4 digit years: (MM/DD/YY or MM/DD/YYYY). Time should be entered using the 12hour format: (HH:MM AM or PM). 2. Key in the To date or a combination of date and time. Date formats can use 2 or 4 digit years: (MM/DD/YY or MM/DD/YYYY). Time should be entered using the 12hour format: (HH:MM AM or PM). Note: Any combination of the methods may be used.
Application Server OnLine Alert Y N Screen Message Text of Message Transaction completed on-line to the host system. An exit alarm was issued. An exit alarm was not issued. The specific error message received from the host for this transaction. You have a few options to view the records on the screen, print them, or return to the previous screen. SCROLL: You can use the scroll bar to view all of the records.
Application Server Figure 4-33: Purge Navigation Figure 4-34: End Purge 4.6.2. Checkout Cache Synchronize The Checkout Cache Synchronize option compares and reconciles the system's internal cache of recorded checked out items with the host system. Figure 4-35: Synchronize Navigation shows how to navigate to the Checkout Cache Synchronize option. A username and password must be entered in order to synchronize the Checkout Cache.
Application Server Figure 4-35: Synchronize Navigation 4.7. Miscellaneous 4.7.1. Shutdown Button The Shutdown button shuts down the Application Server. In order for the Application Server to remain in a shutdown state, all Patron Self-Checkout Stations should be shutdown prior to shutting down the Application Server. Figure 4-36: Shutdown Button 4.7.2. Help About The Help About option is used to display copyright information. The figure below shows how to navigate to the Help About screen.
Application Server Figure 4-37: Help About Navigation 4.7.3. System Info Button The System Info button provides a detailed listing of all components and their versions. Figure 4-38: Help About Screen 4.7.4. Offline Transactions Synchronize The Offline Transactions Synchronize button is used for synchronizing off-line transactions with the host system. It is not available on systems that do not support off-line processing. Page 4-28 Intelligent Library System (ILS) 2.
Application Server Figure 4-39: Transaction Coordinator Offline Synchronization Navigation 4.7.5. Shutdown Checkout Stations The Shutdown Checkout Stations button remotely shuts down all the Patron Self-Checkout Stations. Figure 4-40: Shutdown Patron Self-Checkout Stations 4.8. Installing a Printer Printer installation procedures will vary according to the make and model of printer being installed. The best procedure is to follow the directions included with the printer.
Application Server 5. Double-click on Add Printer. 6. Make sure My Computer is selected. Click Next. 7. Select the checkbox next to LPT1. Click Next. 8. From the next dialog box you can click on Have Disk if you have drivers for you printer in a specific location. Or, you can select the make and model of your printer from the listings. 9. Follow the onscreen directions to complete the installation. Page 4-30 Intelligent Library System (ILS) 2.
Tagging Procedures Chapter 5 Tagging Procedures This section provides instructions on where to place the Circulation Circuit (tag) and how to determine what type of tag to use for books, CDs, audio materials, and kit materials. For information on the optional Circulation Circuit Programming Station, refer to the Circulation Circuit Programming Station User Manual. 5.1. Tagging Book Materials When tagging book materials, use the following steps: 1.
Tagging Procedures The preferred location is on the front inside cover both centered horizontally and vertically. If the video label is metallic, place the circulation circuit in the lower front inside cover of the case. If the card stock is metallic, photocopy and replace the card stock. Your Cover Label options are plain and double barcode Figure 5-2: Tagging Video Materials 5.3.
Tagging Procedures Figure 5-4: Tagging CD Materials with Preprogrammed Circulation Circuit 5.4. Tagging CD Materials with Circulation Circuit Programmed On-Site When tagging CD Material with Circulation Circuit Programmed On-Site, use the following steps: 1. Disassemble CD and place the circulation circuit with plain cover label in the lower right corner 2. Reassemble CD Your cover label options are plain and the recommended application is material with existing barcode labels. 5.5.
Tagging Procedures Plain - Recommended for materials that have barcodes. The circulation circuits are programmed on-site Double Barcode - Recommended for new materials. The circulation circuits are preprogrammed. Figure 5-5: Tagging Audio Materials 5.6. Tagging Kit Materials When tagging Kit Materials, use the following steps: • Place the circulation circuit on the outside of the bag or on the most valuable library material in the kit.
Tagging Procedures Figure 5-6: Tagging Kit Materials Intelligent Library System (ILS) 2.
Tagging Procedures NOTES Page 5-6 Intelligent Library System (ILS) 2.
Troubleshooting Guide Chapter 6 Troubleshooting Guide Consult this document for procedures to follow to correct problems that may arise with various ILS components. Follow the steps in the corresponding Solutions section. 6.1. Patron Self-Checkout Station Problem Patron Self-Checkout Station does not recognize a valid patron ID when using the Barcode Scanner... Solutions 1. Make sure the Patron Self-Checkout Station is at the Patron Entry screen (video depicting a patron ID being scanned).
Troubleshooting Guide Problem If the graphics (pictures or videos) are not displaying or are incorrect... Solution Network connection could have been lost while the Patron Self-Checkout Station was starting. Check all network connections to the Patron Self-Checkout Station and AppServer. If the connections are secure, proceed to Recovery Section A. Problem If the printer does not print or the Patron Self-Checkout Station printer status reports an error... Solutions 1.
Troubleshooting Guide Problem If the Touch Screen does not respond... Solutions 1. Check the cable on the back of the monitor which is plugged into the connection marked Touch Interface. Make sure this cable is securely plugged in. 2. If all the connections are secure, the Touch Screen may be operating properly but the Patron Self-Checkout Station is not currently accepting input or you are not touching a hot spot that accepts input. If so, proceed to Recovery Section A.
Troubleshooting Guide Problem If you have trouble printing a report: Solutions Print a test page using the Windows NT Printer Control Panel. If this is unsuccessful, consult Windows NT's Printing Troubleshooting Guide. If the test page prints successfully proceed to Recovery Section C. Problem If you receive an error message when running a report... Solutions The printer could be out of paper or there may be a problem with the configuration database, proceed to Recovery Section C.
Troubleshooting Guide 6.3. Exit Interrogator Problem If Exit Alarms do not occur when they should... Solutions 1. Power down and restart the Exit Interrogator. Wait a few minutes and trigger an exit alarm. If nothing happens proceed to Recovery Sections D and B. 2. If the alarm shows up in the Exit Alarm display but no alarm occurs, the configuration of the Exit Alarm groups is not correct. Proceed to Recovery Section C.
Troubleshooting Guide 6.4. Tag Pad Problem The Tag Pad reader does not recognize a valid item tag... Solutions 1. Check to make sure the tag pad is on. The internal ventilation fan should be running. You can feel air through the air vents located on the side of the tag pad if the fan is running. Check to make sure the power cord is connected to the tag pad and plugged into a power source and that all the remaining cable connections are secure. Refer to the connection diagram. 2.
Troubleshooting Guide 3. If scandisk (blue screen) displays after, wait until it automatically scans the disk by itself. This will take several minutes to process. It will detect any bad sectors and corrupted files on the hard disk. You should not have to start any of the applications on the Patron Self-Checkout Station. All necessary applications will start automatically. Section B - Complete System Restart 1.
Troubleshooting Guide 6.6. System Connection Diagram Figure 6-1: System Connection Diagram 6.7. Contacts For Technical support: Checkpoint Technical Support (800) 257-5540 x4100 The contact and ordering information for the printer paper required for the Patron Self-Checkout Station is: John Waldron Instruments & Equipment Co. 800-432-1255 Part #: TRF-82-8 Reference Checkpoint when ordering paper Page 6-8 Intelligent Library System (ILS) 2.
System Maintenance Guide Chapter 7 System Maintenance Guide The following section contains detailed instructions for executing various system maintenance tasks. 7.1. Transaction Database Backup After long periods of use, the ILS Transaction database can become quite large if a purge is not performed regularly. But prior to permanently purging database records and losing them permanently, a backup of the database can be performed to preserve these records as long as they are desired.
System Maintenance Guide 2. In order to logon as Administrator, the Autolog program must be disabled. Select Run from the Start menu. 3. Enter Autolog. 4. Select Disable Autolog and press OK. 5. Select Shutdown from the Start menu. 6. Select Close All Programs and Log on as a Different User. Press OK. 7. Log on as Administrator. 8. The ILS Server will automatically launch. Wait for it to complete and then shut down the program again. 9. Launch the Windows NT backup program.
System Maintenance Guide 7.3. Patron Self-Checkout Station Printer Paper Reloading Use the following procedure to reload the paper in the patron self-checkout station. 1. Remove the printer cover from the Self-Checkout Station chassis. 2. Insert a tool (small screwdriver) into the printer cover access hole and push against the cover release button. OPEN Lever Figure 7-1: Patron Self-Checkout Station Printer Paper Reloading – Roll Release 3. Remove the used paper roll core from the printer. 4.
System Maintenance Guide 5. Pass the paper over the damper shaft, then pass it under the thermal head and cutter guide. 6. Feed the paper until the end enters the presenter's roller. Cutter’s Guide Figure 7-3: Patron Self-Checkout Station Printer Paper Reloading – Cutter’s Guide 7. Firmly press the areas indicated with crosshatches on the thermal head until the lever is reset. Figure 7-4: Patron Self-Checkout Station Printer Paper Reloading – Crosshatches 8.
System Maintenance Guide Figure 7-5: Patron Self-Checkout Station Printer Paper Reloading – Winding Roll 9. Press the RESUME button indicated by the arrow. Figure 7-6: Patron Self-Checkout Station Printer Paper Reloading – Resume Button Intelligent Library System (ILS) 2.
System Maintenance Guide 7.4. Safety Warnings Barcode Scanner: LASER RADIATION DO NOT STARE INTO BEAM CLASS 2 LASER PRODUCT ® See the Metrologic Instruments IS 4110 and IS4120 ScanQuest Laser Scan Engine Installation and User’s Guide on other Safety intructions, warnings and technical specifications. P Page 7-6 P Intelligent Library System (ILS) 2.
System Maintenance Guide 7.5. Specifications Mechanical Dimensions: 29 “ L x 20.75 " W x 6.25 " H (736.60 mm x 527.05 mm x 158.75 mm) Weight: 26 lbs. ( 9.7 kg) Materials: Acrylic / PVC alloy Monitor: See the Planar PT1503NT User’s Manual. Electrical Emissions: FCC Part 15, RSS 210, ETSI 300 330 Compliant Immunity: ETSI 301489 Compliant RF Transmit Frequency: 13.56 MHz Demodulation type: AM Read range: Up to 10” with a 2.1” x 2.1” Circulation Circuit® Console Power Requirements: 24 VDC, 50-60 Hz, 1.
System Maintenance Guide NOTES Page 7-8 Intelligent Library System (ILS) 2.