BUILT- IN COOKING APPLIANCES User Manual MODELS CVE612, CVE614, CVE662, CVEP614
CONGRATULATIONS Congratulations and thank you for choosing our Built-in Oven. We are sure you will find your new appliance a pleasure to use and a great asset to your cooking. Before you use the appliance, we recommend that you read through the whole user manual which provides a description of the product and its functions.
GENERAL SAFETY TIPS &&INFORMATION INFORMATION TIPS Important – check for any damage or marks If you find the appliance is damaged or marked, you must report it within 7 days if you wish to claim for damage/marks under the manufacturer’s warranty. This does not affect your statutory rights. ENVIRONMENTAL ENVIRONMENTAL TIPSTIPS Information on disposal for users • Most of the packaging materials are recyclable.
DESCRIPTION OF YOUR APPLIANCE CVE612 UNDERBENCH OVEN MULTIFUNCTION 3 Oven temperature selector Timer CVE614 UNDERBENCH OVEN MULTIFUNCTION 7 Oven function selector 3 button progammable clock Oven/Grill temperature selector CVE662 SEPARATE GRILL WALL OVEN MULTIFUNCTION Oven temperature selector Separate Grill temperature selector Timer CVEP614 UNDERBENCH PYROLYTIC OVEN Oven function selector 5 button progammable clock 4 DESCRIPTION OF YOUR APPLIANCE Built-in Cooking Oven Temperature selector
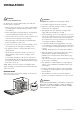
INSTALLATION WARNING WARNING WARNING WARNING USE AN AUTHORISED PERSON As stated in the local municipal building codes and other relevant statutory regulations: • Wiring connections must be in accordance with AS/NZS 3000 Wiring Rules and any particular conditions of the local authority. • Refer to data plate for rating information. The data plate is positioned behind the bottom of the oven door. • A means of disconnection with a contact separation of at least 3mm must be supplied in the fixed wiring.
INSTALLATION (CONT.) CABINET CONSTRUCTION FOR YOUR APPLIANCE For the best integration within a kitchen, install this appliance in a standard 600mm wide cupboard that gives a flush fit with the surrounding cupboard fronts (figure A). A recess of 20mm is ideal. This appliance it can also be installed using a proud fit with the surrounding cupboard (figure B). NOTE: Your appliance must be mounted on a flat, horizontal surface for the full width and depth of the product.
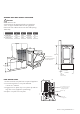
SEPARATE GRILL WALL OVEN & PIZZA OVEN WARNING CAUTION NOTE: Dimension “D”. A requirement for all separate grill wall ovens and all Duo ovens – for proper ventilation there must be a gap at the bottom rear of the cabinet. This must be a full width opening 20mm deep.
INSTALLATION (CONT.) PYROLYTIC UNDERBENCH OVEN-FLUSH FIT ONLY Your underbench oven looks best when the control panel is directly under the benchtop. An upper infill panel may have to be added if the cooktop placed over the oven is too deep. Refer to cooktop installation instructions for required clearance between cooktop and oven. WARNING CAUTION NOTE: Dimension “D”. A requirement for all pyrolytic clean ovens – for proper ventilation there must be a gap at the bottom rear of the cabinet.
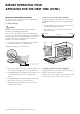
BEFORE OPERATING YOUR APPLIANCE FOR THE FIRST TIME SETTING THE TIME 5 button programmable clock (where applicable) 3 button programmable clock (where applicable) • After the appliance has been electrically connected, “12” and the “Set Clock” symbol “ “ will flash. After electrically connecting the appliance, you must set the time of the day before you can operate your oven. • To set the time of day “Hours” press the or buttons.
BEFORE OPERATING YOUR APPLIANCE FOR THE FIRST TIME (CONT.) INSTALLING YOUR OVEN ACCESSORIES 2. Main oven wire side racks (where applicable) The type of oven accessories you receive is dependant on the model you have purchased. The side racks attach to each side of your oven. There is a left hand and right hand version (see image below for details). 1. Shelves and trays • Insert the rear peg into the rear access hole provided, ensuring that the peg is fully inserted.
Shelves and trays (CVE614 and CVEP614) IMPORTANT TIPS & INFORMATION The shelves are designed so that they have maximum travel but cannot be accidentally pulled right out. The trays are designed the same way and fit straight into the side racks. To fit a shelf or tray to side racks: • Locate the rear edge of the shelf/tray inbetween 2 guide rails of the side rack - see diagram. Ensure the same rail positions on both sides of the oven are being engaged.
OPERATING THE PROGRAMMABLE CLOCK 3 BUTTON PROGRAMMABLE CLOCK Setting the cooking duration Your oven is equipped with a 3 button timer that has the following features: • Select the desired oven function and temperature. - you can set a countdown time that will beep • Timer when the set time has elapsed. • Cook time - you can set cooking duration. A timer will count down the preset cooking time, beep when the time has elapsed and turn the appliance off.
Setting the delayed start cooking time • Set the cook time and end time the previous sections. as described in 5 BUTTON PROGRAMMABLE CLOCK (CVEP614) • Once both the cook time and end time have been set, the cook time and the end time ‘indicators’ will stop flashing and the current time of day will be displayed. • To stop beeper, press any button. To check or cancel settings • To check your settings, press the mode button until the indicator you want is flashing.
OPERATING THE PROGRAMMABLE CLOCK (CONT.) 5 BUTTON PROGRAMMABLE CLOCK (CONT) Setting the oven function 1. Turn the oven FUNCTION selector clockwise to select the desired oven function. The default temperature for that function will be shown on the display. 2. After 5 seconds from the last change, the oven will begin heating and the “Elapsed time” commences on the display. Changing the oven temperature 1. Toggle the TEMPERATURE selector left or right as required to set the desired cooking temperature.
7. To stop the signal, press any button on the clock. Switching the clock display ON and OFF button and the 8. To cancel the minute minder, press the display will flash. Then press and hold or buttons together until the minute minder is cleared. When the oven is off, the clock display can be switched on and off. NOTE: This feature has no effect on the oven operation. With the oven “Off” and minute minder operating, the time of day cannot be displayed.
USING YOUR OVEN UNDERSTANDING YOUR OVEN FUNCTIONS Your oven will have a selection of the following functions. Refer to “Description of your appliance” to confirm what functions are available to you. Fan Grill Fan Bake Heat comes from the element surrounding the fan. This fan circulates the hot air around the oven cavity so that you can put your food in different places in the oven and still cook them at the same time.
COOLING/VENTING FAN Quick Cook Quick Cook allows you to preheat your oven 30% quicker than with standard “Bake”. Heat comes from the element surrounding the fan as well as a smaller element above the food. Quick Cook for rapid, high and even heat means better roasts at home, also ideal for cooking frozen pre-cooked foods such as savoury pastries, pizzas, mini meals (TV dinners), meat pies and fruit pies. Simply place the food in the oven straight from the freezer and heat – ideal for busy people.
USING YOUR OVEN (CONT.) OPERATING YOUR OVEN TEMPERATURE SELECTOR PRE-HEATING YOUR APPLIANCE A thermostat controls the temperature in your appliance. The temperature can be selected within the specified range. To set the temperature, turn the temperature selector in a clockwise direction to the desired setting. An indicator light above the temperature selector will come on. When the temperature is reached, the heating source switches itself off and the indicator light goes out.
COOKING GUIDE COOKING GUIDE • Select the correct shelf location for food being cooked. • Make sure dishes will fit into the oven before you switch it on. • Keep edges of baking dishes at least 40mm from the side of the oven. This allows free circulation of heat and ensures even cooking. • Do not open the oven door more than necessary. • Do not place foods with a lot of liquid into the oven with other foods. This will cause food to steam and not brown.
COOKING GUIDE (CONT.) CHOOSING THE BEST OVEN SETTINGS The following table is intended as a guide and experience may show some variation in cooking times necessary to meet individual requirements. For best baking results preheat the oven for 30 minutes.
ROASTING MEAT ROASTING POULTRY AND FISH 1. Place the meat in the oven and set the temperature between 180°C and 200°C. (It is recommended to wrap your meats in an oven roasting bag or foil to prevent fats and oils from splattering, making it easier to clean your oven.) 1. Place the poultry or fish in an oven set at a moderate temperature of 180°C. 2. Use the grill/oven dish and grill dish insert. Place the meat on the insert. 3. Do not pierce the meat as this will allow juices to escape. 2.
GRILLING GUIDE GRILLING HINTS WARNING WARNING Note: Always clean the grill/oven dish after every use. Excessive fat build up may cause a fire. GUIDE TO BETTER GRILLING No definite times can be given for grilling because this depends on your own tastes and the size of the food. These times should only be used as a guide and remember to turn the food over halfway through the cooking process.
DEALING WITH COOKING PROBLEMS PROBLEM CAUSES REMEDY Uneven cooking Incorrect shelf position Select shelf that puts food in centre of oven Oven tray too large Try other trays or dishes Trays not in centre Put trays in centre Air flow in oven uneven Rotate food during cooking Grill tray affecting thermostat Remove grill tray from oven on bake modes Oven not preheated Preheat the oven Baking tins too large for recipe Use correct size tins Baking tins not evenly spaced Stagger baking tins at
GET TO KNOW YOUR OVEN GET TO KNOW YOUR NEW OVEN WITH THIS ‘SIMPLE TEST CAKE’ Although we strive for a perfect performing oven, it’s possible that there will be some variation in colour when baking. Therefore, we suggest to make this easy and delicious Simple Test Cake, it can help you understand your new oven. All ovens do sometimes have hot or cold spots, therefore it is important to judge with your eye as you may require to rotate during baking. Method: 1.
CLEANING YOUR APPLIANCE TIPS TIPS & INFORMATION INFORMATION Important: • Always make sure that the oven is electrically isolated before cleaning. This can be done via the functional switch located nearby. Do not use steam cleaners. • Do not line the bottom of the oven or grill with foil or cookware as trapped heat will crack and craze the floor of the oven. ENAMEL INSIDE OVEN AND GRILL COMPARTMENTS • Rub persistent stains vigorously with a nylon scourer or creamed powder cleansers.
CLEANING YOUR APPLIANCE (CONT.) Removing the wire side racks (where applicable) • Grasp the middle wire at the front. • Pull firmly inwards, whilst pushing back. Removing and replacing the oven back light and side light (where fitted) • Turn oven back light glass anticlockwise to remove it for globe replacement. • To remove side light, place a spoon under the light glass and lever off. Replace globe and snap glass cover back into position. • A special high temperature resistant globe should be used.
RELEASING THE GRILL ELEMENT Rotating latch models Retaining wire models • Rotate latch 180º. We have designed the upper element with a hanger clip to help you reach your oven roof for cleaning. The element will drop down freely. PIZZA STONE • Lift element up carefully. • Push the sides of the clip together. WARNING WARNING The element will drop down freely. Always wait until the stone is cool before cleaning. The pizza stone will retain heat for a long time.
CLEANING YOUR OVEN DOOR WARNING WARNING • Grasp the oven door with a hand each side of the door and remove it from the oven by pulling it towards you. Do not lift the door by the handle. Rough handling will cause glass to break. Removing the oven door Your oven is equipped with a door that can be disassembled in order to clean all the panes of glass. Remove the door before cleaning.
Removing door glass panels (2 layer and 3 layer doors) WARNING WARNING Rough handling, especially around the edges can cause the glass to break. Re-assembling bottom trim • Push down to “snap” each side of bottom trim back into door columns. • Lift the black bordered glass panel out of the guide. • Repeat this for the smaller clear glass panel (when fitted).
CLEANING YOUR OVEN DOOR (CONT.) Re-assembling top door trim Fitting the oven door • Hold the top door trim at each side and position it to the inside edge of the glass. • Take hold of the oven door with a hand on each side and with the door at an angle of 45º, position the recesses at the bottom of the door onto the hinge arms of the oven. Let the door slide down the hinge arms as far as it will go.
CLEANING YOUR OVEN DOOR (PYROLYTIC MODELS) CLEANING THE 4 LAYER DOOR (PYROLYTIC MODELS) WARNING CAUTION Do not lift the door by the handle. Rough handling will cause glass to break. Removing the oven door TIPS & INFORMATION IMPORTANT Your oven is equipped with a door that can be disassembled in order to clean all the panes of glass. Remove the door before cleaning. • Open the door fully to access the hinges then rotate the ‘stirrups’ (highlighted in the image) on both hinges fully to open position.
CLEANING YOUR OVEN DOOR (PYROLYTIC MODELS) (CONT.) Removing the door glass panels Chamfer to be located in this corner WARNING CAUTION Rough handling, especially around the edges can cause the glass to break. • Lift the black bordered glass panel out of the guide and place on something soft and flat to prevent scratches. • Repeat this for the smaller clear glass panels. Rubber spacers • When removing panel 3, ensure that the two rubber spacers are removed before cleaning.
• Insert the black bordered glass panel into the upper position, ensuring the painted surface is facing the downside as per the diagram below.. Fitting the oven door • Take hold of the oven door with a hand on each side and with the door at an angle of 30˚, position the recesses at the bottom of the door onto the hinge arms of the oven. Let the door slide down the hinge arms as far as it will go.
PYROLYTIC CLEANING Pyrolytic Cleaning of the Oven Cavity (Pyrolytic models only) The oven has a pyrolytic self-cleaning function. It cleans by burning off the spatters and accumulated dirt and grease from the oven liner, at high temperature. This process produces ash which can then be wiped out of the oven cavity. It is recommended you clean your oven regularly to keep the oven in its best condition.
SOLVING PROBLEMS Faults If there is a problem with the oven and/or grill, please: • Check the points listed below before calling for service. It may be possible to avoid a call by fixing the problem yourself – and so continue cooking. • For cooking problems refer to “Dealing with cooking problems” section. NOTE: We may charge for service even in the warranty period if your problem is due to the causes listed below.
NOTES 36 NOTES Built-in Cooking
NOTES Built-in Cooking NOTES 37
NOTES 38 NOTES Built-in Cooking
Warranty FOR SALES IN AUSTRALIA AND NEW ZEALAND APPLIANCE: CHEF BUILT-IN OVENS, COOKTOPS AND FREESTANDING COOKER This document sets out the terms and conditions of the product warranties for Chef Appliances. It is an important document. Please keep it with your proof of purchase documents in a safe place for future reference should there be a manufacturing defect in your Appliance. This warranty is in addition to other rights you may have under the Australian Consumer Law. 1.
LIKE TO KNOW MORE? Contact us if you need more help Australia phone:................................................................ 13 13 49 email:................................. customercare@electrolux.com.au website:........................................... chefappliances.com.au WE ARE PART OF THE ELECTROLUX FAMILY. TO ADD A TOUCH OF PROFESSIONAL INSPIRATION TO YOUR HOME, VISIT ELECTROLUX.COM © 2021 Electrolux Home Products Pty Ltd ABN 51 004 762 341 Part No.