
User's Manual
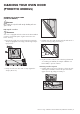


Removing the door glass panels
WARNING
CAUTION
Rough handling, especially around the edges can cause the
glass to break.
• Lift the black bordered glass panel out of the
guide and place on something soft and flat to
prevent scratches.
• Repeat this for the smaller clear glass panels.
• When removing panel 3, ensure that the two rubber
spacers are removed before cleaning. Do not misplace
them!
Chamfer to be located in this corner
Rubber spacers
Cleaning the door glass panels
WARNING
CAUTION
Do not to use harsh abrasives on the glass panes as the
reflective surface plays a role in the function of the oven.
Do not place glass in dishwasher. Hand wash only with
a soft cloth and warm soapy water. When dry polish with
a soft cloth and ensure the glass is dry before reassembly.
Re-assembling the 4 layer oven door
Re-assembling the door glass panels
• Assemble the rubber spacers to the upper corners of one
of the clear glass panels. Position the panel into the lower
position of the door, ensuring the chamfered corner of the
panel is placed in the correct location as shown in the
next diagram.
Chamfer to be located in this corner
Rubber spacers
• Insert the remaining smaller clear glass panel into the
middle position, ensuring the chamfered corner of the
panel is placed in the correct location as shown in
the diagram below.
Chamfer to be located in this corner
CLEANING YOUR OVEN DOOR
(PYROLYTIC MODELS) (CONT.)
32 CLEANING YOUR OVEN DOOR (PYROLYTIC MODELS) Built-in Cooking