
User Guide


6
MODEL: RJ39
Starting the sous vide
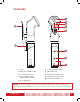
1. Plug unit into your wall outlet (See Figure 2). The sous vide display
will light up. The “SET” display temperature setting will blink to
indicate that the temperature is ready to be changed. The “LIVE”
part of the display will show the actual temperature of the water in
your container/pot.
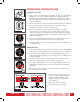
2. Use the scroll wheel to reach your desired temperature (See Figure 3).
3. Press the Play button. This will cause the sous vide to start
circulating and heat the water. (See Figure 4).
4. The sous vide device has a preheat cycle that will run until it
reaches the set temperature. The sous vide will show the letters
“PRE” (See Figure 5) to indicate it is preheating and then toggle
back to the actual temperature of the water as it approaches your
desired temperature.
5. Once the unit preheats and reaches the set temperature, it will
beep one long beep and then begin the cooking cycle.
6. The display will then show the actual temperature throughout the
cooking process.
Setting the Time
1. Press “TIME” button. This will put the sous vide in the “TIME MODE”.
You can now set the length of your cooking process. (See Figure 6).
2. Look at the “SET” display screen; the 2 left digits and the word
“TIME” will be blinking. Now you can set the hours needed for your
cooking program.
3. Use the scroller to reach the number of hours needed for your
sous vide cooking process. Press “TIME” (See Figure 7).
4. Look at the “SET” display screen; the 2 right digits and the word
“TIME” will be blinking. Now you can set the minutes needed for
your dish.
5. Use the scroller to reach the number of minutes needed for your
sous vide dish. Press “TIME”.
6. Now that you have set your cook
timer the “SET” display will blink
again to indicate that the user
should change the temperature
(See Figure 7).
7. Enter your desired cooking
temperature and press play.
OPERATING INSTRUCTIONS
Figure 2
Figure 4
Figure 5
Ł
K
Figure 6
Figure 3
Figure 7