Model #: Serial #: Model C10 Instruction Manual for Globe Chefmate Slicer Models C9, C10, and C12 For Service on Your Slicer 1. Visit our website at www.globeslicers.com (select the Support / Parts drop down). 2. Or call the Globe service department at 937-297-7247 and ask for contact information for your local service company. Visit our website for information on additional products available from Globe. www.globeslicers.
Index ATTENTION OWNERS AND OPERATORS....................................................................................................... 3 KEY COMPONENTS OF THE SLICER............................................................................................................. 4 GLOBE CHEFMATE SLICER SAFETY TIPS..................................................................................................... 5 INSTALLATION.................................................................................
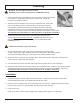
Attention Owners and Operators Globe’s equipment is designed to provide safe and productive processing of food products as long as the equipment is used in accordance with the instructions in this manual and is properly maintained. Importantly, unless the operator is adequately trained and supervised, there is a possibility of serious injury.
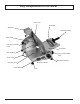
Key Components of the Slicer Knife Cover Endweight Sharpener Endweight Handle Slicer Table Knife Cover Release Knob Food Chute Slice Deflector Food Chute Release Knob Power Cord Model C10 Shown Receiving Area On/Off Switch Page 4 Feet Slice Thickness Dial
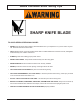
Globe Chefmate Slicer Safety Tips SHARP KNIFE BLADE TO AVOID SERIOUS PERSONAL INJURY: • NEVER touch this slicer without training and authorization from your supervisor or if you are under 18 years old. Read this instruction manual first. • ONLY install the slicer on a level nonskid surface that is nonflammable and is located in a clean, well-lighted work area away from children and visitors. • ALWAYS ground slicer utilizing proper power source. • NEVER TOUCH KNIFE.
Installation UNPACKING 1. Unpack the slicer immediately after receipt. If the machine is found to be damaged, save the packaging material and contact the carrier within fifteen (15) days of delivery. Immediately contact your source of the equipment. You have no recourse to damage after fifteen (15) days. 2. You should receive with the slicer, rubber feet, warranty card, and an instruction manual. Contact Globe or your local supplier if you did not receive all of these materials.
Installation THIS MACHINE IS PROVIDED WITH A THREE-PRONG GROUNDING PLUG. THE OUTLET TO WHICH THIS PLUG IS CONNECTED MUST BE PROPERLY GROUNDED. IF THE RECEPTACLE IS NOT THE PROPER GROUNDING TYPE, CONTACT AN ELECTRICIAN. DO NOT UNDER ANY CIRCUMSTANCES CUT OR REMOVE THE THIRD GROUND PRONG FROM THE POWER CORD OR USE ANY ADAPTER PLUG (Fig. 7-1 and Fig. 7-2). 5. Inspect the slicer to ensure all parts have been provided. 6. Make sure the knife cover and knife sharpener are in place. 7.
Operating Instructions SHARP KNIFE BLADE TO AVOID SERIOUS PERSONAL INJURY: • NEVER touch this slicer without training and authorization from your supervisor or if you are under 18 years old. Read this instruction manual first. • NEVER operate the slicer without the knife cover securely installed. Keep hands and arms away from all moving parts. • ONLY USE THE ENDWEIGHT HANDLE to push the food chute during slicing.
Cleaning SHARP KNIFE BLADE TO AVOID SERIOUS PERSONAL INJURY TO THE SLICER OPERATOR AND CUSTOMERS: • BEFORE CLEANING, SHARPENING, SERVICING OR REMOVING ANY PARTS, always turn slicer off, turn the slice thickness dial clockwise until it stops and unplug power cord. • NEVER attempt to clean slicer with the knife running. • NEVER attempt to remove the knife or knife ring guard from the slicer. They must remain on the slicer for proper operation, sharpening, and cleaning.
Cleaning BE ALERT. The next steps will expose the knife. ALWAYS turn slicer off and unplug power cord BEFORE cleaning. 4. Remove the knife cover by rotating the knife cover release knob counterclockwise until it releases. While holding the knobs on the knife cover, carefully lift the knife cover upward to remove. 5. Take the food chute and knife cover to a three compartment sink. Soak, clean and scrub all surfaces of the food chute and knife cover using a solution of mild detergent and warm water.
Knife Sharpening SHARP KNIFE BLADE TO AVOID SERIOUS PERSONAL INJURY: • NEVER touch rotating knife. • ALWAYS keep hands clear of all moving parts. • ALWAYS turn the slicer off, turn the slice thickness dial clockwise until it stops and remove the food chute before sharpening. • NEVER sharpen slicer unless all guards are installed. WHEN AND HOW OFTEN TO SHARPEN THE KNIFE 1. Symptoms of a dull knife are excess waste or a “tail” on the unsliced portion remaining in the food chute. 2.
Knife Sharpening SHARPENING THE KNIFE - (Regular Procedure) 1. Start the slicer. 2. Push the grinding stone button #2 (Fig. 12-1) and the honing stone button #3 (Fig. 12-2) at the same time so both stones make contact with the knife. Maintain pressure on the buttons for 5-10 seconds. #2 #1 TURN SLICER OFF before inspecting. SHARPENING THE KNIFE - (Extended Procedure) Figure 12-1 NOTE: Use the extended procedure if the regular sharpening procedure does not produce satisfactory results. 1.
Simple Maintenance and Repair SHARP KNIFE BLADE TO AVOID SERIOUS PERSONAL INJURY: • ALWAYS turn off slicer and unplug slicer before servicing. • NEVER touch this slicer without training and authorization from your supervisor. • ALWAYS keep hands clear of rotating knife and moving parts. • DO NOT tamper with, bypass, or remove any safety devices, guards or switches. • ALWAYS turn off slicer and turn slice thickness dial completely clockwise after each use.
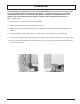
Simple Maintenance and Repair DO NOT USE VEGETABLE OIL TO LUBRICATE SLICER. VEGETABLE OIL WILL DAMAGE THE SLICER! Sharpener Shafts It is necessary to lubricate the sharpener shafts with Globe oil weekly. 1. Loosen the sharpener release knob and pull the sharpener up to remove it (Fig. 14-1). 2. Put several drops of Globe oil on the shaft behind each sharpening stone (Fig 14-2). Main Shaft Sharpener Release Knob Figure 14-1 3.
Troubleshooting Guide SYMPTOM Slicer will not start Ragged cuts-poor yield Metal rubbing knife Hard to push food chute CAUSE SOLUTION Slicer not plugged in Plug in slicer Switch off Turn switch on Dull knife Sharpen knife-make sure knife and stones are clean Chipped knife Sharpen or have new knife installed Knife-slicer table gap too wide Call for service to adjust slicer table Knife too small Have a new knife installed Knife cover Tighten knife cover release knob Food chute Tighten or
Limited Slicer Warranty Globe Food Equipment Company (“GFE”) warrants to the original purchaser of new equipment that said equipment, when installed in accordance with our instructions within North America and subjected to normal use, is free from defects in material or workmanship for a period of 1 year from installation or 18 months from actual shipment date, whichever date occurs first. THIS WARRANTY IS IN LIEU OF ALL OTHER WARRANTIES, WHETHER EXPRESSED OR IMPLIED.