This document and related products are distributed under licenses restricting their use, copying, distribution, and reverse-engineering. No part of this document may be reproduced in any form or by any means without prior written permission by Chelsio Communications. All third party trademarks are copyright of their respective owners.
Version History Version Revision Date 1.0.0 1.0.1 1.0.2 1.0.3 1.0.4 1.0.5 1.0.6 1.0.7 1.0.8 1.0.9 1.1.0 1.1.1 1.1.2 1.1.
TABLE OF CONTENTS I. CHELSIO UNIFIED WIRE 1. Introduction 1.1. Features 1.2. Hardware Requirements 1.3. Software Requirements 1.4. Package Contents 2. Hardware Installation 3. Software/Driver Installation 3.1. Pre-requisites 3.2. Installing Unified Wire 4. Firmware Update 5. Software/Driver Uninstallation 6. Software/Driver Update II. NDIS FUNCTION 1. Introduction 1.1. Hardware Requirements 1.2. Software Requirements 2. Software/Driver Configuration and Fine-tuning 2.1.
Chapter I. Chelsio Unified Wire I.
Chapter I. Chelsio Unified Wire 1. Introduction Thank you for choosing Chelsio T5/T4 Unified Wire adapters. These high speed, single chip, single firmware cards provide enterprises and data centers with high performance solutions for various Network and Storage related requirements. The Terminator 5 (T5) is Chelsio’s next generation of highly integrated, hyper-virtualized 40/10GbE controllers.
Chapter I. Chelsio Unified Wire 1.2. Hardware Requirements The Chelsio T5/T4 Unified Wire supports all x64 architectures supporting PCIE (x4, x8) slots. AMD CPUs, 64-bit (x86_64/amd64) Intel CPUs, 64-bit (x86_64) Note The Chelsio Unified Wire supports 3.3v PCI bus only. Running an adapter on a PCI x4 slot is not recommended as performance will be significantly reduced by the limitations of PCI. 1.3.
Chapter I. Chelsio Unified Wire 2. Hardware Installation 1. 2. 3. 4. 5. 6. Shutdown/power off your system. Power off all remaining peripherals attached to your system. Unpack the Chelsio adapter and place it on an anti-static surface. Remove the system case cover according to the system manufacturer’s instructions. Remove the PCI filler plate from the slot where you will install the Ethernet adapter. For maximum performance, it is highly recommended to install the adapter into a PCIE x8 slot. 7.
Chapter I. Chelsio Unified Wire 3. Software/Driver Installation Chelsio Unified Wire Installer provides two methods of installation: GUI and CLI mode. GUI mode provides an interactive GUI installer with customizable options. Whereas, CLI mode enables unattended installation of Chelsio drivers and software thereby relieving the user from monitoring the installation process and providing input via dialog boxes. 3.1.
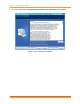
Chapter I. Chelsio Unified Wire 3. Select the radio button I accept the terms of the license agreement and click Next. Figure 3.
Chapter I. Chelsio Unified Wire 4. Select Complete for complete package installation and click Next. Figure 3.
Chapter I. Chelsio Unified Wire 5. Click Install to start the installation. Figure 3.
Chapter I. Chelsio Unified Wire 6. Selected drivers will now be installed. Figure 3.
Chapter I. Chelsio Unified Wire 7. Click Finish to exit from the Unified Wire Installer. Figure 3.2 (f) – Finishing Unified Wire installation 3.2.2. CLI mode (Silent Installation) To install drivers using this feature, open command prompt and execute the following command: C:\Users\Administrator>ChelsioUwire-x.x.x.x.exe –in E.g.: C:\Users\Administrator>ChelsioUwire-x.x.x.x.exe –in all The above command will install all the drivers/software.
Chapter I. Chelsio Unified Wire To know more about other parameters and options, execute the following command: C:\Users\Administrator>ChelsioUwire-x.x.x.x.exe -help The above command will create a help file,ChelsioUwire-x.x.x.x_help.txt, in the present working directory which contains the complete list of command line syntax required for performing all the necessary CLI operations. Note A log file, ChelsioUwire-x.x.x.x.
Chapter I. Chelsio Unified Wire 4. Firmware Update The driver will auto-load the T5 and T4 firmwares if an update is required.
Chapter I. Chelsio Unified Wire 5. Software/Driver Uninstallation Similar to installation, Chelsio Unified Wire can be uninstalled using two methods: GUI and CLI mode. GUI mode requires user interaction and uninstallation occurs with options specified by the user. Whereas, CLI mode does not require any user input. 5.1.1. GUI mode (Installer) 1. Run the ChelsioUwire-x.x.x.x.exe application. 2. Select Modify to add or remove features. Select Repair to repair the previous installation.
Chapter I. Chelsio Unified Wire 3. Click on the Finish button to exit from the installer. Figure 5 (b) – Finishing uninstallation Note You can un-install the driver using the installer only if you have installed the driver using it. 5.1.2. CLI Mode To uninstall all the drivers, execute the following command: C:\Users\Administrator>ChelsioUwire-x.x.x.x.
Chapter I. Chelsio Unified Wire 6. Software/Driver Update For any distribution specific problems, please check README and Release Notes included in the release for possible workaround. Please visit Chelsio support web site http://service.chelsio.com/ for regular updates on various software/drivers. You can also subscribe to our newsletter for the latest software updates.
Chapter II. NDIS Function II.
Chapter II. NDIS Function 1. Introduction Chelsio’s T5/T4 series of Unified Wire Adapters provide extensive support for NIC operation, including all stateless offload mechanisms for both IPv4 and IPv6 (IP, TCP and UDP checksum offload, LSO - Large Send Offload aka TSO - TCP Segmentation Offload, Network Direct and assist mechanisms for accelerating LRO - Large Receive Offload). 1.1. Hardware Requirements 1.1.1.
Chapter II. NDIS Function 2. Software/Driver Configuration and Fine-tuning 2.1. Assigning IP address to the Chelsio Network Adapter 1. Double click on the Network Connections icon and choose the Chelsio card entry and double click it. 2. Click on the Properties button from the Local Area Connection X Status. 3. Select “Internet Protocol (TCP/IP)” from the list and click on Properties button below it. 4. From the Internet Protocol (TCP/IP) Properties window, assign an IP Address (e.g. 192.169.1.
Chapter II. NDIS Function Note This parameter is valid only for 1G port. User can specify any of the above 1G or 100M full duplex modes. If Auto-Detect is selected, the 1G port will do autonegotiation. iScsi Port x: Description: Enables/Disables the iScsi port x. Value: Enabled | Disabled Default: Disabled 2.2.2.
Chapter II. NDIS Function Large Send Offload V2 (IPv4): Description: Allows for configuring Large Send Offload (LSO) using version 2 for the IPv4 traffic. Value: Enabled | Disabled Default: Enabled Large Send Offload V2 (IPv6): Description: Allows for configuring Large Send Offload (LSO) using version 2 for the IPv6 traffic. Value: Enabled | Disabled Default: Enabled Locally Administered Address: Description: Specifies a new MAC address for the port.
Chapter II. NDIS Function Recv Segment Coalescing (IPv4): Description: Enables or Disables the Receive Segment Coalescing feature for IPv4 traffic. This is a receiver packets aggregating feature which helps reduce the receive host CPU load and improve throughput in a 10Gb network environment where CPU can be the bottleneck. Value: Enabled | Disabled Default: Enabled Recv Segment Coalescing (IPv6): Description: Enables or Disables the Receive Segment Coalescing feature for IPv6 traffic.
Chapter II. NDIS Function TCP Checksum Offload (IPv4): Description: This parameter enables or disables computation of TCP checksum by the adapter for IPv4 packets. Value: o Disabled o Rx & Tx Enabled o Rx Enabled o Tx Enabled Default: Rx & Tx Enabled TCP Checksum Offload (IPv6): Description: This parameter enables or disables computation of TCP checksum by the adapter for IPv6 packets.
Chapter II. NDIS Function UDP Checksum Offload (IPv4): Description: This parameter enables or disables computation of UDP checksum by the adapter for IPv4 packets. Value: o Disabled o Rx & Tx Enabled o Rx Enabled o Tx Enabled Default: Rx & Tx Enabled UDP Checksum Offload (IPv6): Description: This parameter enables or disables computation of UDP checksum by the adapter for IPv6 packets.
Chapter II. NDIS Function 2.3. Enabling SMB Direct SMB Direct is installed and enabled by default on Windows Server 2012 R2 systems. RDMA functionality on Chelsio adapters will be enabled after installing the driver from the package. You can use the following PowerShell command Get-NetAdapterRdma to get a list of RDMA capable interfaces in your system. Note At least one adapter should indicate “RDMA Capable” true to take advantage of SMB RDMA capability.
Chapter II. NDIS Function Verify that SMB driver is loaded and working. Open PowerShell window and execute the following command : C:\Users\Administrator> driverquery.exe | findstr /I smb Verify that Chelsio driver is loaded and working. Open PowerShell window and execute the following command : C:\Users\Administrator> driverquery.exe | findstr /I chel Confirm that traffic is running over Chelsio adapter. Look for potential errors in Event Log.
Chapter III. Appendix III.
Chapter III. Appendix Chelsio End-User License Agreement (EULA) Installation and use of the software implies acceptance of the terms in the Chelsio End-User License Agreement (EULA). IMPORTANT: PLEASE READ THIS SOFTWARE LICENSE CAREFULLY BEFORE DOWNLOADING OR OTHERWISE USING THE SOFTWARE OR ANY ASSOCIATED DOCUMENTATION OR OTHER MATERIALS (COLLECTIVELY, THE "SOFTWARE"). BY CLICKING ON THE "OK" OR "ACCEPT" BUTTON YOU AGREE TO BE BOUND BY THE TERMS OF THIS AGREEMENT.
Chapter III. Appendix terminated, if you fail to comply with any term or condition of this Agreement. Upon any termination, including termination by you, you must destroy the Software (including the related documentation), together with all copies or modifications in any form. 6. Limited Warranty.
Chapter III. Appendix civilian agency contract, use, duplication or disclosure by the Government is subject to the restrictions of this Agreement in accordance with 48 C.F.R. 12.212 of the Federal Acquisition Regulations and its successors and 49 C.F.R. 227.7202-1 of the DoD FAR Supplement and its successors. 12. General. You acknowledge that you have read this Agreement, understand it, and that by using the Software you agree to be bound by its terms and conditions.