S320/S310/S302 Chelsio Ethernet Adapter Installation and User’s Guide for Microsoft® Windows® ServerTM 2003, Windows ServerTM 2008, Windows® 2008 R2 and Windows 7. Chelsio Communications, Inc. http://www.chelsio.
Copyright 2011 Chelsio Communications, Inc. All rights reserved. 370 San Aleso Ave, Suite 100, Sunnyvale, CA 94085 This document and related products are distributed under licenses restricting their use, copying, distribution, and reverse-engineering. No part of this document may be reproduced in any form or by any means without prior written permission by Chelsio Communications. N210 and N110 are trademarks of Chelsio Communications, Inc.
Table of Contents Introduction ................................................................................................................................... 4 Hardware and Software Requirements ...................................................................................... 4 Scalable Networking Pack ............................................................................................................ 4 Hardware Installation .................................................................
Introduction This document describes the installation of Chelsio iSCSI driver for Microsoft Windows Server 2003, Windows Server 2008, Windows 2008 R2 and Windows XP. Hardware and Software Requirements The Chelsio iSCSI driver supports the following architectures. All x86 (i386) architectures supporting PCI*/PCI-X (133, 100, or 66 Mhz) and PCIE (x4, x8) adapters. AMD CPUs, 32-bit and 64-bit (x86/x86_64/amd64) Intel CPUs, 32-bit and 64-bit (x86/x86_64) *The Chelsio Ethernet adapter supports 3.
Hardware Installation 1. Shutdown and power off your system. 2. Power off all remaining peripherals attached to your system. 3. Unpack the Chelsio Ethernet adapter and place it on an anti-static surface. 4. Remove the system case cover according to the system manufacturer‟s instructions. 5. Remove the PCI filler plate from the slot where you will install the 10Gb Ethernet adapter. For maximum performance, it is highly recommended to install the adapter into a PCI-X slot running at 133Mhz or PCIE x8 slot. 6.
Software Installation Guide for Win2k3 The Chelsio iSCSI driver has the following component. 1. Chelsio iSCSI Driver (chiscsi.sys) Note: To utilise the Network functionality of Chelsio Adapter, please download and install the Network driver (and related documentation) from service.chelsio.com iSCSI Driver Installation Once Windows has installed the Virtual Bus Driver, it will automatically enumerate the storage devices.
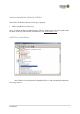
In order to install iSCSI driver, open device manager and Right click on the “Chelsio iSCSI device” and click on “Update Driver”. Select the „No, not this time‟ option and click “Next”.
Select the “Install from a list or Specific Location (Advanced)” option and click “Next”.
Select the “Don’t search, I will choose the driver to install” option and click “Next”. Select “SCSI and RAID controller” and click “Next”.
Click on “Have Disk…” button. Browse for the “chiscsi.inf” file and click “Open” and then press OK.
The Hardware Wizard will show the “Chelsio Terminator 3 iSCSI interface” in the list. Select this entry and click “Next”.
Click on “Finish” button. If the iSCSI driver is installed successfully, you will find “Chelsio Terminator 3 iSCSI interface” in SCSI and RAID controllers. Continue the same steps for the other iSCSI port.
Un-installation of the Driver While uninstalling the driver first you need to uninstall iSCSI driver and then the Virtual Bus Driver. In order to uninstall the iSCSI Driver, open device manager right click on the “Chelsio Terminator 3 iSCSI interface” and click on “Uninstall” option.
Click on “OK” button. The first iSCSI port has disappeared from the “SCSI and RAID controllers” list. Try the above steps to uninstall the other iSCSI port.
Software Installation Guide for Win2k8, Vista, Win 7 The Chelsio iSCSI driver has the following component. 1. Chelsio iSCSI Driver (chiscsi.sys) Please go through NdisVbdInstallGuide, in order to know how to install and uninstall the Chelsio NDIS driver. iSCSI Driver Installation Once Windows has installed the Virtual Bus Driver, it will automatically enumerate the storage devices.
In order to install iSCSI driver, open device manager and Right click on the “Chelsio iSCSI device” and click on “Update Driver Software…”. Click on „Browse my computer for driver software‟ option.
Click on “Let me pick from a list of device drivers on my computer” option. Select “Storage controllers” from the list and click “Next” button.
Click on “Have Disk…” button. Browse for the “chiscsi.inf” file and click “Open” and then press OK.
The Hardware Wizard will show the “Chelsio Terminator 3 iSCSI interface” in the list. Select this entry and click “Next”. Click on “Install this driver software anyway” if it complains about the driver signature.
Click on “Close” button. If the iSCSI Driver is installed successfully, you will find “Chelsio Terminator 3 iSCSI interface” in Storage controllers. Continue the same steps for the other iSCSI port.
Un-installation of the Driver While uninstalling the driver first you need to uninstall the iSCSI Driver and then the Virtual Bus Driver. In order to uninstall the iSCSI Driver, open device manager right click on the “Chelsio Terminator 3 iSCSI interface” and click on “Uninstall” option.
Click on “OK” button. The first iSCSI port has disappeared from the “Storage controllers” list. Try the above steps to uninstall the other iSCSI port.
Assigning IP address to Chelsio T3 iSCSI Interface: After the installation of Chelsio iSCSI driver, static IP address needs to be assigned to that particular Chelsio T3 iSCSI node. Following are the steps to assign an IP address 1. In Device Manager, right click on the iSCSI interface to which the IP needs to be assigned and click on properties. 2. In the properties window, click on advance tab .
3. To assign a static IP address, select the IP address property on the left pane and then assign the value. Note: IP used for the iSCSI Interface should be unique and different from the one used for Network Interface. 4. To assign the corresponding subnet mask, select the subnet mask property on the left pane and then assign the value.
5. Similarly, if required assign the Default gateway by selecting the default gateway property on the left pane and then assign the value. Once all the values are assigned, click OK.
iSCSI Target Discovery and Login using Chelsio iSCSI Driver: Before the target discovery, make sure a static IP address is assigned in the Device Manager to the respective Chelsio T3 iSCSI node. Following are the set of instructions to discover the target and login to it using the Chelsio T3 iSCSI interface – 1. To start the initiator configuration, go to control panel and click on the iSCSI initiator option. 2. From the initiator, choose the discovery tab and click on Add Portal.
3. Click on the advance tab of the Add Target Portal window. 4. In the Advance Settings, Select Chelsio T3 iSCSI interface as the local adapter.
5. Select the corresponding Chelsio T3 iSCSI Interface IP as the Source IP and click OK. 6. Enter the IP address (DNS name not supported) of the target machine and the corresponding port number and click OK on the Add Target Portal Window. Note that the default port number for iSCSI traffic is 3260.
7. Once the target portal is added, the following settings will be displayed. 8. Click on the Targets tab to see the list of targets available, choose a particular target and click on Log on.
9. A windows pop‟s up showing the Target Name, Click OK.
10. After doing a login to the target, the state of the target will change from Inactive to Connected.
11. After the successful login, go to the disk management and make the respective volume online.