QB57L25 User manual 2011/08/08
Safety and Regulation This user manual has been specially designed to guide you through the functions and features of your device. Please read this manual carefully before using your device to ensure safe and correct use. The descriptions in this manual are based on the default settings of your device. Please keep this manual for future reference.
Handle and dispose of batteries and chargers with care Use only approved batteries and chargers specifically designed for your device. Incompatible batteries and chargers can cause serious injuries or damage to your device. Never dispose of batteries or devices in a fire. Follow all local regulations when disposing of used batteries or devices. Never place batteries or devices on or in heating devices, such as microwave ovens, stoves, or radiators. Batteries may explode when overheated.
Drive safely at all times Avoid using your device while driving and obey all regulations that restrict the use of mobile devices while driving. Use hands-free accessories to increase your safety when possible. Turn off the device near medical equipment Your device can interfere with medical equipment in hospitals or health care facilities. Follow all regulations, posted warnings, and directions from medical personnel.
Important usage information Use your device in the normal position Avoid contact with your device’s internal antenna. Handle SIM cards or memory cards with care Do not remove a card while the device is transferring or accessing information, as this could result in loss of data and/or damage to the card or device. Protect cards from strong shocks, static electricity, and electrical noise from other devices. Do not touch gold-colored contacts or terminals with your fingers or metal objects.
The FCC has granted an Equipment Authorization for this model phone with all reported SAR levels evaluated as in compliance with the FCC RF exposure guidelines. SAR information on this model phone is on file with the FCC and can be found under the Display Grant section of www.fcc.
— Consult the dealer or an experienced radio/ TV technician for help. Changes or modifications not expressly approved by the party responsible for compliance could void the user‘s authority to operate the equipment. The antenna(s) used for this transmitter must not be co-located or operating in conjunction with any other antenna or transmitter.
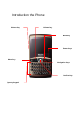
Introduction the Phone Volume key Volume key Back key Power keys Menu key Navigation keys Confirm key Qwerty keypad
Speaker Camera lens Headset jack Flash lens Back cover USB jack
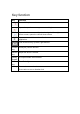
Key function Key Function Turns off the phone and screen. Opens the previous screen you were working in. Opens the Home screen. If you’re viewing the left or right extended Home screen, opens the central Home screen Opens a menu with items that affect the current screen or application. Four directions key, up down, right and left. Confirm Send (OK) confirm function key Volume Adjust the device’s volume. key Qwerty 0-9 input number and character.
Getting started To install the SIM / SD card and battery 1. If the phone is on, press and hold and select Power off to turn it off. 2. Remove the back cover 3. Insert the SIM card 4. Insert the SD card, push the memory card in the SD card slot until it locks in place 5. Insert the battery 6.
[Note] 1. Please the SIM / SD card into the device with the gold-colored contacts facing down. 2. If you do not insert a SIM card you can only use non-network services and some menus. 3. Do not insert a memory card into the SIM card slot. 4. Do not insert / remove a memory card into device when device is running the application. Insert and remove the memory card when device is turn off. Charge the battery Before using the device for the first time, you must charge the battery.
Get to know the Home screen The Home screen is your starting point to access all the features on your phone. It displays application icons, widgets, shortcuts, and other features. You can customize the Home screen with different wallpaper and display the items you want. Home screen Application list At the top of the screen, the Status bar displays the time, information about the status of your phone, and icons for notifications that you’ve received.
Touch & hold the small dots on the lower left or right of the screen to view thumbnails of the Home screen and its extensions, which you can touch to open. How to use menus There are two kinds of Android menus: options menus and context menus. Options menus Options menus contain tools that apply to the activities of the current screen or application, not to any specific item on the screen. You open options menus by pressing the button.
Connected to GPRS mobile network Roaming GPRS in use No signal Connected to EDGE mobile network No SIM card EDGE in use Vibrate mode Connected to 3G mobile network Ringer is silenced 3G in use Phone microphone is mute Mobile network signal strength Battery is very low Connected to a Wi-Fi network Battery is low Bluetooth is on Battery is partially drained Connected to a Bluetooth device Battery is full Airplane mode Battery is charging Alarm is set GPS is on Speakerphone is on Receiv
Notification icons Indicator icon show on that you’ve received a notification.
your wireless provider and a list of your current notifications. Notifications about ongoing activities are listed first, followed by Notifications about events, such as new mail notifications or Calendar reminders. To respond to a notification Open the Notifications panel. Your current notifications are listed in the panel, each with a brief description. Touch a notification to respond to it. The Notifications panel closes. What happens next depends on the notification.
Access applications The Launcher, which you open from the Home screen, holds icons for all of the applications on your phone, including any applications that you downloaded and installed from Android Market or other sources. When you open an application, the other applications you’ve been using don’t stop; they keep on running: playing music, rendering web pages, and so on. You can quickly switch among our applications, to work with several at once.
Back to return to the current application. Locking your screen You can lock your screen so that only you can unlock it to make calls, access your data, buy applications, and so on. You may also be required to lock your screen by a policy set by an email or other account you add to your phone. . To lock your screen On the Home screen, press and touch Settings > Location & security. Select Set up screen lock.
delete or move an item before you can add another item, or switch to another Home screen. In the menu that opens, touch the type of item to add. You can add the following types of items to the Home screen. Shortcuts: Add shortcuts to applications, a bookmarked webpage, a favorite contact, a destination in Maps, a Gmail label, a music playlist, and many other items. (Note: The shortcuts available depend on the applications you have installed.
Touch Live wallpapers to open a scrolling list of animated wallpapers installed on your phone. Some live wallpapers change according to the time of day, in response to touching the screen, tell the time, or offer other information. Some live wallpapers have a Settings button. Touch Wallpapers to open a screen where you can sample the wallpaper images that come with the phone. Slide the miniature images left and right to view the samples. Touch a sample to view a larger version. Touch Save or Set wallpaper.
wrong number, touch to erase digits one by one. To erase the entire number, touch & hold To dial an international number, touch & hold the 0 key to enter the plus (+) symbol. Then enter the international prefix for the country, followed by the full phone number Touch the green phone icon to dial the number that you entered. You can switch applications during a call—for example, to look up information by using the Browser. The green phone icon appears in the Status bar while the call is underway.
To decline a call and divert it to voicemail Drag the red phone button to the left. The caller is sent directly to your voicemail box to leave a message. Working with the Call log The Call log is a list of all the calls you’ve placed, received, or missed. It offers a convenient way to redial a number, return a call, or add a number to your Contacts. To open the Call log Press the Call button. If you have the Phone or Contacts tab open, touch the Call log tab.
To clear the Call log While viewing the Call log, press and touch Clear call log. You can also touch & hold an entry in the log. In the menu that opens, touch Remove from call log to remove that entry from the log. Calling your contacts Instead of entering the number in the Phone tab, you can touch one of your contact’s phone numbers to dial it. You can also quickly call a contact by using Quick Contact. Adding, editing, and performing other tasks with your contacts is described in Contacts.
To listen to your voicemail Open the Notifications panel and touch New voicemail. Open Phone and touch the voicemail icon on the Phone tab. Your carrier’s voicemail system guides you through the process of listening to and managing your voicemail. The first time you call your voicemail, it also guides you through the process of recording greetings, setting a password, and so on.
conference, mute your microphone, and more. To place a call on hold Touch the Hold icon . The current call screen indicates that you have a call on hold. A Hold icon appears in the Status bar to remind you that you have a call on hold. From any other application, you can open the Notifications panel and touch the entry for the call on hold to return to the current call screen. Take the call off hold by touching the Unhold button. To mute the microphone during a call Touch Mute.
Managing multiple calls If you accept a new call when you’re already on a call, you can switch between the two callers or merge the two calls into a single conference call. You can also set up a conference call with multiple callers. To switch between current calls Touch the Swap icon . The current call is put on hold and you join the other call. To set up a conference call Contact your wireless service provider to learn whether they support conference calls and how many participants you can include.
To delete a message thread from the Messaging window Touch & hold the message thread. Touch Delete thread in the menu that opens. You can also press and touch Delete thread to delete all message threads from the window. Exchanging messages You can send text (SMS) messages of up to 160 characters to another mobile phone. If you keep typing after the limit, your message is delivered as a series of messages.
To create and send a multimedia message On the Messaging screen, touch New message. Enter a mobile phone number or email address in the To field. As you type, matching contacts appear. You can touch a suggested contact or continue typing. You can also enter the name of a contact with a mobile number. Touch the composition text box to start entering your message. Press and touch Add subject to add a message subject.
Touch & hold a message in a message window. Touch Forward in the menu that opens. Enter a recipient for the message and edit the content if you want. Touch Send. To lock a message You can lock a message so it won’t be deleted if you reach your storage limits. If you try to delete a thread that contains a locked message, you’re asked to confirm that you want to delete it. Touch & hold a message in a message window. Touch Lock message in the menu that opens. A lock icon appears to the right of the message.
another kind of phone where you exchanged text messages. Multimedia message (MMS) settings Delivery reports Check to receive a report on the messages you send. Read reports Check to receive reports when your messages are read or deleted. Auto-retrieve Uncheck to download only the heading of multimedia messages, which you can then touch to open a menu to download the whole message. This is useful for controlling how much data you download, for example, when connected to a slow data network.
View email messages In Idle mode, open the application list and select Gmail. Select an email message. From the message view, use the following options: • To reply to the message, select Reply. • To reply to the message including all recipients, select Reply to all. • To forward the message to other people, select Forward. • To view an attachment, select Preview next to the attachment item. To save it to your device, select Download. • To archive the message, select Archive.
To open Email Touch the Email icon on the Home screen or in the Launcher. The first time you open Email, a setup wizard opens to help you add an email account, as described in “Adding and editing email accounts”. After the initial setup, Email opens to the last screen you were viewing or, if you have not used Email recently, it displays the contents of your Inbox (if you have only one account) or the Accounts screen (if you have multiple accounts).
download earlier messages in batches for IMAP or POP3 accounts, touch Load more messages at the bottom of the list of email. Reading your messages You can read messages in your Combined Inbox or in the Inbox or other folders for individual accounts. When you receive a new message, you also receive a notification in the Status bar, unless you’ve turned off Email notifications using the Email Account settings, where you can also set whether Email notifications vibrate the phone and pick a ringtone.
To mark a message as unread You can to return a read message to the unread state—for example, to remind yourself to read it again later. You can also mark a batch of messages as unread; see “Working with message in batches”. While reading a message, press and touch Mark as unread. To delete a message You can delete a message from its folder. You can also delete a batch of messages; see “Working with message in batches”. While reading a message, touch Delete. Press and touch Delete.
You can delete, star, or mark unread a batch of messages at once. In the Inbox or mailbox, check the messages that you want to work with as a batch. When you check one or more messages, the Mark unread, Add star, and Delete buttons appear at the bottom of the screen. Touch Mark unread, Add star, or Delete. You can also press and touch Deselect all. Your action affects the entire batch of messages. Composing and sending email To compose and send a message Press and touch Compose. Address the message.
folders. To view an account’s folders Open the Accounts screen. Touch an account’s folder icon. You can also open an account’s folders while viewing its Inbox or other folder, by touching and then touching Folders. The account’s Folders screen opens, with a scrolling list of the folders in the account. Touch a folder to view a list of the messages it contains. Adding and editing email accounts The first time you open Email, you are prompted to set up an email account.
Touch Next. Or, if you need to enter email account settings the wizard can’t configure for you, touch Manual setup. If you touch Next, Email attempts to communicate with your email service provider to validate your account for sending and receiving mail, using just your email address and password. This is sufficient for most email services. Depending on the service provider, you may be asked what kind of email account you have.
Open the Accounts screen. On some Email screens, you can press and touch Accounts. Touch & hold the account to delete. Touch Remove account in the menu that opens. Touch OK in the dialog to confirm that you want to delete the account. Changing email account settings You can change the following settings for each email account when you create it or at any later time. These settings apply only to the account you’re working with. To change the settings for another email account, you must switch accounts.
Sync contacts For accounts that can sync contacts, check to sync contacts from this account to your phone. Sync calendar For accounts that can sync calendars, check to sync contacts from this account to your phone. Entertainment Camera Camera is a combination camera and camcorder that you use to shoot and share pictures and videos. Pictures and videos are stored on the phone’s SD card, so you must install one to use Camera, as described in your phone’s owners’ guide.
touch & hold the Shutter icon or press & hold the Navigation key to focus first, before taking a picture; then lift your finger to take a focused picture more quickly. Slide your finger off the Shutter icon or roll the Navigation key and release your finger to cancel taking the picture. The picture you just took is displayed for a moment, and then is displayed as a thumbnail at the top right.
To change Camera settings Open the Camera screen for taking pictures or shooting videos and touch the icon for the settings you want to change.The settings open over the screen. Touch the setting category you want to control and then touch a setting. Press Back to close the Settings menus. Icons on the screen indicate the current settings. Take your pictures using the new settings. Camera mode settings When in Camera mode, Camera settings are displayed on screen.
1X Zoom: Touch to zoom from 1x to 2x. Video mode settings As in Camera mode, Video mode settings are displayed on screen. Settings Touch to open a scrolling list of settings: Color effect: Touch a special effect for your videos, such as monochrome, sepiatone, or negative. Restore to defaults: Touch to restore all of Camera’s settings to their default values. White balance: Touch to select how Camera adjusts colors in different kinds of light, to achieve the most natural-looking colors for your shots.
To open Gallery and view your albums Touch the Gallery icon in the Launcher or on the Home screen. Open Gallery from Camera by touching the thumbnail image at the top right. Open Gallery from Camera by pressing and touching Gallery. Gallery presents the pictures and videos on your SD card, including those you’ve taken with Camera and those you downloaded from the web or other locations.
Touch an arrow in the scroll tool at the bottom of the screen to scroll images a screen at a time. Drag the scroll tool to the left or right to scroll more or less quickly. The date of the images in view is displayed, so you can scroll by date. You can also scroll through an album by swiping left or right. To change how the contents of an album are displayed You can view the images and videos in your albums in a chronological grid or in stacks, sorted by the date and the location where they were taken.
Check or uncheck the albums you want to share. Touch Share at the bottom of the screen. In the menu that opens, touch the application to use to share the selected albums. The application that you selected opens with the pictures from the selected albums or links, attached to a new message. For information about addressing and sending the message, see the section on that application.
The picture is displayed (but not saved) in the new orientation. Touch the picture to view the Zoom and other controls. Touch a Zoom icon, double-tap the screen, or pinch two fingers together or spread them apart to zoom in or out. When the picture is zoomed in, drag the picture to view parts that are not in view. When the picture is zoomed to fit in the window, drag left or right to view the next or previous picture in the album.
Use the cropping tool to select the portion of the picture to crop. Drag from the inside of the cropping tool to move it. Drag an edge of the cropping tool to resize it to any proportion. Drag a corner of the cropping tool to resize it with fixed proportions. Touch Save to save a copy of the picture as you cropped it. The original uncropped version remains on your SD card. To get details about a picture Touch the picture to view the controls and touch . Touch More. Touch Details.
Touch a picture to view the controls and touch . Touch Delete. Touch OK in the dialog that opens. Working with videos Use Gallery to play videos that you’ve taken with Camera and to share them. To play videos Open a Gallery album and touch a video. The video plays, with the orientation (portrait or landscape) you shot it in. Touch the video to view the playback controls. To share a video You can share a video by sending it in an email or with a multimedia (MMS) message.
Touch Confirm Delete. Music You use Music to organize and listen to music and other audio files that you transfer to your SD card from your computer. Transferring music files to your phone Music plays audio files that are stored on your phone’s SD card, so before you open Music, you must copy audio files from your computer onto the SD card. Music supports a wide variety of audio file formats, so it can play music that you purchase from online stores, music that you copy from your CD collection, and so on.
To open Music and view your music library Touch the Music icon in the Launcher or on the Home screen. When you copy music to your SD card, Music searches the card for music files and builds a catalog of your music, based on information about each file that is stored in the file itself. This can take from a few seconds to several minutes, depending on how many files you have copied onto the SD card.
headset, or through a wireless Bluetooth stereo headset that supports the A2DP profile. To play music Touch a song in your library to listen to it. While viewing a list of tracks in an album, press and touch Play all. The Playback screen opens and the song you touched or the first song in the album or other playlist starts to play. The tracks in the current playlist play in order until you reach the end of the playlist (unless you choose a repeat option).
Press the phone’s Volume Up/Down button. A panel opens to show the current media volume; the indicator moves as you adjust the volume. Some headsets include their own volume controls or ways to pause and resume playback or to switch tracks. To play your tracks in a party shuffle When you turn on Party Shuffle, Music plays tracks from your SD card in random order, until you turn Party Shuffle off. In the Playback or a Library screen, press and touch Party shuffle.
Touch New. Enter a name and touch Save. The new playlist is added to the Playlist library. You can also add the song that is playing in the Playback screen as the first song in a playlist by pressing and touching Add to playlist. Or touch Save as playlist to save all the songs in an album that you’re playing as a playlist. To add a song to a playlist While viewing a list of tracks in the Library, touch & hold a song to add it to a playlist. Touch Add to playlist.
FM radio To listen to the FM radio, you must connect the supplied headset, which serves as the radio antenna. Listen to the FM radio Plug the wired headset into the device. In Home screen, open the application list and select FM radio. Select to turn on the FM radio. Press scans available stations.
Add a radio station to the favorite list Plug the supplied headset into the device. In Home screen, open the application list and select FM radio. Select to turn on the FM radio. Scroll to the radio station you want. Long press screen “Frequency Number” or radio icon on screen to add station to the favorite list. FM radio station sound recorder Press to star recording FM station, press again to stop. You can find the FM radio recording in “Music Playlists”.
Personal information Contacts Contacts give you quick and easy access to the people you want to reach. When you first turn on your phone and sign into your Google Account any existing Google contacts are downloaded to your phone. After that, your contacts are synchronized: any changes you make to your contacts on the phone or the web are made in both places the next time you sync. Contacts from Exchange ActiveSync accounts are also synced in this way.
To view details about a contact Open your contacts and Touch the contact whose details you want to view. Entries for communicating with the contact are followed by details. Touch a communication method to start dialing, texting, or emailing the contact by using the listed number, address, and so on. Touch an address to view it on Google Maps. You can also press and touch Edit contact to edit the contact’s information, or touch Delete contact to delete all information about the contact.
Importing, exporting, and sharing contacts If you have contacts stored in vCard format on an SD card or SIM, you can import them into Contacts on your phone. You can export contacts in vCard format onto an SD card, to back them up to a computer or other device. And you can send a contact via email. To import contacts from your SIM card Your service provider may store some contacts on your SIM card, such as customer care and voicemail numbers.
To export contacts to your SD card You can export all of the contacts on your phone to your SD card, as a group vCard file. You can then copy this file to a computer or another device that can work with files in this format, such as an address book application. Open your contacts. Press and touch Import/Export. Touch Export to SD card. Touch OK to confirm. Contacts create a file with the .vcf extension on your SD card. This file contains all of your contacts.
Searching for a contact You can search for a contact by name. To search for a contact Open your contacts. Press the Search button . Start entering the name of the contact you’re searching for. As you type, contacts with matching names appear below the search box. Touch a matching contact in the list to open its Details screen. Or touch the Magnifying Glass icon to open a screen with a list of matching contacts. Editing contact details You can change or add details about your contacts.
Touch Done. To change a contact’s default phone number A default phone number appears below the contact’s name in the Contacts list. The default phone number is used when you initiate a call or send a text message from the list by touching & holding a contact. Open your contacts or favorites. Touch the name of a contact in the list to view its details. Touch & hold the phone number to use as the contact’s default phone number. Touch Make default number in the menu that opens.
contacts), the contact is also deleted from Contacts on the web the next time you sync your phone. You can’t delete contacts from a read-only account, such as Facebook. Instead, a dialog informs you that the contact will be hidden. To restore hidden contacts from a read-only account, you must delete that account from your phone and then add it again.
on the current view. To view information about an event In Agenda, Day, or Week view, touch an event to view its details. In Month view, touch a day to switch to Day view. Then touch an event to view its details. You can set or change whether you will attend the event by using the Attending menu. Other attendees’ status is displayed below your own. You change any event reminders or touch the plus button to add one. If you have permission to change events, you can press to edit or delete the event.
The event is added to your calendar. Editing or deleting an event You can an edit or delete an event that you created on the phone or on the web. You can also edit or delete events created by others, if they have given you permission. To edit an event Open the summary of the event. Press and touch Edit event. The Event Details screen opens. Press and touch Show extra options to add or edit event details. Make your changes to the event. Scroll to the bottom of the screen and touch Done.
time before the event that you want to be reminded of it. When the time comes, you receive a notification about the event. You can use Google Calendar on the web to configure additional reminder settings. To delete an event reminder Open the event summary. Touch the reminder’s Minus button . Responding to an event reminder If you set a reminder for an event, the Upcoming Event icon appears in the Notifications area of the Status bar when the reminder time arrives.
Select ringtone: Opens a dialog where you can select the ringtone to sound when you receive an event reminder. Vibrate: Opens a dialog where you can configure the phone to vibrate whenever you receive an event reminder, only when the phone is in Silent mode, or never. Default reminder time: Opens a dialog where you can select the default time before an event for event reminders. Build version: The version of Calendar you are using.
Touch a suggestion or enter an address and touch the arrow icon. If you touch a suggested page or enter an address and touch the arrow icon that webpage opens. If you touch a suggested query, Google web search opens with the results. To refresh the current page Press and touch Refresh. The webpage is reloaded, updating any content that has changed. To stop opening a page If a webpage is taking a long time to open, or if you change your mind, you can stop itfrom opening.
To allow installing applications from the web or email By default, your phone is configured to prevent you from installing applications that you download from the web or receive with an email message. Note Applications downloaded from the web can be from unknown sources. To protect your phone and personal data, download applications only from trusted sources, such as Android Market. Press Home, then press and touch Settings > Applications. Check Unknown sources.
Touch & hold the file you want to delete from your SD card. Touch Delete. Touch OK. The file is permanently deleted from the SD card.You can also delete and perform other tasks with the files on your SD card when you connect your phone to a computer using the USB cable that came with your phone. Changing Browser settings You can configure a number of Browser settings, including several that you can use to manage your privacy. To open the Browser settings screen, press and touch More > Settings.
webpages. Many webpages function correctly only if they can run JavaScript features on yourphone. Enable plug-ins: Uncheck to disable plug-ins from webpages. Open in background: Check to open new windows in the background when you touch & hold a link and touch Open in new window. This is useful when you are working with windows that take a long time to download and display. Press touch Windows, and then touch the new window to view it.
Clear location access: Opens a dialog where you can clear the permissions you’ve granted to websites in the past, to access your location. If those websites want permission to access your location again, you must grant it again. Security settings Remember passwords: Browser can remember your passwords for some webpages that require you to sign in, to make it quicker to sign into those pages onrepeat visits. Uncheck to prevent Browser from storing passwords.
Check the My Location options that you want to use. Check Use wireless networks to allow the phone to determine your approximate location by using Wi-Fi and mobile networks. Check Use GPS satellites to allow your phone to determine your location to street-level accuracy. (GPS works best when you have a clear view of the sky.) Press Home, press and touch Settings > Privacy. Check Share with Google to use your location when you search.
To star or unstar an location You can star any location or labeled feature on a map. Touch & hold a location or labeled feature on a map. Touch the balloon that opens. Touch the gray star at the top of the screen to star the location. (Or touch a gold star to unstar that location.) The star turns gold and a gold star is added to the map at that location. To view a list of starred items You can open a list of your starred locations, so you can quickly go to a starred location on the map.
Markers with letter labels indicate search matches on the map. You can touch a marker to open a balloon that contains a label. Touch the balloon to open a screen with more information about the location, as well as options for obtaining directions. Getting directions Maps can provide directions for travel by foot, public transportation, bicycle, or car.
messages and emails, make phone calls, and get directions to your friends’ locations. Your location is not shared automatically. You must join Latitude and then invite your friends to view your location, or accept invitations from your friends. To join Latitude While viewing a map, press and touch Join Latitude. The first time you join Latitude, you’re prompted to accept or reject the Google privacy policy. When you’ve joined Latitude, the menu item changes to Latitude.
can’t see yours. Don’t accept: No location information is shared between you and your friend. To view your friends’ locations You can view your friends’ locations on a map or in a list. When you open Maps, your friends’ locations are shown. Each friend is represented by their picture (from Contacts) with an arrow pointing to their approximate location. If a friend has chosen to share city-level locations, their picture does not have an arrow and appears in the middle of the city.
You have control over how and when your friends can find you. Only the last location sent to Latitude is stored with your Google Account. If you turn off Latitude or are hiding, no location is stored. Open Latitude, touch your own name, and touch Edit privacy settings. You can set the following privacy options: Detect your location: Let Latitude detect and update your location as you move.
Press Back to stop playback and return to the videos list. Press to turn captions on or off and to rank, read comments, share, flag as inappropriate, and interact with the video in other ways. For details about these features, visit the YouTube web site. To search for videos At the top of the main YouTube screen, touch the Search icon . Enter the text to search for, or touch the Microphone icon to search by voice. Touch a suggestion below the search box or touch the magnifying glass icon.
network, where videos always open in high-quality. Captions font size: Opens a dialog where you can set the size of text you prefer when viewing captions with your videos. Clear search history: Touch to remove record of the results of video searches you’ve chosen in the past, so they aren’t presented as suggestions in future searches for YouTube videos.
The Browser opens to the Android Market Help page, with links to many help topics. To browse for applications You can browse applications by category and sort them in different ways. On the Android Market home page, touch a top-level category, such as Apps or Games. Scroll to view subcategories and touch the one you want to explore.
Before you can download a paid application, you must set up a billing arrangement, as described in “To create a Google Checkout account”. Find an application you want and open its details screen. In the application’s details screen, you can read more about the application, including its cost, overall rating, and comments by users. Scroll down to the About the developer section to view more applications by this developer, visit the developer’s web site, or send the developer an email message.
On the Android Market home screen, press and touch downloads. In the list of the free and paid applications that opens, you can touch one to rate it, uninstall it, request a refund, and so on. To set whether an application is updated automatically Applications you download from Market are not set to update automatically by default; applications that came with your phone are.
downloaded. Touch OK. To uninstall an application On the Android Market home screen, press and touch Downloads. Touch the application to uninstall. The details screen for the application opens. Touch Uninstall. Touch OK in the confirmation dialog. Touch the explanation that best matches why you’re uninstalling and touch OK. The application is uninstalled. You can install the application again at any time, without charge if it was a paid application.
downloaded applications. Touch the stars under My review. Touch the number of stars to award the application and touch OK. If you want to share a comment about the application, back on the details screen, touch Post a comment. To flag inappropriate applications If you discover an application with graphically violent, sexual, or otherwise hateful or offensive content, you can report it to the Android Market team. Open the details screen for an application.
roaming. Press Home, press , and touch Settings, to open the Settings application. Touch Wireless & networks > Mobile networks and uncheck Data roaming. With Data roaming unchecked, you can still transmit data with a Wi-Fi Connection. To limit your data connection to 2G networks You can extend your battery life by limiting your data connections to 2G networks (GPRS or EDGE).
If you created a new APN, touch it in the APNs screen to start using it Connecting to Wi-Fi networks Wi-Fi is a wireless networking technology that can provide Internet access at distances of up to 100 meters, depending on the Wi-Fi router you’re your surroundings. To use Wi-Fi on your phone, you access a wireless access point, or “hotspot.” Some hotspots are open and you can simply connect to them.
that network by touching Connect. If the network is secured, you’re prompted to enter a password or other credentials. (Ask your network administrator for details.) When you’re connected to a network, you can touch its name in the Wi-Fi settings screen for details about the speed, security, address, and related settings. To receive notifications when open networks are in range By default, when Wi-Fi is on, you receive notifications in the Status bar when your phone detects an open Wi-Fi network.
To turn Bluetooth on or off Press Home, press , and touch Settings to open the Settings application. Touch Wireless & networks. Check or uncheck Bluetooth to turn it on or off. To change your phone’s Bluetooth name Press Home, press , and touch Settings to open the Settings application. Touch Wireless & networks > Bluetooth settings. The Bluetooth settings screen opens. If Bluetooth isn’t turned on, check Bluetooth to turn it on.
application. Touch Wireless & networks > Bluetooth settings. If Bluetooth isn’t turned on, check Bluetooth to turn it on. In the list of devices, touch a paired but unconnected device in the list. If the device you expected isn’t displayed, touch Scan for devices. When the phone and the device are connected, the device is displayed as connected in the list. To configure the Bluetooth features you want to use Touch & hold the device in the Bluetooth settings screen. Touch Options in the menu that opens.
want to transfer files. To disconnect your phone from the computer Note: Carefully follow your computer’s instructions to unmount the SD card and disconnect USB devices correctly, to avoid losing information on the card. Unmount the SD card on your computer. Open the Notifications panel and touch Turn off USB storage. Touch Turn off USB storage in the screen that opens. To safely remove the SD card from your phone Press Home, press , and touch Settings, to open the Settings application.
can also press and touch Add alarm to add a new alarm. Touch Time to set the time of the alarm. In the dialog that opens, you change the time by touching the + or - buttons and the AM or PM buttons. Or touch a time to type the time you want. Touch Ringtone to select a ringtone for the alarm. You can select a ringtone that comes with the phone or one that you saved as a ringtone by using the Music application. The ringtone plays briefly when you select it.
topics. You can also customize the news topics that are displayed. This information is summarized in the News & Weather widget, which you can place on your Home screen, and is presented in greater detail in the News & Weather application. To open News & Weather Touch the news or weather section of the News & Weather widget on your Home screen, or touch its icon in the Launcher. To get details about the news and weather When you open News & Weather, you view a summary of the weather or headlines.
News settings Select news topics: Opens a screen where you can select the categories of news to include in the scrolling list of News & Weather tabs. You can also touch Custom topic to enter specific topics—for example, “solar power” or “Olympics”. News terms of service: Opens a screen with details about the terms of service for Google News. Prefetch articles: Check to download news articles so that they open more quickly and are available when you don’t have a data connection.
communicates, protects your privacy, and operates in many other ways. Many applications also have their own settings; for details, see the sections about individual applications. To open Settings Press Home , press , and touch Settings. Touch the Settings icon on the Home screen or in the Launcher. All of the settings in the Settings application are described in this section.
MAC address The Media Access Control (MAC) address of your phone when connecting to Wi-Fi networks. IP settings If you check Use static IP, you can use IP settings to enter an IP address and other network settings for you phone manually, rather than using the DHCP protocol to obtain network settings from the W-Fi network itself. Bluetooth settings screen For details about working with these settings, see “Connecting to Bluetooth devices”.
your phone transmitting data on other wireless networks, such as Wi-Fi or Bluetooth. Data roaming: Uncheck to prevent your phone from transmitting data on other carriers’ mobile networks when you can’t access your own carrier’s mobile networks. Data usage: Only available if your carrier enforces a mobile network data use policy.
the number—for example, to add a password after the phone number. If you are using Google Voice, this setting opens a screen where you can view the Google Voice number or sign out of Google Voice. Other call settings Call forwarding: Opens a screen where you can configure how your calls are forwarded when you’re on the phone, when you don’t answer, and so on. Caller ID: Opens a dialog where you can set whether your phone number is displayed to the people you call.
Vibrate: Opens a dialog where you can configure when you want the phone to vibrate when you receive a phone call or notification: Always, never, only when the phone is in Silent mode, or only when the phone is not in Silent mode. Volume: Opens a dialog where you can set the volume of ringtones that sound when you receive a phone call or notification, media (music, videos, an so on), and alarms.
brightness. Animation: Opens a dialog where you can set whether you want to enjoy animated transitions for some effects (such as opening menus), for all supported effects (including when navigating from screen to screen), or to enjoy a phone without any optional animation effects (this setting does not control animation in all applications). Screen timeout: Opens a dialog where you can set how long to wait after you touch the screen or press a button before the screen darkens.
must enter to unlock your screen, as described in “Locking your screen”. Change unlock password: When a screen lock password is set, opens a set of screens you can use to change password. Turn off screen lock: Touch to stop requiring a pattern, PIN, or password to unlock your screen.
installed on your phone, along with their sizes. By default, only downloaded applications are shown, and they are sorted in alphabetical order. Press and touch Filter to change the list to show all applications, only running applications, or only downloaded applications. Press and touch Sort by size to display applications in order by size. Touch an application to open its Application Info screen.
The application is stopped without confirmation. Permissions Lists the kinds of information about your phone and data the application has access to. Development screen The Development screen contains settings that are useful for developing Android applications. For full information, including documentation of the Android APIs and development tools, see the Android developer web site (http://developer.android.com).
Manage accounts: The rest of this screen lists the Google Accounts and other accounts you’ve added to the phone. If you touch an account in this screen, its account screen opens. Account screen This screen contains different options, depending on the kind of account. For Google Accounts, it lists the kinds of data you can synchronize to the phone, with checkboxes so you can turn synchronizing on and off for each kind. You can also press and touch Sync now to synchronize data.
photos. If you reset the phone in this way, the next time you turn on your phone you’re prompted to reenter the same kind of information as when you first started Android. SD card & phone storage SD card, Total space and Available space Lists the amount of space on any SD card installed in your phone and the amount you have used to store photos, videos, music, and other files. Unmount SD card Unmounts the SD card from your phone so that you can format the card or safely remove it when the phone is on.
Android Keyboard settings screen The Android Keyboard settings apply to the onscreen keyboard that is included with your phone. The correction and capitalization features affect only the English version of the keyboard. Vibrate on keypress: Check to have the phone vibrate briefly each time you touch a key on the onscreen keyboard. Sound on keypress: Check to play a brief sound each time you touch a key on the onscreen keyboard.
by speaking. When checked, Google voice recognition replaces those words in transcriptions with a placeholder comprised of hash symbols (#). Text-to-Speech settings screen If you don’t have speech synthesizer data installed, only the Install voice data setting is available. Listen to an example Plays a brief sample of the speech synthesizer, using your current settings. Always use my settings: Check to use the settings on this screen in place of speech synthesizer settings available in other applications.
obtaining the current time from the mobile network. Automatic: Uncheck to set the date, time, and time zone on the phone manually, rather than obtaining the current time from the mobile network. Set date: If Automatic is unchecked, opens a dialog where you can manually set the phone’s date. Select time zone: If Automatic is unchecked, opens a dialog where you can set the phone’s time zone. Set time: If Automatic is unchecked, opens a dialog where you can set the phone’s time.