Review this Quick Reference Guide for an overview of some important features in your Chevrolet Camaro. More detailed information can be found in your Owner Manual. Some optional equipment described in this guide may not be included in your vehicle. For easy reference, keep this guide with your Owner Manual in your glove box. ✦ denotes optional equipment www.chevrolet.
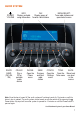
INSTRUMENT PANEL Turn Signal Lever/Driver Information Center Controls Exterior/Interior Lamps Control Safety Belt Reminder Check Engine Low Tire Pressure Brake System Warning Antilock Brake System Warning 2 Driver Information Center Cruise Control Buttons Windshield Wipers Lever Tilt/Telescopic Steering Wheel Lever Charging System Oil Pressure Airbag Readiness Security Fog Lamps Cruise Control Set Traction Control Off Audio Steering Wheel Controls✦ Hood Release Lever Head-Up Display Controls✦ Stab
Climate Controls/ Heated Seat Buttons✦ Auxiliary Gauges✦ StabiliTrak Button Audio System Hazard Warning Flashers Button/ Power Door Locks Button Accessory Power Outlet* * The accessory power outlet does not operate once the key is removed from the ignition and the driver’s door is opened. Note: Refer to your Owner Manual to learn about the information being relayed by the lights, gauges and indicators of the instrument cluster, as well as what to do to ensure safety and prevent damage.
REMOTE KEYLESS ENTRY TRANSMITTER Unlock Press to unlock the driver’s door only or all doors. The unlock setting can be changed in the Vehicle Settings menu by pressing the CONFIG button on the audio system. Lock Press to lock all doors. The driver’s door will not lock if open. Trunk Press and hold to unlatch the trunk. Vehicle Locator/Panic Alarm Press and release to locate your vehicle. The turn signal lamps will flash and the horn will sound. Press and hold to activate the alarm.
DRIVER’S SEAT ADJUSTMENTS 6-Way Power Seat Adjustment✦ A B 4-Way Seat Adjustment B A. Seat Adjustment Move the horizontal control to move the seat forward or rearward and to raise, lower or tilt the seat. B. Power Seatback Recline Adjustment Move the vertical control to recline or raise the seatback. A A. Seat Adjustment Move the lever up or down repeatedly to raise or lower the seat. B. Power Seatback Recline Adjustment Move the vertical control to recline or raise the seatback.
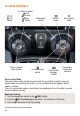
DRIVER INFORMATION CENTER The Driver Information Center (DIC) on the instrument cluster displays a variety of vehicle system information and warning messages. DIC Controls A. MENU Press to display the: – Vehicle Information menu (units, tire pressure, remaining oil life, coolant temperature, speed warning). – Trip/Fuel menu (digital speedometer, trip odometers, fuel range, average fuel economy, average vehicle speed, OnStar® Turn-by-Turn guidance✦). B.
AUDIO SYSTEM POWER/ VOLUME RADIO/ BAND (FM, AM, XM) INFO: Display available song information CD/AUX: Play a CD or portable audio device FAV: Display pages of favorite radio stations PHONE: Open the Phone menu SEEK: Previous and Next radio station CONFIG: Open the Settings menu MENU/SELECT: Tune radio stations and open/select menus TONE: BACK: Open the Move back Tone menu one level in the menus Note: Once the key is turned off, the audio system will continue to work for 10 minutes or until the dri
AUDIO SYSTEM Note: Avoid extended searching for specific items or configuring system settings while driving. Favorite Stations Radio stations from all bands (AM, FM or XM) can be stored in any order on up to six pages of favorites. Setting Number of Favorite Pages 1. Press the CONFIG button. 2. Turn the MENU/SELECT knob to highlight the Radio Settings menu; press the knob to select it. 3. Turn the MENU/SELECT knob to highlight Radio Favorites; press the knob to select it. 4.
AUDIO STEERING WHEEL CONTROLS✦ + – Volume Press + or – to increase or decrease the volume. Next/Previous Rotate up or down to go to the next or previous favorite radio station, CD track, or MP3 file. SRC Source Press to select an audio source. Push to Talk Press to interact with the OnStar or Bluetooth system. End Call/Mute Press to end or reject an OnStar or Bluetooth call. Press and hold to mute the vehicle speakers.
CLIMATE CONTROLS Off/ Fan control Air delivery modes: Vent Bi-level Floor Defog Driver’s heated seat control✦ Temperature control Air conditioning control Defrost mode Rear window defogger control Recirculation mode Passenger’s heated seat control✦ Recirculation Mode The recirculation mode can help to quickly cool the air inside the vehicle or prevent outside odors from entering the vehicle. It is not available while the defog or defrost mode is selected.
EXTERIOR/INTERIOR LIGHTING Automatic Headlamp System Off/On AUTO Automatic Headlamp System Activates the Daytime Running Lamps (DRLs) in the daytime and the headlamps and other exterior lamps at night or when necessary. Parking Lamps Manual operation of the parking lamps. Headlamps Manual operation of the headlamps. Fog Lamps✦ Press the switch to turn the fog lamps on or off. On vehicles with the RS package✦, the DRLs replace the fog lamps.
SUNROOF✦ Vent/Open Press the rear of the switch to the first detent to vent the sunroof. Press the rear of the switch to the second detent to express-open the sunroof. Close Press and hold the front of the switch to close the sunroof. WINDOW INDEXING To provide a tight seal, the window will automatically open slightly when the door is opened and then automatically close when the door is closed. If battery power is disconnected, follow the Owner Manual procedure for initializing the indexing feature.
CRUISE CONTROL Adjusting Cruise Control Use the following switches to adjust or cancel cruise control: RES+ Resume/Accelerate Rotate the switch up to resume a set speed. If the system is active, rotate the switch up to increase speed. Setting Cruise Control 1. Press the On/Off button. The Cruise Control symbol will illuminate in white in the instrument cluster. 2. When traveling at the desired speed, rotate the SET– switch down to set the speed.
MANUAL TRANSMISSION OPERATION The 6-speed manual transmission (V8) includes a 1-to-4 shift feature that helps achieve the best possible fuel economy. The 1-to-4 shift light will turn on when, from a standstill, acceleration and vehicle speed qualifications are met. When the shift light is on, the transmission can be shifted only from 1st to 4th gear. Forcing the shift lever into any other gear may damage the transmission.
TIRES Tire Pressure Monitor The Tire Pressure Monitor alerts you when a significant reduction in pressure occurs in one or more of your vehicle’s tires by illuminating the Low Tire Pressure warning light on the instrument cluster. The warning light will remain on until the tire pressure is corrected. The proper tire pressures for your vehicle are listed on the Tire and Loading Information label, located below the driver’s door latch.
ROADSIDE ASSISTANCE 1-800-CHEV-USA TTY Users: 1-888-889-2438 (1-800-243-8872) As the owner of a new Chevrolet, you are automatically enrolled in the Chevrolet Roadside Assistance program. This value-added service is intended to provide you with peace of mind as you drive in the city or travel the open road.