
Use And Care Manual


12
CBO-750 Assembly Instructions
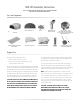
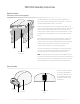
After you have built the Support Base and positioned the Insulation
Boards and Galvannealed Steel Plate as shown, you are ready to
place the Dome Assembly on the Insulation Boards. You have two
Dome Assembly placement options:
• You can align the front of the Dome Assembly with the edge
of the Insulation Boards and your 2-inch Arch Assembly and
Door will overhang.
• You can recess the Dome approximately 2 inches from the edge of
the Insulation Boards to accommodate the Arch and Door Assembly.
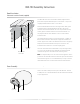
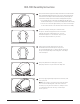
1
2
Place the two “Wing” Hearth pieces inside the Dome.
The pieces should fit snug against the walls of the Dome.
A Chicago Brick Oven wood burning oven is a custom-
manufactured product so some variances may occur, but will
not affect the performance of your Oven.
3
Finally, place the Center Hearth piece into position.
DO NOT DROP the Center Hearth piece into position. The
recommended approach is to gently slide the centerpiece into
position. Align the edges of the wing pieces to the edges of
the centerpiece. A Chicago Brick Oven wood burning oven
is a custom-manufactured product so some variances may
occur, but will not affect the performance of your Oven.
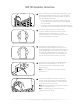
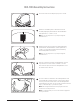
5
Lay the Insulating Blanket over the top of the Oven. Cut
out a hole for the Flue Pipe, and cut the Insulating Blanket
to line up with the front of the Oven. If you have any extra
insulation, put it on the top of the Oven.
Note: Industrial-grade aluminum foil may be placed over the
insulation for moisture protection.
Note: It is important that you use all of the insulation
supplied to avoid a possible fire.
4
Attach the Anchor Box to the Dome Assembly aligning the
pre-drilled holes and included bolts (ss 1/4 - 20 x 1/2").
Install the Anchor Box before attaching the Insulating
Blanket to the Oven.
Note: Do not over-torque bolts or you may dislodge the
threaded inserts!