/2” variable speed reversible hammer drill Model 67616 Set up and Operating Instructions Visit our website at: http://www.harborfreight.com Read this material before using this product. Failure to do so can result in serious injury. Save this manual. Copyright© 2009 by Harbor Freight Tools®. All rights reserved. No portion of this manual or any artwork contained herein may be reproduced in any shape or form without the express written consent of Harbor Freight Tools.
NOTICE is used to address practices not related to personal injury. Save This Manual Keep this manual for the safety warnings and precautions, assembly, operating, inspection, maintenance and cleaning procedures. Write the product’s serial number in the back of the manual near the assembly diagram (or month and year of purchase if product has no number). Keep this manual and the receipt in a safe and dry place for future reference.
ranges and refrigerators. There is an increased risk of electric shock if your body is grounded. up or carrying the tool. Carrying power tools with your finger on the switch or energizing power tools that have the switch on invites accidents. c. Do not expose power tools to rain or wet conditions. Water entering a power tool will increase the risk of electric shock. d. Remove any adjusting key or wrench before turning the power tool on.
with the switch is dangerous and must be repaired. c. Disconnect the plug from the power source and/or the battery pack from the power tool before making any adjustments, changing accessories, or storing power tools. Such preventive safety measures reduce the risk of starting the power tool accidentally. 5. Drill and Impact Drill Safety Warnings 1. Wear ear protectors with impact drills. Exposure to noise can cause hearing loss. 2. Use Auxiliary Handle (4) supplied with the Drill.
pacemaker interference or pacemaker failure. In addition, people with pacemakers should: • Avoid operating alone. • Do not use with power switch locked on. • Properly maintain and inspect to avoid electrical shock. • Any power cord must be properly grounded. Ground Fault Circuit Interrupter (GFCI) should also be implemented – it prevents sustained electrical shock. 11.
7. To reduce vibration, maintain the tool as explained in this manual. If any abnormal vibration occurs, stop use immediately. Save these instructions. double insulation system which satisfies OSHA requirements and complies with the applicable standards of Underwriters Laboratories, Inc., the Canadian Standard Association, and the National Electrical Code. 2.
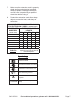
. Make sure the extension cord is properly wired and in good electrical condition. Always replace a damaged extension cord or have it repaired by a qualified electrician before using it. 8. Protect the extension cords from sharp objects, excessive heat, and damp or wet areas. RECOMMENDED MINIMUM WIRE GAUGE FOR EXTENSION CORDS* (120/240 VOLT) EXTENSION CORD NAMEPLATE LENGTH AMPERES (at full load) 25’ 50’ 75’ 100’ 150’ 0 – 2.0 18 18 18 18 16 2.1 – 3.4 18 18 18 16 14 3.5 – 5.
Specifications Electrical Input 120 V~ / 60 Hz / 6.
and unplug the tool from its electrical outlet before adjusting tool or installing accessories. in a counterclockwise direction, slide the Forward/Reverse Switch to the left. See Figure 2. The Hammer Drill is equipped with a keyed Chuck. Follow these steps to insert bit: 1. Insert the Chuck Key (52) into the Chuck and turn counterclockwise to open the mouth of the Chuck. 2. Insert the hammer bit or the drill bit (not included) all the way into the Chuck. 3.
oscillating hammer motion), slide the Mode Switch (21) to left or right. The “drill” symbol indicates plain drilling while the “hammer” symbol indicates hammer drilling. See Figure 3. 4. Start by drilling slowly to keep bit from wandering away from your starting point. 5. As hole is established, increase speed. Do not use so much pressure that bit heats up. This can damage bit and create irregular hole. For hard metal, use cutting oil to keep bit cool. 6.
Recommended Drill Bits Sets The chart below lists applicable Drill Bit sets that are available from Harbor Freight Tools.
Maintenance And Servicing Procedures not specifically explained in this manual must be performed only by a qualified technician. To prevent serious injury from accidental operation: Turn the Power Switch of the tool off and unplug the tool from its electrical outlet before performing any inspection, maintenance, or cleaning procedures. 2. After Use, wipe external surfaces of the tool with clean cloth. 3.
Troubleshooting Problem Possible Causes Tool will not start. 1. Cord not connected. 2. No power at outlet. Tool operates slowly. Performance decreases over time. Excessive noise or rattling. Overheating. 3. Tool’s thermal reset breaker tripped (if equipped). 4. Internal damage or wear. (Carbon brushes or switch.) Extension cord too long or wire size too small. 1. Accessory dull or damaged. 2. Carbon brushes worn or damaged. Internal damage or wear. (Carbon brushes or bearings, for example.) 1.
PLEASE READ THE FOLLOWING CAREFULLY The manufacturer and/or distributor has provided the parts list and assembly diagram in this manual as a reference tool only. Neither the manufacturer or distributor makes any representation or warranty of any kind to the buyer that he or she is qualified to make any repairs to the product, or that he or she is qualified to replace any parts of the product.
ASSEMBLY DIAGRAM 54 43 55 56 SKU 67616 For technical questions, please call 1-800-444-3353.
LIMITED 90 DAY WARRANTY Harbor Freight Tools Co. makes every effort to assure that its products meet high quality and durability standards, and warrants to the original purchaser that this product is free from defects in materials and workmanship for the period of 90 days from the date of purchase.