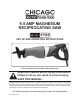
9.5 AMP MAGNESIUM RECIPROCATING SAW 97580 SET UP AND OPERATING INSTRUCTIONS Visit our website at: http://www.harborfreight.com Read this material before using this product. Failure to do so can result in serious injury. SAVE THIS MANUAL. Copyright© 2008 by Harbor Freight Tools®. All rights reserved. No portion of this manual or any artwork contained herein may be reproduced in any shape or form without the express written consent of Harbor Freight Tools.
SAVE THIS MANUAL CAUTION, used with the safety alert symbol, indicates a hazardous situation which, if not avoided, could result in minor or moderate injury. Keep this manual for the safety warnings and precautions, assembly, operating, inspection, maintenance and cleaning procedures. Write the product’s serial number in the back of the manual near the assembly diagram (or month and year of purchase if product has no number). Keep this manual and the receipt in a safe and dry place for future reference.
Distractions can cause you to lose control. 2. Electrical safety a. Power tool plugs must match the outlet. Never modify the plug in any way. Do not use any adapter plugs with grounded power tools. Unmodified plugs and matching outlets will reduce risk of electric shock. b. Avoid body contact with grounded surfaces such as pipes, radiators, ranges and refrigerators. There is an increased risk of electric shock if your body is grounded. c. Do not expose power tools to rain or wet conditions.
g. Use the power tool, accessories and tool bits etc. in accordance with these instructions, taking into account the working conditions and the work to be performed. Use of the power tool for operations different from those intended could result in a hazardous situation. Use of these devices can reduce dust-related hazards. 4. Power tool use and care a. Do not force the power tool. Use the correct power tool for your application.
parts can grab the surface and pull the tool out of your control. 6. When using a handheld power tool, maintain a firm grip on the tool with both hands to resist starting torque. 7. Do not leave the tool unattended when it is plugged into an electrical outlet. Turn off the tool, and unplug it from its electrical outlet before leaving. 8. This product is not a toy. Keep it out of reach of children. 9. People with pacemakers should consult their physician(s) before use.
not being caused or worsened from use. Pregnant women or people who have impaired blood circulation to the hand, past hand injuries, nervous system disorders, diabetes, or Raynaud’s Disease should not use this tool. If you feel any medical or physical symptoms related to vibration (such as tingling, numbness, and white or blue fingers), seek medical advice as soon as possible. 2. Do not smoke during use.
and three prong grounding plug. The plug must be connected to a properly grounded outlet. If the tool should electrically malfunction or break down, grounding provides a low resistance path to carry electricity away from the user, reducing the risk of electric shock. (See 3-Prong Plug and Outlet.) 2. 3. The grounding prong in the plug is connected through the green wire inside the cord to the grounding system in the tool.
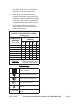
the suffix “W-A” (“W” in Canada) to indicate it is OK for outdoor use. 6. Make sure the extension cord is properly wired and in good electrical condition. Always replace a damaged extension cord or have it repaired by a qualified electrician before using it. 7. Protect the extension cords from sharp objects, excessive heat, and damp or wet areas. RECOMMENDED MINIMUM WIRE GAUGE FOR EXTENSION CORDS* (120/240 VOLT) (at full load) 50’ 75’ 100’ 150’ EXTENSION CORD LENGTH 25’ NAMEPLATE AMPERES 0 – 2.
SPECIFICATIONS Electrical Requirements INSTRUCTIONS FOR PUTTING INTO USE 120 V~ / 60 Hz/9.5 A Read the ENTIRE IMPORTANT SAFETY INFORMATION section at the beginning of this manual including all text under subheadings therein before set up or use of this product.
2. Select a Blade that is appropriate for the task at hand. See the Blade Selection Chart on page 14 for suggested blade size and type. 3. Rotate the Chuck (8) counterclockwise to open it. Hold it in the open position. (See Photo previous page.) 4. Insert the 1/2” shank of the selected Blade (43) firmly into the Chuck. Be sure the Blade is fully inserted. 5. Release the Chuck to close it. 6. With work gloves on, pull on the Blade to ensure that it is firmly installed.
4. There must not be hazardous objects, such as utility lines or foreign objects, nearby that will present a hazard while working. 2. 3. 4. Plunge Cutting 1. You can plunge cut into plywood and thin board panels. Do not attempt to plunge cut into thick, hard or metal panels. 2. Select a short, thick blade which is in good condition. 3. Be sure the work piece is firmly mounted so it will not move during the cutting operation.
MAINTENANCE AND SERVICING Procedures not specifically explained in this manual must be performed only by a qualified technician. TO PREVENT SERIOUS INJURY FROM ACCIDENTAL OPERATION: Turn the Power Switch of the tool to its “OFF” position and unplug the tool from its electrical outlet before performing any inspection, maintenance, or cleaning procedures. TO PREVENT SERIOUS INJURY FROM TOOL FAILURE: Do not use damaged equipment.
Troubleshooting Problem Tool will not start Possible Causes 1. No power at outlet. 2. Cord not connected. 3. Carbon Brushes may be worn or damaged. 1. Carbon Brushes may be worn or damaged. Likely Solutions 1. Check power at outlet. 2. Check that cord is plugged in. 3. Inspect Carbon Brushes and replace if necessary. 1. Inspect Carbon Brushes and replace if necessary. Tool operates slowly or sporadically. Tool does not 1. Blade may be damaged, worn 1. Check condition and type of blade.
PARTS LIST Part 1 2 3 4 5 6 7 8 9 10 11 12 13 14 15 16 17 18 19 20 21 22 23 24 25 26 27 28 29 30 31 32 33 34 35 36 37 Description Phillips Pan Head Screw Spring Washer m5 Gear Cover Phillips Head Pan Screw Spring Washer m5 Cover Plate Retainer Ring Chuck (outer Ring) Torsion Spring Inner Ring Compression Spring Pin Spring Pin Wool Gasket Ring Gasket Ring Cap Plastic Ring Sealed Bearing Reciprocating Lever Middle Plate Spindle Needle Bearing Cylinder Pin Baffle Ring m7 Gear Flat Washer Phillips Head Pan Sc
ASSEMBLY DIAGRAM Record Product’s Serial Number Here: Note: If product has no serial number, record month and year of purchase instead. Note: Some parts are listed and shown for illustration purposes only, and are not available individually as replacement parts. SKU 97580 For technical questions, please call 1-800-444-3353.
90 Day Warranty Harbor Freight Tools Co. makes every effort to assure that its products meet high quality and durability standards, and warrants to the original purchaser that this product is free from defects in materials and workmanship for the period of 90 days from the date of purchase.