INVERTER PLASMA CUTTER Model 97994 Set up And Operating Instructions Distributed exclusively by Harbor Freight Tools®. 3491 Mission Oaks Blvd., Camarillo, CA 93011 Visit our website at: http://www.harborfreight.com Read this material before using this product. Failure to do so can result in serious injury. Save this manual. Copyright© 2008 by Harbor Freight Tools®. All rights reserved.
Contents Parts list and assembly diagram ���������������������������������� 17 Important SAFETY Information ���������������������������� 3 Limited 1 Year / 90 day warranty ������������������������������ 18 General Safety Rules �������������� 3 Specific Safety Rules ��������������� 5 Specifications �������������������������� 8 PLEASE READ THE FOLLOWING CAREFULLY ������� 18 Duty Cycle ������������������������������������� 8 Unpacking ���������������������������������� 9 Initial Set Up Instructions � 9 A
NOTICE is used to address practices not related to personal injury. Save This Manual Keep this manual for the safety warnings and precautions, assembly, operating, inspection, maintenance and cleaning procedures. Write the product’s serial number in the back of the manual near the assembly diagram (or month and year of purchase if product has no number). Keep this manual and the receipt in a safe and dry place for future reference.
c. Do not abuse the Power Cord (32). Never use the Cord for pulling or unplugging the plasma cutter. Keep Cord away from heat, oil, sharp edges or moving parts. Damaged or entangled Cords increase the risk of electric shock. d. When operating a plasma cutter outdoors, use an extension cord suitable for outdoor use. Use of a cord suitable for outdoor use reduces the risk of electric shock. 3. Personal safety a. Stay alert, watch what you are doing and use common sense when operating a plasma cutter.
. Service a. Have your plasma cutter serviced by a qualified repair person using only identical replacement parts. This will ensure that the safety of the plasma cutter is maintained. 6. Avoid unintentional starting. Prepare to begin work before turning on the Inverter Plasma Cutter. 7. Do not leave the Plasma Cutter unattended when it is plugged into an electrical outlet. Turn off the plasma cutter, and unplug it from its electrical outlet before leaving. 8.
(California Health & Safety Code § 25249.5, et seq.) 13. Prevent eye injury and burns. Wearing and using ANSI-approved personal safety clothing and safety devices reduce the risk for injury. • Wear ANSI-approved safety impact eye goggles underneath welding eye protection featuring at least a Number 10 shade lens rating. • Leather leggings, fire resistant shoes or boots should be worn when using this product.
vapors, and dust. Do not apply heat to a container that has held an unknown substance or a combustible material whose contents, when heated, can produce flammable or explosive vapors. Clean and purge containers before applying heat. Vent closed containers, including castings, before preheating, welding, or cutting. 14. Do not touch live electrical parts. Wear dry, insulating gloves. Do not touch electrode or conductor tong with bare hand. Do not wear wet or damaged gloves. 15.
• Have a recognized specialist in Industrial Hygiene or Environmental Services check the operation and air quality and make recommendations for the specific welding or cutting situation. 19. Live torch when Trigger is pressed. Keep Torch away from people and flammables before touching Trigger. 20. Turn off, unplug, and discharge electrode to ground before performing any inspection, maintenance, or cleaning. 21. Use only compressed air at between 30 and 35 PSI.
Initial Set Up Instructions Regulator Nut Read the entire Important Safety Information section at the beginning of this manual including all text under subheadings therein before set up or use of this product. To prevent serious injury from accidental operation: Turn the Power Switch (11) of the Plasma Cutter to its “OFF” position and unplug the plasma cutter from its electrical outlet before assembling or making any adjustments to the plasma cutter. Loop Regulator Body 2.
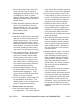
CONTROLS & INDICATORS FIGURE B POTENTIOMETER KNOB (10) AIR PRESSURE REGULATOR (33) AIR PRESSURE GAUGE FIGURE C POWER SWITCH (11) ON = GREEN LED CUTTING = YELLOW LED OVERHEATING = RED LED MALE QUICK RELEASE ADAPTER CIRCUIT BREAKER (30) 4. 5. A male Quick Release Adapter is mounted on the Air Pressure Regulator (33) at the rear of the Plasma Cutter. Attach your compressor’s air supply hose to the Quick Release Adapter. Then, adjust your compressor to deliver 30 to 35 PSI compressed air.
Operating Instructions General Operating Instructions Protective gear must be worn when using the Plasma Cutter. ANSI-approved, arc shaded, eye protection, a full face shield, heavy-duty work gloves, a welding apron, respirator, and heavy-duty work clothes without pockets should be worn when using this product. Do not look at the ignited arc without eye protection. Light from the arc can cause permanent damage to the eyes. Light from the arc can burn the skin. Do not breathe arc fumes.
routine to help prevent excess wear to the Plasma Cutter. 2. Mount the metal to be cut to the metal welding/cutting table. It should be mounted so that the cutting debris falls to the cement floor. 3. Place the Plasma Cutter unit no closer than 6 feet from the workpiece to be cut. 4. Adjust the Knob on the Air Pressure Regulator (33) to regulate the air supply between 30 and 35 PSI as indicated on the Air Pressure Gauge. The air supply must be dry.
Note: If the input current is too high for the Plasma Cutter, the overload protector will activate and the cutter will stop working. To reset, press the Circuit Breaker (30) to begin cutting again. (See Figure D.) 14. When finished cutting: 3. Set the air pressure between 30 and 35 PSI. Increased air pressure will increase plasma speed and cutting pressure. Air pressure and amperage should be adjusted in tandem. 4. Start with a mid-range amperage setting (10 amps) and adjust up or down from there.
Maintenance And Servicing WARNING! If the Power Cord (32) of this Plasma Cutter is damaged, it must be replaced only by a qualified service technician. Procedures not specifically explained in this manual must be performed only by a qualified technician.
Troubleshooting To Prevent serious injury: Shut off the Welder, disconnect it from power, and discharge the torch to ground before adjusting, cleaning, or repairing the unit. Cutting arc not stable. • Possible Causes and Solutions: • Loose Cutting Torch (13) cable or Earth Clamp (14) cable: Check to ensure that all connections are tight. • Damaged Cutting Torch (13) or loose connection within Torch: Have a qualified technician inspect and repair/replace as necessary.
Parts list and assembly diagram Part Qty. Part 1 Screw (M5x14) & Nut (M5) Description 2 18 Inductance Description Qty. 1 2 Handle 1 19 Transformer 1 3 Pothook 2 20 Radiator 3 4 Steel Cover 1 21 LED 3 5 Fan 1 22 Potentiometer 1 6 Tapping Screw (2.
Limited 1 Year / 90 day warranty Harbor Freight Tools Co. makes every effort to assure that its products meet high quality and durability standards, and warrants to the original purchaser that for a period of ninety days from date of purchase that the torch, liner, wire feed mechanism (if applicable), welding clamps, electrode holders, cables and accessories packed with the welder are free of defects in materials and workmanship.