MULTI-FUNCTION POWER TOOL 67256 Set up and Operating Instructions Visit our website at: http://www.harborfreight.com Read this material before using this product. Failure to do so can result in serious injury. Save this manual. Copyright© 2009 by Harbor Freight Tools®. All rights reserved. No portion of this manual or any artwork contained herein may be reproduced in any shape or form without the express written consent of Harbor Freight Tools. Diagrams within this manual may not be drawn proportionally.
Save This Manual CAUTION, used with the safety alert symbol, indicates a hazardous situation which, if not avoided, could result in minor or moderate injury. Keep this manual for the safety warnings and precautions, assembly, operating, inspection, maintenance and cleaning procedures. Write the product’s serial number in the back of the manual near the assembly diagram (or month and year of purchase if product has no number). Keep this manual and the receipt in a safe and dry place for future reference.
2. Electrical safety moment of inattention while operating power tools may result in serious personal injury. a. Power tool Plugs must match the outlet. Never modify the Plug in any way. Do not use any adapter plugs with grounded power tools. Unmodified plugs and matching outlets will reduce risk of electric shock. b. Use personal protective equipment. Always wear ANSIapproved safety goggles.
and off. Any power tool that cannot be controlled with the Switch is dangerous and must be repaired. c. Disconnect the Power Cord from the power source before making any adjustments, changing accessories, or storing the power tool. Such preventive safety measures reduce the risk of starting the power tool accidentally. d. Store idle power tools out of the reach of children and do not allow persons unfamiliar with the power tool or these instructions to operate the power tool.
9. • Do not use with power switch locked on. • Properly maintain and inspect to avoid electrical shock. • Any power cord must be properly grounded. Ground Fault Circuit Interrupter (GFCI) should also be implemented – it prevents sustained electrical shock. cover all possible conditions and situations that may occur. It must be understood by the operator that common sense and caution are factors which cannot be built into this product, but must be supplied by the operator.
5. Include vibration-free periods each day of work. 6. Grip the power tool as lightly as possible (while still keeping safe control of it). Let the tool do the work. 7. To reduce vibration, maintain the power tool as explained in this manual. If any abnormal vibration occurs, stop use immediately. Save these instructions. Double Insulated Tools: Tools with Two Prong Plugs 1. Tools marked “Double Insulated” do not require grounding.
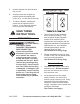
3. 4. 5. 6. 7. 8. The smaller the gauge number of the wire, the greater the capacity of the cord. For example, a 14 gauge cord can carry a higher current than a 16 gauge cord. (See Table A.) When using more than one extension cord to make up the total length, make sure each cord contains at least the minimum wire size required. (See Table A.) If you are using one extension cord for more than one tool, add the nameplate amperes and use the sum to determine the required minimum cord size. (See Table A.
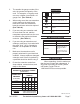
refer to the Assembly Diagram near the end of this manual. COMPONENTS Power Switch (44) OFF Tool ON 1. Spindle (5) Turn the Power Switch off and unplug the tool. Attachment Angled Scraper (4) [Angled Scraper (4)] Sanding Pad (502) Figure B Spindle (5) Angled Cutter Blade (501) Half Moon Cutter Blade (503) Sanding Sheets (504) Cap Screw (1) Small Washer (2) Large Washer (3) Hex Wrench (505) Figure A 2.
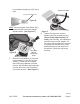
be mounted at angles up to 90° left or right. Torque to 10 ft-lbs Angled Cutter Blade (501) Figure D Note: The long Angled Cutter Blade (501) should only be used in the straight ahead position. (See Figure D.) Figure F 4. Figure E 3. Place Large Washer, cupped side down Tighten the cap screw onto the Spindle using the provided hex key. Torque firmly (approximately 10 ft-lbs). After securing, the attachment should not move on the spindle.
Operating Instructions Read the entire Important Safety Information section at the beginning of this manual including all text under subheadings therein before set up or use of this product. 5. Avoid contact with foreign objects such as metal screws and nails when sanding, scraping, or cutting. 6. Do not apply excessive pressure on the tool. Allow the tool to do the work. 7. When finished, turn off the tool and allow it to completely stop before setting it down.
Maintenance And Servicing Procedures not specifically explained in this manual must be performed only by a qualified technician. To prevent serious injury from accidental operation: Turn the Power Switch (44) of the Tool to its “OFF” position and unplug the tool from its electrical outlet before performing any inspection, maintenance, or cleaning procedures. To prevent serious injury from tool failure: Do not use damaged equipment.
Troubleshooting Problem Tool will not start. Possible Causes 1. Cord not connected. 2. No power at outlet. Likely Solutions 1. Check that cord is plugged in. 2. Check power at outlet. If outlet is unpowered, turn off tool and check circuit breaker. If breaker is tripped, make sure circuit is right capacity for tool and circuit has no other loads. 3. Have technician service tool. 3. Internal damage or wear. (Carbon brushes or switch, for example.) Attachment is loose 1. Holes on attachment not 1.
Part 1 2 3 4 5 6 7 8 9 10 11 12 13 14 15 16 17 18 19 20 21 22 23 24 25 26 PARTS LIST and Assembly diagram Description Cap Screw (M8 x 1.25 x 12) Small Washer Large Washer Angled Scraper Spindle Rubber Casing Circlip for Shaft 26 Spline Spring Washer Bearing (6000) Block Bronze Bushing Screw (ST4 x 27) Plain Washer (#4) Reducer Circlip for Shaft 5 Bearing (60025) Sealing Washer Middle Cover Bearing (608) Balance Block Armature Bearing (6017) Rubber Bushing Wind Guide Circle Screw (ST4.
Record Product’s Serial Number Here: either repair or replace the product at our election or we may elect to refund the purchase price if we cannot readily and Note: If product has no serial number, quickly provide you with a replacement. We record month and year of purchase will return repaired products at our expense, instead.