Owner’s Manual & Safety Instructions Save This Manual Keep this manual for the safety warnings and precautions, assembly, operating, inspection, maintenance and cleaning procedures. Write the product’s serial number in the back of the manual near the assembly diagram (or month and year of purchase if product has no number). Keep this manual and the receipt in a safe and dry place for future reference. REV 14j Visit our website at: http://www.harborfreight.
Table of Contents Safety Safetye��������������������������������������������������������� 2 Specifications.............................................. 8 Setup........................................................... 9 Operationa��������������������������������������������������� 12 Maintenancei���������������������������������������������� 17 Parts List and Diagram............................... 20 Warranty.....................................................
1. Power tool plugs must match the outlet. Never modify the plug in any way. Do not use any adapter plugs with grounded power tools. Unmodified plugs and matching outlets will reduce risk of electric shock. 4. Do not abuse the cord. Never use the cord for carrying, pulling or unplugging the power tool. Keep cord away from heat, oil, sharp edges or moving parts. Damaged or entangled cords increase the risk of electric shock. 2.
6. Keep cutting tools sharp and clean. Properly maintained cutting tools with sharp cutting edges are less likely to bind and are easier to control. 7. Use the power tool, accessories and tool bits etc. in accordance with these instructions, taking into account the working conditions and the work to be performed. Use of the power tool for operations different from those intended could result in a hazardous situation.
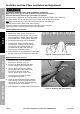
a. Maintain a firm grip, with thumbs and fingers encircling the chain saw handles, with both hands on the saw and position your body and arm to allow you to resist kickback forces. Kickback forces can be controlled by the operator, if proper precautions are taken. Do not let go of the chain saw. Use this grip thumb below handle 15. Avoid unintentional starting. Prepare to begin work before turning on the tool. 16. Do not leave the tool unattended when it is plugged into an electrical outlet.
Grounding Safety TO PREVENT ELECTRIC SHOCK AND DEATH FROM INCORRECT GROUNDING WIRE CONNECTION: Check with a qualified electrician if you are in doubt as to whether the outlet is properly grounded. Do not modify the power cord plug provided with the tool. Never remove the grounding prong from the plug. Do not use the tool if the power cord or plug is damaged. If damaged, have it repaired by a service facility before use.
2. As the distance from the supply outlet increases, you must use a heavier gauge extension cord. Using extension cords with inadequately sized wire causes a serious drop in voltage, resulting in loss of power and possible tool damage. (See Table A.) 3. The smaller the gauge number of the wire, the greater the capacity of the cord. For example, a 14 gauge cord can carry a higher current than a 16 gauge cord. (See Table A.) 4.
Specifications Electrical Rating Motor Speed Safety Chain Oil Cutting Attachment 120 VAC / 60 Hz / 9 A 5,600 RPM (No Load) Type Bar and Chain Oil Capacity 6 oz (175 ml) 14" Sprocket Nose Chain Guide Bar Low-Kickback Full Skip Chain Pitch: 3/8" Gauge: 0.050" # of links: 52 225428 Note: This electric chain saw is for cutting small logs and for lighter weight trimming jobs. A more powerful chain saw may be needed for heavy duty use.
Setup - Before Use: Read the ENTIRE IMPORTANT SAFETY INFORMATION section at the beginning of this manual including all text under subheadings therein before set up or use of this product. Safety Note: For additional information regarding the parts listed in the following pages, refer to Parts List and Diagram on page 20.
Guide Bar and Saw Chain Installation and Adjustment Safety TO PREVENT SERIOUS INJURY FROM ACCIDENTAL OPERATION: Make sure that the Trigger is in the off‑position and unplug the tool from its electrical outlet before performing any procedure in this section. The Chain Saw is supplied with the Chain Guide Bar and Saw Chain pre-installed and no assembly is required. Before first use and before each use thereafter, check the Saw Chain tension.
Replacing the Saw Chain 1. Soak the new Saw Chain overnight in Bar and Chain Oil (sold separately). Cutter Safety Do not install a Saw Chain or Chain Guide Bar other than the size and type provided and listed in the Specifications Chart on page 8. Tip of Bar Drivelink 2. Remove the Nut Cover (1) and loosen the Nut (2) on the Drive Cover (3), then loosen the Tension Screw (26) counter-clockwise until the Saw Chain (72) is loose. CUTTERS MUST FACE IN DIRECTION OF ROTATION 3.
Operating Instructions Read the ENTIRE IMPORTANT SAFETY INFORMATION section at the beginning of this manual including all text under subheadings therein before set up or use of this product. Safety Workpiece and Work Area Set Up 1. Designate a work area that is clean and well lit. The work area must not allow access by children or pets to prevent distraction and injury. 2.
Direction of Fall Felling Back Cut 2" Make the felling back cut at least 2 inches higher than the horizontal notching cut as illustrated in Figure F. Keep the felling back cut parallel to the horizontal notching cut. Make the felling back cut so enough wood is left to act as a hinge. The hinge wood keeps the tree from twisting and falling in the wrong direction. Do not cut through the hinge. Felling Back Cut 2" Notch As the felling gets close to the hinge, the tree should begin to fall.
Bucking a Log Bucking is cutting a log into lengths. It is important to make sure your footing is firm and your weight is evenly distributed on both feet. When possible, the log should be raised and supported by the use of limbs, logs or chocks. Follow the simple directions for easy cutting. When the log is supported along its entire length as illustrated in Figure H, it is cut from the top (overbuck).
Bucking a Log (continued) When the log is supported on both ends, as illustrated in Figure J, cut 1/3 the diameter from the top (overbuck). Then make the finished cut by underbucking the lower 2/3 to meet the first cut. 2nd cut underbuck (2/3 diameter) to meet 1st cut (to avoid pinching) Figure J: Log Supported Both Ends Operation When bucking on a slope always stand on the uphill side of the log, as illustrated in Figure K.
General Operating Instructions Safety 1. Before first use and before each use thereafter, remove the Oil Tank Cap. Inspect the Cap Gasket for damage. Fill the oil reservoir to just below fill plug with Bar and Chain Oil (not included). Then replace the Oil Tank Cap. Oil is automatically applied to the Saw Chain during operation. 2. Make sure that the Trigger is in the off‑position, then connect the outdoor rated extension cord (not included) to the Power Cord.
Maintenance and Servicing TO PREVENT SERIOUS INJURY FROM ACCIDENTAL OPERATION: Make sure that the Trigger is in the off‑position and unplug the tool from its electrical outlet before performing any procedure in this section. TO PREVENT SERIOUS INJURY FROM TOOL FAILURE: Do not use damaged equipment. If abnormal noise or vibration occurs, have the problem corrected before further use. Safety Procedures not specifically explained in this manual must be performed only by a qualified technician. 1.
Sharpening/Replacing the Saw Chain WARNING! Wear heavy-duty work gloves when handling the Saw Chain. 1. For smooth and safe operation, always keep the Saw Chain cutters sharp. Safety 2. Have the cutters sharpened by a qualified technician when you notice any of the following symptoms: 3. A Saw Chain that is damaged or too worn to be restored to a useable condition by sharpening will need to be replaced. Refer to Replacing the Saw Chain on page 11. a. The sawdust becomes powder-like. b.
Note: This maintenance schedule is intended solely as a general guide. If performance decreases or if equipment operates unusually, check systems immediately. The maintenance needs of each piece of equipment will differ depending on factors such as duty cycle, temperature, air quality, and other factors. If you have doubts about your ability to safely service this tool, have a qualified technician service the equipment instead. Periodic Maintenance or When Replacing Saw Chain: a.
Parts List and Diagram PLEASE READ THE FOLLOWING CAREFULLY Safety THE MANUFACTURER AND/OR DISTRIBUTOR HAS PROVIDED THE PARTS LIST AND ASSEMBLY DIAGRAM IN THIS MANUAL AS A REFERENCE TOOL ONLY. NEITHER THE MANUFACTURER OR DISTRIBUTOR MAKES ANY REPRESENTATION OR WARRANTY OF ANY KIND TO THE BUYER THAT HE OR SHE IS QUALIFIED TO MAKE ANY REPAIRS TO THE PRODUCT, OR THAT HE OR SHE IS QUALIFIED TO REPLACE ANY PARTS OF THE PRODUCT.
Parts List 1 1 1 1 1 1 1 23 1 1 1 1 1 1 1 3 1 1 1 1 1 1 2 1 1 1 1 1 1 2 1 2 1 1 1 1 1 Part 39 40 41 42 43 44 45 46 47 48 49 50 51 52 53 54 55 56 57 58 59 60 61 62 63 64 65 66 67 68 69 70 71 72 73 74 Description Gear Trim Plate Bearing Motor Gear Backup Plate Front Bearing Rear Bearing Rotor Spring Lockout Switch Trigger Switch Trigger Spring Power Cord Sheath Power Cord Power Cord Clamp Left Housing Screw Motor Rear Holder Carbon Brush Brush Holder Plate Screw Stator Pump Oil Plug Cover Piston Support Wo
Assembly Diagram Safety Setup Operation Maintenance Page 22 For technical questions, please call 1-888-866-5797.
Safety Setup Operation Maintenance Item 67255 For technical questions, please call 1-888-866-5797.
Limited 90 Day Warranty Harbor Freight Tools Co. makes every effort to assure that its products meet high quality and durability standards, and warrants to the original purchaser that this product is free from defects in materials and workmanship for the period of 90 days from the date of purchase.