
Installation Sheet

Overview
Chicago Faucets deck mounted faucets feature cast brass bodies and precision cartridges for years of reliable operation. Metering models with adjustable cycle
time offer true water savings.
Notice to the Installer
• Read this entire instruction sheet before installing to ensure proper installation.
• Installation must comply with local codes and ordinances.
Pressurized plumbing fixtures shall be installed in accordance with manufacturer's recommendations. The supply piping to these devices shall be securely
anchored to the building structure to prevent installed device from unnecessary movement when operated by the user. Care shall be exercised when
installing the device to prevent marring the exposed surface.
NOTE: The information in this manual is subject to change without notice.
Please leave this manual with the facility manager after completing the faucet installation. This document contains information necessary for routine maintenance
and servicing.
NOTE: Before installation, turn off water supplies to existing faucet and remove faucet if replacing. Clean faucet basin and clear away debris. Flush all supply
lines before connecting to faucet. Failure to do so can result in debris clogging the inlets and/or cartridges.
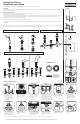
Widespread Fittings
Installation Instructions
Recommended for base numbers: 200, 404, 405, all “HZ” models, all “PO” models
For additional technical assistance, call 800/TEC-TRUE (800-832-8783) or visit our website at chicagofaucets.com.
1
Exploded Views:
Tall Stem Cartridge
Short Stem Cartridge
Metering
“HZ” Models with Flexible Supply Hoses
Other Configurations:
200 Series 404 Series 405 Series
Waste Fitting
Above
Deck
Below
Deck
Basin Washer
Arandela del tazón
Rondelle en C
Slip Washer
Arandela toroidal
Contre-écrou
Lock Nut
Contratuerca
Queue du tuyau
Tail Piece
Pieza posterior
Morceau subséquent
Body Shank
Vástago del cuerpo
About de corps
de robinet
Thread seal tape
Cinta selladora de rosca
Ruban à joints
Basin Seat
(Use putty or basin
washer provided)
Asiento del tazón (Use
masilla o arandela del
tazón provista)
Spud Flange
Collarín
Collerette de
cuvette
Stopper
Tapón
Bouchon
Stirrup
Estribo
Étrier
Gasket
Empaquetadura
Joint
Removable
Removible
Détachable
Non-removable
No removible
Non détachable
1/4”
1/2”
Pop-Up Drain Installation
Centerset and Single Basin Fittings
Spaces may be
required for thin
wares such as
stainless steel
Podrán necesitarse
espacios para productos
delgados tales como
el acero inoxidable
Des matériaux minces
comme l’acier inoxydable
peuvent nécessiter des
bagues d’espacement
Ensure o-rings
are in place
Asegúrese que los sellos
anulares estén en su sitio
S’assurer que les
joints annulaires sont
en place
Rigid /Swing Convertible Spout Installation - Gooseneck & V.B. Gooseneck
ADHESIVE
Rigid Only Spout Installation
Support de cuvette
(utiliser du mastic ou
la rondelle en C qui
est incluse)
Stirrup
Estribo
Étrier
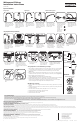
One-Piece Body Installation
1. Using grease from sup-
plied packet, lubricate
the 4 o-rings on the
spout shank and inside
of center hub of under-
mount body.
7. Slide a retaining clip on
top of the sealing washer
and into the groove of
each cartridge housing.
2. Slide the shank through
the slim rubber washer
and top center hole of
deck.
6. Above deck, place a
sealing washer over
each handle stem and
around the cartridge
housing.
3. From below deck, use
nut and metal washer to
secure spout to deck.
Hand tighten.
4. Align the undermount body
(marked H & C for connections)
with deck holes and shank.
Push the center of the under-
mount body (E) onto shank.
Be careful not to pinch o-rings.
5. Install lockwasher and
nut to the shank. Hand
tighten.
9. Below deck, hand tighten
the flanged nuts and then
with a wrench tighten 1/4
- 1/2 turn more.
10. With a wrench, tighten
center lower nut on
shank and upper center
nut.
11. Install handles, connect
water lines, and flush
lines.
12. Install aerator and flush
again.
ILLUSTRATION A
This side up This side down
Sealing washer
must be placed on
mounting surface
as indicated.
8. Install and tighten
escutcheons over each
handle.
*NOTE: If installing 636 Series handles, the escutcheon must be threaded onto the cartridge cap nut and fully seated in order for the handles to operate properly.