OWNER’S MANUAL © Chicago Gaming Company 4616 W. 19th Street, Cicero, IL 60804 (800) 379-9776 (Rev.
DIGITAL BUBBLER TM Thank you for purchasing Chicago Gaming Company’s Digital Bubbler. You can look forward to many hours of musical enjoyment. We strongly recommend that you follow the instructions and procedures as presented in this Owner’s Manual and that it be read in its entirety before setting up your jukebox. Table of Contents 1. Important Safety Instructions……………….……………………………………….2-3 2. Warranty Information……………….……………………………………………….…3 3. Navigating the Menus………………….………………………………………………..4 4.
THE LIGHTNING FLASH AND ARROWHEAD WITHIN THE TRIANGLE IS A WARNING SIGN ALERTING YOU OF “DANGEROUS VOLTAGE” INSIDE THE PRODUCT. CAUTION: TO REDUCE THE RISK OF ELECTRIC SHOCK, DO NOT OPEN FRONT DOOR. NO USER SERVICEABLE PARTS INSIDE. REFER SERVICING TO QUALIFIED SERVICE PERSONNEL. THE EXCLAMATION POINT WITHIN THE TRIANGLE IS A WARNING SIGN ALERTING YOU OF IMPORTANT INSTRUCTIONS ACCOMPANYING THE PRODUCT. SEE MARKINGS ON PRODUCT • • • • • • • CAUTION: Shock hazard if instructions are not followed.
3. Navigating the Menus 3.1 Vol Up-This button turns the volume up. 3.2 Vol Down-This button turns the volume down. 3.3 Pause/Resume-This button pauses the current song. Pressing it again resumes play. 3.4 Mode- This button opens the Mode Menu. 3.5 Playlists- This button opens the Playlist Menu. 3.6 Utilities- This button opens the Utilities Menu. 3.7 Menu-This button is used to go to the previous or top menu. 3.8 Select-This button is used to make selections and proceed through the menus. 3.
4. CD Database and Untitled Albums The majority of CDs do not contain text data on the artist name, album name and track names. The Digital Bubbler contains a text database of 2,500,000 albums. This database allows the system to include album information even when the jukebox is not connected to the internet. This database is installed in the jukebox at the date of manufacture; therefore any albums released after the latest database update will not be recognized by the local database.
5. Mode Menu Pressing the Mode button opens the Mode Menu. This menu allows the user to sort music by Artist, Album Name or Track Name. This menu also allows you to turn Shuffle or Jukebox Mode on. Mode Menu Artists Albums Tracks Sorts by artist name Sorts by album name Sorts by track name Jukebox Mode Shuffle Plays tracks in random order When Jukebox Mode is on, selecting a song will place it in a temporary queue. When this mode is off, selecting a new song will replace a song that is playing.
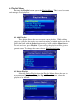
6. Playlist Menu Pressing the Playlist button opens the Playlist Menu. This is used to create and manage saved playlists. 6.1 Add Playlist This option allows the user to create a new playlist. While adding songs to a playlist, the tracks are sorted according to which mode you are in. Select the track with the Select button and go back with the Menu button. To exit and save, press Playlist. Upon saving, the playlist will be given a generic name. To change the name, choose Edit Playlist Name. 6.
6.3 Edit Playlist Name To edit a playlist name, select a playlist from the menu using Up, Down, and Select. Use Up and Down to change letters. Page Up and Page Down move six letters at a time. Use Select to move the cursor forward and Menu to save changes. 6.4 Select Playlist Use this option to start a playlist that has already been created. Use Up and Down to navigate and Select to begin playing.
7. Utilities Menu Pressing the Utilities button opens the Utilities Menu. This menu allows the user to manage albums, adjust settings, perform diagnostics, and rip CDs. Album Maintenance Menu Utilities Menu Settings Manage albums and album information View settings for the Jukebox Bubbler Stats Rip CD Displays number of songs, artists, disk use, etc.
7.1 Album Maintenance Menu The Album Maintenance Menu allows the user to manage album names, merge artists, and access the internet to update untitled albums. 7.1.i Edit Untitled Album This option allows the user to add information for an untitled album. Select the album to be edited. Use Up and Down to change letters, Menu to go back, and Select to advance the cursor. See section 4 on page 5 for more information on untitled albums.
7.1.ii Delete Albums This option allows the user to delete an entire album from The Digital Bubbler. After selecting Delete Albums, choose the album to be deleted. The albums are organized alphabetically by album name. 7.1.iii Merge Artists If albums of a single artist are listed under multiple variations of a single artist name (i.e. Beatles and The Beatles), the user may combine the multiple instances into one common name.
7.2 Bubbler Stats Select Bubbler Stats to view current status of the Digital Bubbler. The current software version numbers can be found in a table towards the bottom of the screen. Descriptions of the stats are shown below. Artists: Number of different artists copied to the jukebox. Albums: Total number of albums copied to the jukebox. Tracks: Total number of songs copied to the jukebox. Untitled: Number of albums without titles. Disk Use: Percent of hard drive currently used.
7.3.i Switch Test The Switch Test allows the user to test that the buttons are working properly. The description of the button pressed should appear in the box on the display. Press Menu three times to exit the Switch Test. 7.3.ii AirClick Test The Digital Bubbler supports the Griffin AirClick USB. This tests the functionality of the AirClick device. Like the Switch Test, pressing a button on the AirClick should display the button in the box.
7.4 Now Playing Choosing Now Playing shows a screen that displays information about the song that is currently playing. 7.5 Rip CD 7.5.i Rip CD To transfer a CD to the Digital Bubbler, Choose Rip CD from the Utilities Menu. The jukebox will check the CD against the database to find the album information. If more than one album title is returned, choose the correct name using the Up, Down and Select buttons. If the name of the album in the jukebox does not appear, choose Rip As Untitled CD.
7.6 Settings The Settings Menu lets you change your ISP Phone Number, Bass and Treble levels, and turn Main Channel and J-Pod Channel On or Off. 7.6.i Bass & Treble Control Bass and Treble Control can be found in the Utilities Menu, listed under Settings. Page Up and Page Down control bass, while Up and Down control treble. Both bass and treble can be changed from -18 db to +18 db. Press Menu to exit and save.
7.6.ii ISP Phone Number This menu allows you to change the number the modem will dial to connect to the internet. Press Up and Down to change the number, Select to move to the next number, and Menu to exit and save. To find the closest number to your location, go to page 35 to search by state, or visit the following website and enter the first six digits of your telephone number: https://myaccount.earthlink.net/cam/accessnumber.jsp 7.6.
8. Connecting To the Internet Database Information on new albums is not included in the local database. You can connect to the internet database through either the dialup modem or an existing broadband line. You do not need an internet account to use the dialup modem. 8.1 Broadband Connection To connect The Digital Bubbler using broadband, connect an ethernet cable from your modem or router to the ethernet jack on the back of the jukebox. You must have broadband service to update using this method.
9. Connecting External Speakers The Digital Bubbler supports two 8 Ohm external speakers. The speaker terminal can be found on the back panel, next to the ethernet and phone line jacks. To attach the speakers, run the wire from the speaker to the jukebox. Press on the colored release tab and push the end of the corresponding wire into the terminal. Releasing this tab will hold the wire in place. • Be sure to connect the red terminal on the speaker to the red terminal on the jukebox.
11. System Restore To perform a system restore 1) While The Digital Bubbler is turned on, open the disc tray and insert the system restore DVD 2) Turn the power off and wait for 10 seconds 3) Turn the power on, and wait for the JB Live! Menu to load. This will take slightly longer than normal 11.00 Re-Install Only JB OS This option allows you to reinstall the jukebox operating system without loosing any Albums or Playlists. Highlight this option and press Select to start reinstallation.
12. Parts List Part Picture Part Number Part Name Qty.
Part Picture Part Number Part Name Qty.
Part Picture Part Number Part Name Qty.
Part Picture Part Number Part Name Qty.
Part Picture Part Number Part Name Qty.
Part Picture Part Number Part Name Qty.
Part Picture Part Number Part Name Qty.
Part Picture Part Number Part Name Qty. 015-MLS-DSKID Door Skid 1 015-MLS-FLMPLFL F. Lamp Mount Left Lower 1 015-MLS-FLMPLFU F. Lamp Mount Left Upper 1 015-MLS-FLMPRTL F. Lamp Mount Right Lower 1 015-MLS-FLMPRTU F.
Part Picture Part Number Part Name Qty.
Part Picture Part Number Part Name Qty. 015-MLS-PLSBRKT Plastic Retainer 16 000-MLS-PWRPLT2 Power Switch Plate for Chily Switch 1 015-MLS-WINCLIP Window Clip 4 015-MON-LCD8INC LCD Display 1 015-MTR-A224LC5 Synchron 110V, 60Hz, 10 RPM Motor w/ .
Part Picture Part Number Part Name Qty. 015-PCB-LCDINT2 LCD to USB Interface 1 000-PIN-RING.
Part Picture Part Number Part Name Qty.
Part Picture Part Number Part Name Qty.
Part Picture Part Number Part Name Qty.
Part Picture Part Number Part Name Qty. 015-SPK-DRIVER6 6.
Part Picture Part Number Part Name Qty.
13.
14. FCC COMPLIANCE Note: This equipment has been tested and found to comply with the limits for a Class B digital device, pursuant to Part 15 of the FCC Rules. These limits are designed to provide reasonable protection against harmful interference in a residential installation. This equipment generates, uses and can radiate radio frequency energy and, if not installed and used in accordance with the instructions, may cause harmful interference to radio communications.