PORTABLE REMOTE CONTROL WINCH 12 VOLT - 3,000 LB. CAPACITY Model 95912 Assembly And Operation Instructions Due to continuing improvements, actual product may differ slightly from the product described herein. ® 3491 Mission Oaks Blvd., Camarillo, CA 93011 Visit our website at: http://www.harborfreight.com To prevent serious injury, read and understand all warnings and instructions before use. Copyright© 2007 by Harbor Freight Tools®. All rights reserved.
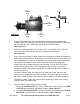
Specifications Electrical Requirements 12 VDC Power Input 1.1 HP / Permanent Magnet 6’Length Battery Wires (Qty. 2) Maximum Line Pull Capacity 3,000 Pounds Remote Control Hand Held Wireless (A = “Power In” / B = “Power Out”) Gear Ratio 153.1 Cable Assembly 32 Ft. x 3/16” Diameter / High Carbon Steel, Zinc Plated Hook Assembly Spring Loaded Safety Latch 1” Jaw Opening 3-1/2” Long x 2-1/2” Wide x 1/2” Thick Mounting Plate Dimensions 7.086” Long x 4.881” Wide x 2.165” High Overall Dimensions 12.
2. Do not operate power tools in explosive atmospheres, such as in the presence of flammable liquids, gases, or dust. Power tools create sparks which may ignite the dust or fumes. 3. Keep bystanders, children, and visitors away while operating a power tool. Distractions can cause you to lose control. Protect others in the work area from debris such as chips and sparks. Provide barriers or shields as needed. Personal Safety 1. Stay alert.
. Check for misalignment or binding of moving parts, breakage of parts, and any other condition that may affect the tool’s operation. If damaged, have the tool serviced before using. Many accidents are caused by poorly maintained tools. 5. Use only accessories that are recommended by the manufacturer for your model. Accessories that may be suitable for one tool may become hazardous when used on another tool. Service 1. Tool service must be performed only by qualified repair personnel.
9. Always examine the Winch for structural cracks, bends, damage, frayed Cable, and any other condition that may affect the safe operation of the tool. Do not use the Winch even if minor damage appears. 10. Always keep hands and fingers away from the Gears, Drum, Cable, and all other moving parts when applying or releasing a load. Remain clear of the Cable when pulling a load. Do not stand in line with the Cable, as it can whip violently should it break.
22. WARNING! This Winch is designed for outdoor use only. Do not operate the Winch in a closed area or in a poorly ventilated area. When running, the engine of the vehicle product produces carbon monoxide, a colorless, odorless, toxic gas that, when inhaled, can cause serious personal injury or death. 23. WARNING! People with pacemakers should consult their physician(s) before use. Electromagnetic fields in close proximity to a heart pacemaker could cause pacemaker interference or pacemaker failure. 24.
5/16” MOUNTING HOLE NUT (25) LOCK WASHER (25) 5/16” MOUNTING HOLE BOLT (25) WASHER (25) FIGURE A 5/16” MOUNTING HOLE 5/16” MOUNTING HOLE 3. Place the Mounting Base (3) of the Winch on the desired mounting location. Using the four 5/16” diameter mounting holes in the Mounting Base as a template, mark and drill four 5/16” mounting holes in the mounting location. (See Figure A.) 4.
RED/POSITIVE (+) POWER CABLE (26) FIGURE B VEHICLE BATTERY (NOT INCLUDED) BLACK/NEGATIVE (--) POWER CABLE (26) OPERATING INSTRUCTIONS WARNING! The remote control operates by radio frequency. The receiver has a delay to avoid signal interference. When the winch is operating (either IN or OUT), it will continue to run for 1 to 2 seconds after the remote button is released. 1. Place the vehicle’s transmission in “NEUTRAL”.
WIRE CABLE (22) FIGURE C “POWER OUT” FIGURE D “POWER IN” FREEWHEEL KNOB (1) (DISENGAGED) CLEVIS HOOK (22) HOOK STRAP (24) 6. REMOTE TRANSMITTER (23) Point the Remote Transmitter (23) toward the Winch, and press the “POWER OUT” button on the Transmitter. Then pull out the Wire Cable to the desired length. Make sure to leave at least five turns of Wire Cable on the Drum (5) to prevent pulling the Cable completely out of the Winch.
break it can suddenly whip back towards the Winch, causing a hazard for anyone in the area. Always stand well to the side while winching. “POWER IN” FIGURE F “POWER OUT” FIGURE G FREEWHEEL KNOB (1) (ENGAGED) REMOTE TRANSMITTER (23) 10. Stand clear and, when it is safe to do so, use the “POWER IN” button on the Remote Transmitter (23) to retract the Wire Cable (22) and winch the object as desired. (See Figure G.) 11. When finished winching, loosen the Wire Cable (22).
FIGURE H BATTERY REMOTE TRANSMITTER (23) 5. To replace the Battery in the Remote Transmitter (23): Unscrew and remove the Philips Head Screw located on the back of the Transmitter. Then remove the front of the Transmitter casing to expose the Battery. Remove the old Battery and replace with a new Battery, making sure to match the Battery’s positive and negative poles with the positive and negative poles shown on the interior of the Transmitter.
TROUBLESHOOTING Problem Motor will not operate, or runs in one direction only. Possible Cause Possible Solution 1. Have a qualified service technician replace switch. 2. Check for broken wires or bad connections. 3. Have a qualified service technician replace motor. Motor runs extremely hot. 1. Too long a period of operation. 1. Discontinue use, and allow motor to cool. 2. Damaged motor. 2. Have a qualified service technician replace motor. Motor runs, but with 1. Weak vehicle battery. 1.
PARTS LIST & ASSEMBLY DIAGRAM Part 1 2 3 4 5 6 7 8 9 10 11 12 13 14 15 16 17 18 19 20 21 22 Description Freewheel Knob Assy. Nut (M6) Mounting Base Tie Rod Drum Assy. Set Screw (M5 x 6) Screw (M6 x 16) Core Rod Spring Screw (STPH M4 x 12) Splined Shaft Drum Support Plate Drive Gear Gear Plate Planetary Gear Gear Rod Drive Gear Ring Mounting Plate Hex Nut (M8) Roller Fairlead Bolt (M8 x 25) Wire Cable w/Clevis Hook Assy.
Limited 1 year / 90 Day warranty Harbor Freight Tools Co. makes every effort to assure that its products meet high quality and durability standards, and warrants to the original purchaser that for a period of ninety days from date of purchase that the engine/motor, the belts (if so equipped), and the blades (if so equipped) are free of defects in materials and workmanship.