
Specifications


Page 7
SKU 95912
For technical questions, please call 1-800-444-3353.
5/16”
MOUNTING
HOLE
5/16”
MOUNTING
HOLE
5/16”
MOUNTING
HOLE
NUT (25)
WASHER
(25)
LOCK
WASHER
(25)
5/16”
MOUNTING
HOLE
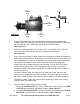
FIGURE A
BOLT (25)
3. Place the Mounting Base (3) of the Winch on the desired mounting location.
Using the four 5/16” diameter mounting holes in the Mounting Base as a template,
mark and drill four 5/16” mounting holes in the mounting location.
(See Figure A.)
Use the four Mounting Bolts (25), Washers (25), Lock Washers (25), and Nuts 4.
(25) to securely attach the Winch to the desired mounting location.
(See Figure A.)
Plan a route for the Winch’s Power Cables (26) to the point of where the Cables will 5.
be connected to the vehicle’s 12 volt battery. The route should be secure, out of the
way of moving parts, hot parts, road debris, or any or maintenance of the vehicle.
For example, the Cables may be routed under the vehicle, attaching them
to the frame using suitable fasteners (not included). Do not attach the Cables
to the exhaust system, drive shaft, emergency brake, fuel line, or any other
components which may create damage to the Cables through heat or motion, or
create a fire hazard.
If a hole is drilled through the bumper or any other part of the vehicle, make
sure to install a rubber grommet (not included) in the hole to prevent fraying of
the Cables. When drilling, make sure no wires or cables are in the drilling path.
The Winch’s Power Cables (26) should not be drawn taut. Make sure to leave
slack for some Cable movement.
Once the Power Cables (26) have been routed.
Attach the f. RED/POSITIVE (+) Power Cable (26) of the Winch to the RED/
POSITIVE (+) terminal on the vehicle’s battery. (See Figure B.)
Attach the g. BLACK/NEGATIVE (--) Power Cable (26) of the Winch to the BLACK/
NEGATIVE (--) terminal on the vehicle’s battery. (See Figure B.)
6.