
Owner`s manual


Item 99857 For technical questions, please call 1-888-866-5797. Page 11
2. Never “Jump” or attempt to start the
vehicle while the Battery Charger is
plugged in.
3. Do not attempt to charge a damaged
or “dead” battery with this tool. This
charger is designed to “top off” and
maintain vehicle batteries at or
near 12 VDC. Attempting to charge
damaged or discharged batteries with
this tool may cause the battery or the
charger to overheat, possibly causing
damage or explosion.
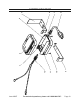
4. Plug your extension cord into the
Power Cable (8). Plug the extension
cord into a GFCI protected 120 VAC
outlet.
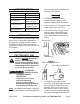
LED
Color
Meaning
Green Charger is plugged in.
Yellow
Charger is charging battery. Turns off after
battery is charged.
Red
Cannot charge. Battery voltage too low or
battery is not connected properly. Charger
cannot charge batteries with less than 9V.
5. Observe the LED lights on the
charger to determine the operational
status of the circuit and the charger.
6. Periodically check the Battery
Charger during operation to be sure it
does not overheat.
7. Before starting or operating the
vehicle, unplug and put away the
extension cord.
MAINTENANCE AND
SERVICING
Procedures not specifically
explained in this manual
must be performed only by a
qualified technician.
TO PREVENT
SERIOUS INJURY
FROM TOOL FAILURE:
Do not use damaged
equipment. If abnormal heat
occurs, or Charger overheats,
have the problem corrected
before further use.
Cleaning and Maintenance.
1. BEFORE EACH USE, inspect the
general condition of the Charger.
Check for loose screws, misalignment
or binding of moving parts, cracked
or broken parts, damaged electrical
wiring, and any other condition that
may affect its safe operation.
2. AFTER USE, clean external surfaces
of the tool with clean cloth.
3. WARNING! If the supply cord of
this Battery Charger is damaged,
it must be replaced only by a
qualified service technician.