
Owner`s manual


Item 99857 For technical questions, please call 1-888-866-5797. Page 8
SPECIFICATIONS
Electrical Requirements 120 VAC / 60 Hz
Output Voltage 12 VDC / 1.5 Amps
Charging Method 3-Stage trickle charge
Status Indicators
Red, Yellow and
Green LED lights
Overload Protection
On / Off trickle
charging with Thermal
Overload Protection
Additional Protection
Short Circuit and
Polarity Protection
UNPACKING
When unpacking, check to make sure
that the item is intact and undamaged. If
any parts are missing or broken, please
call Harbor Freight Tools at the number
shown on the cover of this manual as soon
as possible.
INSTRUCTIONS FOR
PUTTING INTO USE
Read the ENTIRE IMPORTANT
SAFETY INFORMATION
section at the beginning of this
manual including all text under
subheadings therein before set
up or use of this product.
TO PREVENT
SERIOUS INJURY
FROM ACCIDENTAL
OPERATION:
Unplug the tool from its
electrical outlet and
disconnect from battery
before assembling or making
any adjustments to the tool.
Note: For additional information regarding
the parts listed in the following pages,
refer to the Assembly Diagram near
the end of this manual.
Mounting
1. The Battery Charger must be
mounted near the battery in the
engine compartment of the vehicle.
2. Leave at least 2-½” clearance in front
of the Output Wires (12) Plug.
3. You can mount the Charger on the
vehicle engine compartment wall
near the battery, or you can mount
it on a bracket held in place by the
battery.
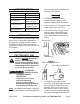
4.
Bracket A (9)
Bracket B (6)
Front View with Brackets
Side View with Brackets
For Engine Compartment Wall
mounting, mark and predrill wall using
Bracket A (9) or Bracket B (6) as a
template. See Figure 1 above. Be
sure that there are no wires, hoses
or other components behind the wall
that will be damaged by drilling. Use