
User Manual


Wireless Keyboard + Mouse Kits User’s Manual
- 1 -
¦
¦
Getting Started
Thank you for choosing this 2.4G Wireless keyboard and Mouse Kits. It operates with digital radio technology to ensure
no hinder communication between the keyboard, the mouse and your computer without connecting cable.
The transmission and receiving of keyboard and mouse are free from angle restriction.
Features
● Complies with Directive 1995/5/EC of the European Parliament and Commission.
● Complies with the mutual recognition of conformity 1999 for radio and telecommunications Equipment.
● Manufactured with environmental friendly recycled materials.
● Fully compliant with original USB version 2.0 and HID Version 1.11.
Preparing Keyboard, mouse and receiver
Before working with your new keyboard and mouse, look at the "Hardware Installation", and take a few one-time
preparations.
Hardware Installation
● Place the receiver at least 20 cm from other electrical devices (e.g. monitor) to achieve optimum performance.
● The distance between the keyboard, mouse and receiver should not exceed 10 M.
● Do not place the receiver on metal surfaces.
● Do not move optical mouse on following surface -
Glass or any transparent materials
Dark surface
Mirror or reflecting surface
Mouse pad with too many colors
Rough surface.
Step 1: Connect the receiver
● Plug the dongle connector into an USB port.
● SYSTEM will take around 10 sec to find your keyboard and mouse automatically.
Step 2: Insert batteries
Inserting batteries in mouse
The mouse requires two alkaline AA batteries.
● Remove the battery compartment cover on the bottom of the mouse
● First push the battery puller in then insert two AA batteries into battery compartment.
● Fix the battery compartment cover ¦ on the bottom of mouse again.
CAUTION: Risk of explosion if battery is replaced by an incorrect type. Dispose of used batteries according to instructions.
Refer to "Important Battery Information" for disposal instructions.
Inserting batteries in keyboard
The keyboard requires two alkaline batteries (AAA).
● Remove the battery compartment cover ¦ on the bottom of the keyboard by pushing
it in the direction of arrow.
● Insert two AAA batteries.
The illustration in the battery compartment § shows how to insert the batteries properly.
● Recover the battery compartment by pushing the locking lug § under the battery compartment.
Software Installation for Displaying Modes
This software supports Windows 2000/XP/Vista/Windows 7.
Install the software to display keyboard and mouse modes:
● Start the computer and insert the CD ROM.
● Start the "Setup "program from the CD ROM and follow the instruction on the screen.
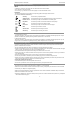
Once you have installed the software, the following symbols will display on Windows taskbar.
The symbol is green when the respective mode is activated and light grey when it is deactivated.
Uppercase mode (Caps Lock)
Virtual numeric keypad (Num Lock)
Stop screen output (Scroll Lock)
Keyboard battery low indicator
Mouse battery low indicator
§