INSTALLATION INSTRUCTIONS All-in-One System Spanish Product Description German Product Description Portuguese Product Description Italian Product Description Dutch Product Description French Product Description AN1 Series
AN1 Series Installation Instructions DISCLAIMER Milestone AV Technologies and its affiliated corporations and subsidiaries (collectively "Milestone"), intend to make this manual accurate and complete. However, Milestone makes no claim that the information contained herein covers all details, conditions or variations, nor does it provide for every possible contingency in connection with the installation or use of this product.
Installation Instructions AN1 Series DIMENSIONS DIMENSIONS: INCHES [MILLIMETERS] 3
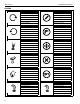
AN1 Series Installation Instructions LEGEND 4 Tighten Fastener Pencil Mark Apretar elemento de fijación Marcar con lápiz Befestigungsteil festziehen Stiftmarkierung Apertar fixador Marcar com lápis Serrare il fissaggio Segno a matita Bevestiging vastdraaien Potloodmerkteken Serrez les fixations Marquage au crayon Loosen Fastener Drill Hole Aflojar elemento de fijación Perforar Befestigungsteil lösen Bohrloch Desapertar fixador Fazer furo Allentare il fissaggio Praticare un foro B
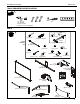
Installation Instructions AN1 Series TOOLS REQUIRED FOR INSTALLATION 1/8" (wood) 1/2" (drywall) 8mm (concrete) 6mm (concrete - AF6 toggler) #2 7/16" PARTS A (4) 1/4 x 2-1/2" Install Hardware Kit B (4) Hilti Hud-L #8 x 60 D (4) 1/4" C (4) 1/4-20 x 1-3/4" E (4) 1/4-20 [Toggler anchor kit] F (8) [4" cable tie] G (4) 10-24 x 3/8" K (8) #8 x 1/2" H (6) 10-24 x 3/8" J (4) M4 x 10mm N (2) #4-24 x 1/4" L (6) #8-9 x 1-1/2" M (6) Toggler AF6 P (6) [Screen bracket] Q (4) 10-24 x 1/2" T (1) [Project
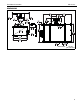
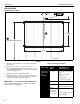
AN1 Series Installation Instructions INSTALLATION Determining Location 2.75” 3 5 CENTER OF SCREEN 6.50” 2 1 2 46.00” HEIGHT FROM FLOOR STUDS 73.00” FLOOR Figure 1 1. Determine desired height of screen (measured from floor). (See Figure 1) 2. Determine desired center of screen. (See Figure 1) 3. Measure 6.5 inches up from desired height (top) of screen and 2.75 inches to the right of center of screen and mark location. (See Figure 1) 4. Determine location of studs behind drywall. 5.
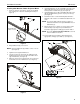
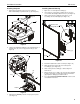
Installation Instructions AN1 Series Installing Wall Bracket / Boom Projector Mount 1. Install one fastener (See Table 1) into previously drilled hole, leaving 1/2" of fastener extending from wall. (See Figure 2) 1 x1 6. Install and tighten two 10-24 x 3/8" Phillips cap head screws (H) through upper arm of boom projector mount (V) into vertical portion of wall bracket (S). (See Figure 4) 7.
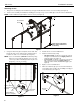
AN1 Series Installation Instructions Attaching Screen 1. Hang screen assembly (R) onto wall bracket (S) using pre-installed bracket on back of screen assembly. (See Figure 5) 2. Center screen assembly on wall bracket, matching pieces of tape on top of screen with edges of boom mount on wall bracket. NOTE: Notch in wall bracket (S) indicates center of screen. (See Figure 2) (R) Pre-installed bracket Tape locations (S) 1 1 (View shown from behind wall to which wall bracket is attached) Figure 5 3.
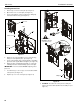
Installation Instructions AN1 Series Installing Projector Installing Control Housing 1. 1. Open door on control panel assembly (U). 2. Insert edges of control panel assembly (U) into groove in screen frame, with tab placed behind screen. (See Figure 10) 3. Slide control panel assembly up along side of screen assembly to the desired height. (See Figure 10) Attach projector interface (T) to projector using four M4 x 10mm Phillips cap head screws (J).
AN1 Series Installation Instructions Installing Control Pad 1. Remove top cover from control pad. (See Figure 11) 2. Open lower cover on control pad. (See Figure 11) 3. Insert control pad into control housing (U) by sliding it up under tabs inside housing. (See Figure 11) 4 Bosses 25 Top cover 1 Tabs 2 (U) 5 (N) x 2 Lower cover Connect cables BEFORE replacing control pad cover. 3 6 7 Cable tie anchors Control pad 8 Figure 11 4.
Installation Instructions AN1 Series Projector Adjustments 2 Yaw Adjustment 1. Loosen yaw adjustment locking screw using a #2 Phillips screwdriver. (See Figure 13) 2. Turn yaw micro-adjustment screw right or left using a #2 Phillips screwdriver until image is properly aligned on target. 3. Tighten yaw adjustment locking screw using a #2 Phillips screwdriver. (See Figure 13) 1 3 Figure 14 Roll Adjustment 1 3 1. Loosen roll adjustment locking screw using a #2 Phillips screwdriver.
AN1 Series Installation Instructions Micro Adjustment 1. If required, turn the micro adjust fastener clockwise to extend projector further from wall. (See Figure 16) 2. If required, turn the micro adjust fastener counterclockwise to retract projector closer to wall. (Y) (Z) 2 1 Extend 2 Retract (BB) 1 Bracket placed on outside edge of brace Left brace 1 (H) x 2 2 Right brace Figure 18 Figure 16 Attaching Marker Tray 1.
Installation Instructions AN1 Series FASTENER INSTALLATION METHODS Steel stud (if present) NOTE: Refer to Table 1 for appropriate hardware and pilot hole sizes for various wall types. 4 Drywall Steel Stud / Drywall 1. Plastic cap Hold metal channel on anchor (E) flat alongside plastic straps and slide channel through hole. (See Figure 20) Drywall Plastic straps Plastic straps 1 Anchor metal channel (side view) Figure 22 (E) 5. Line up anchor with attachment point. 6.
AN1 Series Installation Instructions Concrete NOTE: Refer to Table 1 for appropriate hardware and pilot hole sizes for various wall types. 1. Install an anchor (B) into each pilot hole using a hammer, making sure that the anchor is flush with the wall. 2. Use one 1/4 x 2-1/2" lag bolt (A) through product into each anchor in wall.
Installation Instructions AN1 Series 15
AN1 Series Installation Instructions USA/International Europe Chief, a products division of Milestone AV Technologies 8800-002469 Rev01 2014 Milestone AV Technologies www.chiefmfg.com 02/14 Asia Pacific A P F A P F A 6436 City West Parkway, Eden Prairie, MN 55344 800.582.6480 / 952.225.6000 877.894.6918 / 952.894.6918 Franklinstraat 14, 6003 DK Weert, Netherlands +31 (0) 495 580 852 +31 (0) 495 580 845 Office No.