
Installation instructions


Installation Instructions FCA650/651
7
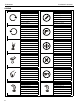
9. Use 5/32" security hex key (H) to remove two security
screws holding side panel to CPU holder (A). (See Figure 4)
10. Slide side panel up to remove it from CPU holder. (See
Figure 4)
Figure 4
11. Use four 5/16-18 x 1/2" button head cap screws (D) to
secure CPU holder (A) to adapter bracket (B). (See
Figure 5)
Figure 5
12. Install CPU to CPU holder.
WARNING: Exceeding the weight capacity can result in
serious personal injury or damage to equipment! It is the
installer’s responsibility to make sure the combined weight of
all components located within the CPU holder does not
exceed 25 lbs (11.34 kg) for the FCA650 or 10 lbs (4.5 kg) for
the FCA651.
13. Replace side panel back into its original position on CPU
holder (A). (See Figure 6)
14. Use security screws (removed in Step 9) to reattach side
panel to CPU holder (A). (See Figure 6)
15. (Optional) Use padlock (not provided) to provide further
security to CPU holder. (See Figure 6)
Figure 6
16. Reinstall back cover to cart/stand.
17. Reinstall inner column cover to cart/stand.
Adjustments
Height Adjustment
1. Remove side panel and CPU from CPU holder (A).
2. Loosen set screw (F). (See Figure 7)
3. Loosen two button head cap screws (E). (See Figure 7)
4. Adjust height as desired.
5. Tighten two button head cap screws (E). (See Figure 7)
6. Reinstall CPU and side panel to CPU holder.
Figure 7
9
side panel
(A)
10
10
(B)
11
(D) x 4
(A)
14
15
13
13
2
3 5
4