INSTALLATION INSTRUCTIONS Instrucciones de instalación Installationsanleitung Instruções de Instalação Istruzioni di installazione Installatie-instructies Instructions d´installation Direct Attach Ceiling Mount Spanish Product Description German Product Description Portuguese Product Description Italian Product Description Dutch Product Description French Product Description FHS110/ FHSV
FHS110/ FHSV Installation Instructions DISCLAIMER CSAV, Inc., and its affiliated corporations and subsidiaries (collectively, "CSAV"), intend to make this manual accurate and complete. However, CSAV makes no claim that the information contained herein covers all details, conditions or variations, nor does it provide for every possible contingency in connection with the installation or use of this product.
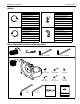
Installation Instructions FHS110/ FHSV LEGEND Tighten Fastener Phillips Screwdriver Apretar elemento de fijación Destornillador Phillips Befestigungsteil festziehen Kreuzschlitzschraubendreher Apertar fixador Chave de fendas Phillips Serrare il fissaggio Cacciavite a stella Bevestiging vastdraaien Kruiskopschroevendraaier Serrez les fixations Tournevis à pointe cruciforme Сожмите Застежку Отвертка Loosen Fastener Hex-Head Wrench Aflojar elemento de fijación Llave de cabeza hexagonal Be
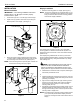
FHS110/ FHSV Installation Instructions INSTALLATION Display Installation 1. Mount Installation IMPORTANT ! : The following installation instructions assume that a 1 1/2" NPT pipe has been properly installed and is in place. 1. Thread mount (A) onto 1 1/2" NPT pipe until hand tight. 2. Adjust mount (A) position until Centris cup is facing the desired position of the display. (See Figure 1) Determine mounting pattern on display.
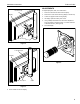
Installation Instructions FHS110/ FHSV ADJUSTMENTS To adjust display Roll, Pitch, and YAW tension: 1 1/2" NPT Pipe Display 3 1. Disconnect all wires and cable from the display. 2. Remove two Lower screws securing display to Centris cup. 3. Loosen two Upper screws securing display. 4. Lift display upward and away from mount. 5. Using a Phillips screwdriver turn the tension adjustment screw clockwise to increase tension, or counter-clockwise to decrease tension. (See Figure 6) 6.
FHS110/ FHSV 6 Installation Instructions
Installation Instructions FHS110/ FHSV 7
FHS110/ FHSV Installation Instructions USA/International Europe Asia Pacific 8805-000219 ©2007 Chief Manufacturing www.chiefmfg.com 01/07 A P F A P F A 8401 Eagle Creek Parkway, Savage, MN 55378 800.582.6480 / 952.894.6280 877.894.6918 / 952.894.6918 Fellenoord 130 5611 ZB EINDHOVEN, The Netherlands +31 40 2668620 +31 (0) 40 2668615 Room 30I, Block D, Lily YinDu International Building LuoGang, BuJi Town, Shenzhen, CHINA.