
Installation instructions


Installation Instructions K1 Series
11
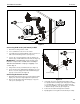
Figure 9
(F) x 2
(E)
(G) x 2
3
4
5
set screw
6
side view
Connecting K1W Series (wall mount) to Wall
1. Determine mounting location on wall.
2. Use a stud finder to locate 2" x 4" wood stud.
3. Use wall bracket to mark and drill two 3/16 x 2 1/2" holes in
wall at desired mounting location. (See Figure 9)
4. Use two 1/4-2 1/2" hex head lag screws (F) and two 1/4"
washers (G) to install wall bracket onto wall. (See Figure 9)
IMPORTANT ! : Overtightening screws (F) may cause
bracket to compress into soft wall surface resulting in
difficult mount installation or improper engaging of set
screw in Step 6.
5. Hang monitor arm (A) over wall bracket. (See Figure 9)
6. Secure monitor arm to wall bracket by tightening set screw.
Ensure set screw engages back side of wall bracket (E) to
properly secure mount. (See Figure 9)
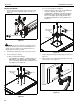
Connecting K1P Series to Pole
1. Determine approximate location for mount keeping in mind
display size, extension, height adjustment requirements.
2. Place mount (A) against pole with clamp (H) on opposite
side of pole. (See Figure 10)
Figure 10
3. Using 5/32" hex key (L) and appropriate length screws,
loosely attach K1P assembly to pole clamp (H). If installing
to 1 1/2" NPT pipe, use 1/4-20 x 1 1/2" button head cap
screws (J). If installing to 1 1/2" diameter pipe, use 1/4-20 x
1" button head cap screws (K). (See Figure 10)
4. Position mount at desired height and orientation.
5. Equally tighten screws against mount and the pole clamp.
3
(J or K) x 4
(H)
K1P assembly