
Installation instructions


LVM Series Installation Instructions
10
Assembly And Installation
Cart Assembly
LVM2X2U/LVM3X1UP/LVM2X2UP/LVM3X2UP
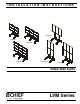
1. Lay two cart array columns (M) down on a flat surface.
2. Use eight 5/16-18 x 2 1/2" button head cap screws (EE) and
eight 5/16" washers (JJ) to connect cross bar (J) to columns
(M). (See Figure 1)
Figure 1
3. Use four 5/16-18 x 1/2" button head cap screws (LL) to
attach two end brackets (R) or (R2) to cross bar (J). (See
Figure 1)
NOTE: Custom end brackets (R2) are used for LVM3X1UP
and LVM3X2UP models only for additional support.
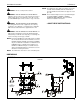
4. Use four 5/16-18 x 5" button head cap screws (GG), four
5/16" washers (JJ) (not for LVM3X1UP and LVM3X2UP
models) and four 5/16-18" lock nuts (NN) to secure right and
left legs (CC and DD) to cross bar (J). (See Figure 2)
NOTE: To ensure right and left legs (CC and DD) are
assembled on the appropriate side, make sure the
smooth side of the legs are to the outside when
assembling to cross bar (J).
5. Stand cart up on its wheels.
6. Proceed to Install Rails Section.
Figure 2
LVM3X2U/LVM3X3U
1. Lay two cart array columns (M) down on a flat surface.
2. Use eight 5/16-18 x 2 1/2" button head cap screws (EE) and
eight 5/16" washers (JJ) to connect two cross bars (J) to
columns (M). (See Figure 3)
3. Use four 5/16-18 x 1/2" button head cap screws (LL) to
attach two end brackets (R) to cross bars (J). (See Figure 3)
Figure 3
4. Use four 5/16-18 x 1" button head cap screws (MM) to
attach two extender brackets (W) to the other ends of cross
bars. (J). (See Figure 3)
3
2
(EE) x 8
(JJ) x 8
(J)
(M) x 2
(LL) x 4
(R) or (R2) x 2
4
(NN) x 4
(CC)
(DD)
(JJ) x 4*
(GG) x 4
4
*washers not used with
LVM3X1UP or LVM3X2 models
(M) x 2
2
(EE) x 8
(JJ) x 8
(J) x 2
(LL) x 4
(R) x 2
3
(W) x 2
4
(MM) x 4