INSTALLATION INSTRUCTIONS Knockdown Racks Spanish Product Description German Product Description Portuguese Product Description Italian Product Description Dutch Product Description French Product Description NS1F12-20-28-36-41
NS1F12-20-28-36-41 Installation Instructions DISCLAIMER Milestone AV Technologies and its affiliated corporations and subsidiaries (collectively "Milestone"), intend to make this manual accurate and complete. However, Milestone makes no claim that the information contained herein covers all details, conditions or variations, nor does it provide for every possible contingency in connection with the installation or use of this product.
Installation Instructions NS1F12-20-28-36-41 DIMENSIONS MODEL WEIGHT CAPACITY LBS (KG) RACKING HEIGHT UNITS OVERALL DEPTH (A) IN (MM) USABLE DEPTH (B) IN (MM) WIDTH (C) IN (MM) HEIGHT (D) IN (MM) HEIGHT W/CASTERS (E) IN (MM) HEIGHT W/MIN. LEVELER (F) IN (MM) NS1F1223 500 LBS (226.8) 12 23 (584.2) 22.6 (574.0) 19.25 (489.0) 28.4 (720.3) 29.2 (742.4) 29.1 (741.7) NS1F2023 500 LBS (226.8) 20 23 (584.2) 22.6 (574.0) 19.25 (489.0) 42.4 (1077) 43.2 (1097.3) 43.1 (1094.
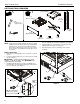
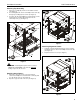
NS1F12-20-28-36-41 Installation Instructions PARTS AND TOOLS REQUIRED B (1) [Top assembly] A (1) [Base assembly] C (2) [Rack rail, left] • 7/16" • 13mm (use to adjust levelers) D (2) [Rack rail, right] E (2) [Cross brace] F (2) [Alignment panel] #2 G (24) 10-32 x 3/4" ASSEMBLY 4. Install two 10-32 x 3/4" Phillips head screws (G) through base assembly (A) into rack rail (C) and tighten. (See Figure 2) 5. Tighten Phillips truss head machine screw (H) which was partially installed in Step 3.
Installation Instructions NS1F12-20-28-36-41 Attaching Top Assembly 1. 2. 3. Place top assembly (B) onto the four installed rack rails. (See Figure 3) Insert and tighten two 10-32 x 3/4" Phillips head screws (G) through top assembly (B) into rack rail. (See Figure 3) (H) x 4 2 Insert two 1/4-20 x 5/8" Phillips truss head machine screws (H) through top assembly (B) and rail rack, into two 1/4-20 keps nuts (J).
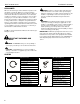
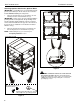
NS1F12-20-28-36-41 Installation Instructions Attaching Optional Side Panels, Optional Doors IMPORTANT ! : If installing doors (not included) and side panels (not included) on an S1 rack, the doors must be installed before installing the side panels. 1. If desired, add optional door(s) (not included) to the rack following instructions included with the door(s).
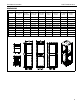
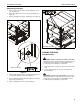
Installation Instructions NS1F12-20-28-36-41 Completing Installation 1. Remove and save 1/4" nut from the grounding lug on rack rail. (See Figure 8) 2. Attach grounding wire from door to the grounding lug. (See Figure 8) 3. Replace and tighten nut onto grounding lug. (See Figure 8) 6 4 logo panel (front view of rack) Figure 9 LOADING THE RACK Load Distribution CAUTION: BEGIN PLACEMENT OF LOAD AT BOTTOM OF RACK! Load rack, moving from bottom toward top of rack.
NS1F12-20-28-36-41 Installation Instructions USA/International Europe Chief Manufacturing, a products division of Milestone AV Technologies 8800-002167 Rev00 2012 Milestone AV Technologies, a Duchossois Group Company www.chiefmfg.com 04/12 Asia Pacific A P F A P F A 6436 City West Parkway, Eden Prairie, MN 55344 800.582.6480 / 952.225.6000 877.894.6918 / 952.894.6918 Franklinstraat 14, 6003 DK Weert, Netherlands +31 (0) 495 580 852 +31 (0) 495 580 845 Office No.