
Manual


PAC730A/B/C Installation Instructions
6
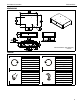
3. Remove and save four button head cap screws from top of
cart or stand column. (See Figure 3)
4. Place upper bracket with PAC730 onto top of cart or stand
column. (See Figure 3)
5. Fasten PAC730 to cart or stand using four button head cap
screws removed in Step 3. (See Figure 3)
Figure 3
6. Re-attach display to faceplate following installation
instructions included with cart or stand.
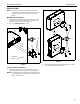
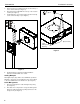
Adding Bumpers
Add eight bumpers (G) to fill the unused PEM nuts (inside the
PAC730) to protect the stored equipment. They can be added
to the unused PEM nuts in the circled areas. (See Figure 4)
Cable Management
1. Place hole plug (D) into 2" cable management opening.
(See Figure 4)
2. Run cables from components in storage shelf through the
plug in the cable management opening at the back of the
storage shelf. (See Figure 4)
Figure 4
4
Cart/Stand
Column
(A)
Faceplate
5
x 4
4
3
(G) x 8
[Bottom View]
Cable
Management
Opening