INSTALLATION INSTRUCTIONS Instrucciones de instalación Installationsanleitung Instruções de Instalação Istruzioni di installazione Installatie-instructies Instructions d´installation IN-WALL ENCLOSURE FRAMING KIT PACHFK1
PACHFK1 Installation Instructions DISCLAIMER Milestone AV Technologies, Inc., and its affiliated corporations and subsidiaries (collectively, "Milestone"), intend to make this manual accurate and complete. However, Milestone makes no claim that the information contained herein covers all details, conditions or variations, nor does it provide for every possible contingency in connection with the installation or use of this product.
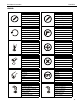
Installation Instructions PACHFK1 LEGEND Tighten Fastener Pencil Mark Apretar elemento de fijación Marcar con lápiz Befestigungsteil festziehen Stiftmarkierung Apertar fixador Marcar com lápis Serrare il fissaggio Segno a matita Bevestiging vastdraaien Potloodmerkteken Serrez les fixations Marquage au crayon Loosen Fastener Drill Hole Aflojar elemento de fijación Perforar Befestigungsteil lösen Bohrloch Desapertar fixador Fazer furo Allentare il fissaggio Praticare un foro Bevestig
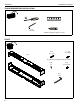
PACHFK1 Installation Instructions TOOLS REQUIRED FOR INSTALLATION 3/16" (Included) M4 Allen Head Bit provided but not shown PARTS C (16) M7 x 40mm B (4) 08 x 1-1/2" A (2) D (1) (M4 Allen Head Bit provided but not shown) F (8) 5/16-18 x 5/8" E (8) 1/4" G (1) 3/16 4
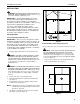
Installation Instructions PACHFK1 INSTALLATION Wood Studs WARNING: IMPROPER INSTALLATION CAN RESULT IN DEATH OR SERIOUS PERSONAL INJURY! This accessory should be installed by qualified personnel. IMPORTANT ! : The following installation procedure assumes that a Chief PAC501 In-Wall Enclosure has been purchased and is available for use during this procedure.
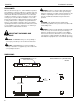
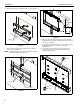
PACHFK1 2. Installation Instructions Orient brackets (A) as shown in figure below. (See Figure 3) Front Flange On Bracket 2 Drywall Figure 5 (A) x 2 4. Make sure upper and lower brackets are level and there is a minimum of 20.375" between them at bracket centers and at both ends of brackets. 5. Secure upper and lower brackets to center studs using four Phillips flat head wood screws (B) at center studs. (See Figure 6) 6.
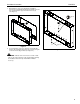
Installation Instructions 7. PACHFK1 Orient PAC-501 enclosure following the installation instructions provided with the PAC-501 and slide enclosure into opening between upper and lower brackets (A). (See Figure 7) (F) x 8 8 7 (F) x 8 (E) x 8 Figure 7 8. Secure PAC-501 enclosure to brackets using eight flat washers (E) and eight button head cap screws (F) using the 3/16" hex wrench (G) provided.
PACHFK1 Installation Instructions USA/International Europe Asia Pacific 8805-000247 2008 Chief Manufacturing www.chiefmfg.com 1/08 A P F A P F A 8401 Eagle Creek Parkway, Savage, MN 55378 800.582.6480 / 952.894.6280 877.894.6918 / 952.894.6918 Fellenoord 130 5611 ZB EINDHOVEN, The Netherlands +31 (0)40 2668620 +31 (0)40 2668615 Room 24F, Block D, Lily YinDu International Building LuoGang, BuJi Town, Shenzhen, CHINA.