INSTALLATION INSTRUCTIONS Confidence Carts MFM, PFM, MFQ, PFQ
MFM, PFM, MFQ, PFQ Installation Instructions DISCLAIMER CSAV, Inc., and its affiliated corporations and subsidiaries (collectively, "CSAV"), intend to make this manual accurate and complete. However, CSAV makes no claim that the information contained herein covers all details, conditions or variations, nor does it provide for every possible contingency in connection with the installation or use of this product.
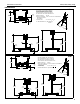
Installation Instructions MFM, PFM, MFQ, PFQ DIMENSIONS [918] 36-1/8” NOTE: CUSTOM INTERFACE BRACKET NOT SHOWN. THE CUSTOM INTERFACE BRACKET NEEDED FOR YOUR DISPLAY WILL ADD BETWEEN ½”AND 2” IN DEPTH AND MAY AFFECT LOCATION OF DISPLAY ON THE MOUNT. SEE PSBU DRAWING ALSO.
MFM, PFM, MFQ, PFQ Installation Instructions DIMENSIONS [918] 36-1/8” MFQ NOTE: CUSTOM INTERFACE BRACKET NOT SHOWN. THE CUSTOM INTERFACE BRACKET NEEDED FOR YOUR DISPLAY WILL ADD BETWEEN ½”AND 2” IN DEPTH AND MAY AFFECT LOCATION OF DISPLAY ON THE MOUNT. SEE PSBU DRAWING ALSO.
Installation Instructions MFM, PFM, MFQ, PFQ LEGEND Tighten Fastener Pencil Mark Apretar elemento de fijación Marcar con lápiz Befestigungsteil festziehen Stiftmarkierung Apertar fixador Marcar com lápis Serrare il fissaggio Segno a matita Bevestiging vastdraaien Potloodmerkteken Serrez les fixations Marquage au crayon Loosen Fastener Drill Hole Aflojar elemento de fijación Perforar Befestigungsteil lösen Bohrloch Desapertar fixador Fazer furo Allentare il fissaggio Praticare un for
MFM, PFM, MFQ, PFQ Installation Instructions TOOLS REQUIRED FOR INSTALLATION 3/16" (Provided) PARTS A (1) (left) B (1) (right) C (1) MFQ/PFQ Only F (2) D (1) MFM/PFM Only E (1) G (1) MFM/MFQ Only J (1) H (1) MFM/PFM PFM/PFQ Only Only K (1) 3/16" 6 L (4) N (4) M (4) 5/16-18 x 3/4" 5/16-18 x 2-3/4" 5/16-18 x 4-1/4" P (4) 5/16" Q (1) 3/16"
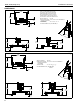
Installation Instructions MFM, PFM, MFQ, PFQ ASSEMBLY 2. Attach center post (C or D) to leg assembly using four 5/16-18 x 2-3/4" button head cap screws (M) and four 5/16" washers (P). (See Figures 2 and 3) CAUTION: Attachment holes may be damaged if a power drill is used to insert button head cap screws. Screws should first be inserted and turned BY HAND with the hex key or with a handheld screwdriver BEFORE using the hex head drill bit (Q) and power drill to complete the attachment.
MFM, PFM, MFQ, PFQ Installation Instructions Attaching Display to Cart WARNING: EXCEEDING MAXIMUM WEIGHT CAPACITY 5 MAY LEAD TO SERIOUS PERSONAL INJURY OR DAMAGE TO EQUIPMENT! It is the installer’s responsibility to ensure the total amount of weight placed on the cart does not exceed 125 lbs (56.70 kg) for the MFM and MFQ, and 200 lbs (90.72 kg) for the PFM and PFQ. WARNING: Before attaching display to cart set the brakes on the back wheels by pressing down on the tab.
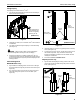
Installation Instructions MFM, PFM, MFQ, PFQ Tilting Display The display can be tilted from 15o to 45o. 1. 1 Turn knob counterclockwise on back of head assembly to loosen the tilt. (See Figure 9) 2 4 Exit for cables Place optional bolt lock display (not provided) here to lock in a midway position (30o tilt) 3 1 (Rear view of center post) (Front view of center post) (MFM Shown) Figure 9 2. Tilt display as desired, to a maximum of 45o either forward or backward. 3.
MFM, PFM, MFQ, PFQ Installation Instructions Cart Use and Maintenance CAUTION: This cart is intended for use only with the products and maximum weights indicated (125 lbs (56.70 kg) for the MFM and MFQ, and 200 lbs (90.72 kg) for the PFM and PFQ). Use with other products or products heavier than the maximum weights indicated may result in instability causing possible injury. WARNING: CART CAN TIP OVER RESULTING IN RISK OF INJURY. Do not allow children under 16 to move cart.
Installation Instructions 1 Remove bolt or padlock if used MFM, PFM, MFQ, PFQ 2 Pin in "Closed" position move to "Open" position to remove display 4 Pin in "Open" position move to "Closed" position after display is removed.
MFM, PFM, MFQ, PFQ Installation Instructions USA/International Europe Asia Pacific 8809-000042 ©2007 Chief Manufacturing www.chiefmfg.com 08/07 A P F A P F A 8401 Eagle Creek Parkway, Savage, MN 55378 800.582.6480 / 952.894.6280 877.894.6918 / 952.894.6918 Fellenoord 130 5611 ZB EINDHOVEN, The Netherlands +31 (0)40 2668620 +31 (0)40 2668615 Room 30I, Block D, Lily YinDu International Building LuoGang, BuJi Town, Shenzhen, CHINA.