INSTALLATION INSTRUCTIONS Instructions d´installation Istruzioni di installazione Installationsanleitung RPM A-C Instrucciones de instalación Installatie-instructies Instruções de Instalação RPM RPA Elite Series Projector Mount RPA Elite Series Projector Mount RPA Elite Series Projector Mount RPA Elite Series Projector Mount RPA Elite Series Projector Mount RPA Elite Series Projector Mount RPA Elite Series Projector Mount RPM and RPM A-C
RPA Elite Series Projector Mount Installation Instructions DISCLAIMER Milestone AV Technologies, and its affiliated corporations and subsidiaries (collectively, "Milestone"), intend to make this manual accurate and complete. However, Milestone makes no claim that the information contained herein covers all details, conditions or variations, nor does it provide for every possible contingency in connection with the installation or use of this product.
Installation Instructions WARNUNG: Wenn das zulässige Gewicht überschritten wird, kann dies zu schweren Körperverletzungen oder Schäden an den Geräten führen! Der Monteur ist dafür verantwortlich, dass das kombinierte Gewicht aller Komponenten, die am Modell RPM befestigt sind, nicht mehr als 22.68 kg beträgt. ADVERTÊNCIAS e AVISOS IMPORTANTES! ADVERTÊNCIA: Os alertas de ADVERTÊNCIA avisam-no para a possibilidade de ocorrência de graves lesões ou morte no caso de incumprimento das instruções.
RPA Elite Series Projector Mount Installation Instructions WAARSCHUWING: Overschrijding van het draagvermogen kan de oorzaak zijn van ernstig persoonlijk letsel en beschadiging van de apparatuur! Degene die het product installeert is ervoor verantwoordelijk dat het totale gewicht van alle componenten die aan de RPM worden bevestigd een gewicht van 22.68 kg niet overschrijdt.
Installation Instructions RPA Elite Series Projector Mount LEGEND Tighten Fastener Pencil Mark Serrez les fixations Marquage au crayon Serrare il fissaggio Segno a matita Befestigungsteil festziehen Stiftmarkierung Apretar elemento de fijación Marcar con lápiz Bevestiging vastdraaien Potloodmerkteken Apertar fixador Marcar com lápis Loosen Fastener Drill Hole Desserrez les fixations Percez un trou Allentare il fissaggio Praticare un foro Befestigungsteil lösen Bohrloch Aflojar elemen
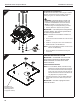
RPA Elite Series Projector Mount Installation Instructions Hammer Target of Projector Martillo Punto de enfoque del proyector Hammer Ziel des Projektors Martelo Mira do projector Martello Punto di proiezione Hamer Doel van de projector Marteau Cible du projecteur 1/4" A (1) A (1) or B (1) Example Only (Interface bracket varies dependent on projector model) 6 7/32" (6mm) dia.
Installation Instructions RPA Elite Series Projector Mount 1 RPM INSTALLATION Threaded Pipe Installation 1. Carefully determine required mounting location. IMPORTANT ! : This will require knowing the lens to screen distance. See projector specifications for details on determining this distance. 2 2. 4 Install ceiling plate and extension accessories following installation instruction provided by manufacturer.
RPA Elite Series Projector Mount Installation Instructions INSTALLATION 1a Wood Stud Installation 1. Carefully determine required mounting location. IMPORTANT ! : This will require knowing the lens to screen distance. See projector specifications for details on determining this distance. 1 WARNING: IMPROPER INSTALLATION CAN RESULT IN SERIOUS PERSONAL INJURY OR DAMAGE TO EQUIPMENT! Structural members MUST be capable of supporting five times the combined weight of all equipment being mounted.
Installation Instructions RPA Elite Series Projector Mount Concrete Installation 1b 1. Determine mounting location. WARNING: IMPROPER INSTALLATION CAN RESULT IN SERIOUS PERSONAL INJURY OR DAMAGE TO EQUIPMENT! Structural members MUST be capable of supporting five times the combined weight of all equipment being mounted. 1 2. Using the RPM as a guide, mark four mounting hole locations on ceiling using a pencil or similar tool. 3. Drill four 3/8" (10mm) dia.
RPA Elite Series Projector Mount 1c 1 Installation Instructions Threaded Rod Installation 2 The RPM can be secured to unistrut, angle or channel assembly overhead structural members (trusses or Ibeams) using four 1/4” diameter threaded rods. WARNING: IMPROPER INSTALLATION CAN RESULT IN SERIOUS PERSONAL INJURY OR DAMAGE TO EQUIPMENT! Structural members MUST be capable of supporting five times the combined weight of all equipment being mounted. 4 1. Carefully determine required mount position.
Installation Instructions 2a RPA Elite Series Projector Mount Example Only (Interface bracket varies dependent on projector model) WARNING: IMPROPER INSTALLATION CAN LEAD TO PROJECTOR FALLING RESULTING IN SERIOUS PERSONAL INJURY OR DAMAGE TO EQUIPMENT. DO NOT substitute hardware. Use only the hardware provided by the manufacturer. 1 1. Secure interface bracket to mount using installation instructions and hardware provided with interface bracket.
RPA Elite Series Projector Mount 2c Installation Instructions Example Only (Interface bracket varies dependent on projector model) Securing Projector with Interface Bracket to Model RPM Mount. WARNING: IMPROPER INSTALLATION CAN LEAD TO PROJECTOR FALLING RESULTING IN SERIOUS PERSONAL INJURY OR DAMAGE TO EQUIPMENT. Make certain mounting slots in mount base slide under thumb screws and that screws are seated in the back of slots. 1. Turn thumb nuts until tight to secure projector to mount.
Installation Instructions RPA Elite Series Projector Mount 3 Example Only (Interface bracket varies dependent on projector model) ADJUSTMENTS YAW Adjustment 1. Loosen YAW adjustment locking screw using a #2 Phillips screwdriver. 2. Turn YAW micro-adjustment screw right or left using a #2 Phillips screwdriver until image is properly aligned on target. 3. Tighten YAW adjustment locking screw using a #2 Phillips screwdriver.
RPA Elite Series Projector Mount Installation Instructions 3b Roll Adjustment 1 1. Loosen ROLL adjustment locking screw using a #2 Phillips screwdriver. 3 2. Turn ROLL micro-adjustment screw right or left using a #2 Phillips screwdriver until image is properly aligned on target. 3. Tighten ROLL adjustment locking screw using a #2 Phillips screwdriver.
Installation Instructions CHIEF RPA Elite Series Projector Mount I SANUS AUDIO VISUAL CE MANUFACTURERS DECLARATION OF CONFORMITY For Product identification: Model/type Category (description) Brand :RPM : Mounting devices, Stands and other Accessories, to be used with entertaimnent electronics :Chief CSAVInc. 8401 Eagle Creek Parkway Savage, MN 55378 Manufacturer: EU Representative: CSAVInc.
RPA Elite Series Projector Mount Installation Instructions USA/International Europe Chief Manufacturing, a products division of Milestone AV Technologies 8832-000157 Rev D ¤2009 Milestone AV Technologies, a Duchossois Group Company www.chiefmfg.com 08/09 Asia Pacific A P F A P F A 8401 Eagle Creek Parkway, Savage, MN 55378 800.582.6480 / 952.894.6280 877.894.6918 / 952.894.
INSTALLATION INSTRUCTIONS Instrucciones de instalación Installationsanleitung Instruções de Instalação SLBU Istruzioni di installazione Installatie-instructies Instructions d´installation SLMU Universal Interface Brackets Spanish Product Description German Product Description Portuguese Product Description Italian Product Description Dutch Product Description French Product Description SLBU/SLMU
SLBU/SLMU Installation Instructions DISCLAIMER Milestone AV Technologies and its affiliated corporations and subsidiaries (collectively "Milestone"), intend to make this manual accurate and complete. However, Milestone makes no claim that the information contained herein covers all details, conditions or variations, nor does it provide for every possible contingency in connection with the installation or use of this product.
Installation Instructions SLBU/SLMU LEGEND Tighten Fastener Pencil Mark Apretar elemento de fijación Marcar con lápiz Befestigungsteil festziehen Stiftmarkierung Apertar fixador Marcar com lápis Serrare il fissaggio Segno a matita Bevestiging vastdraaien Potloodmerkteken Serrez les fixations Marquage au crayon Loosen Fastener Drill Hole Aflojar elemento de fijación Perforar Befestigungsteil lösen Bohrloch Desapertar fixador Fazer furo Allentare il fissaggio Praticare un foro Bevest
SLBU/SLMU Installation Instructions TOOLS REQUIRED FOR INSTALLATION #2 1/4" (included) 5/32" (security - included) PARTS OR A (1) [SLBU Plate] C (2) [Security Cover Bracket] [SLBU Only] B (4) [SLBU/SLMU Leg] A (1) [SLMU Plate] [Universal Projector Interface Hardware Kit] D (4) [Thumb Nut] [SLBU Only] K (4) 8-32 x 3/8" L (4) 8-32 x 1/4" M (4) M2.
Installation Instructions SLBU/SLMU ASSEMBLY AND INSTALLATION NOTE: Only use washers (S) if using M or N screws to attach screw adapters to projector. Remove Screw Adapters from SLBU/SLMU Legs 1. Press locking buttons on SLBU/SLMU leg (B) firmly and simultaneously push clip cover toward enclosed sliding stud mount bracket and screw. (See Figure 1) 2. Screw adapter and attached height-adjustment nut will be released. Set aside for later use. (See Figure 1) 3.
SLBU/SLMU 4. Installation Instructions Place SLBU/SLMU legs (B) over screw adapters and height-adjustment nuts. (See Figure 4) NOTE: Make sure arm latch clips are in the unlocked position. (B) x 3 or 4 7. Manuever legs so that sliding stud mount brackets and screws are towards the middle of the projector. (See Figure 6) and (See Figure 7) 8. Position sliding stud mount brackets and screws so that SLBU or SLMU main plate (A) can be evenly mounted to legs. (See Figure 6) and (See Figure 7) 9.
Installation Instructions SLBU/SLMU Attach SLBU/SLMU to RPA or RPM 1. On SLBU, partially install four thumb nuts (D) to SLBU main plate screws. Be sure to install thumb nuts with tapered side down. (See Figure 8) NOTE: If using optional security brackets (C) to connect SLBU bracket to RPA or non-locking RPM mount, refer to Security Bracket Installation section prior to installing thumb nuts.
SLBU/SLMU Installation Instructions USA/International Europe Chief Manufacturing, a products division of Milestone AV Technologies 8802-002058 Rev00 ¤2010 Milestone AV Technologies, a Duchossois Group Company www.chiefmfg.com 04/10 Asia Pacific A P F A P F A 8401 Eagle Creek Parkway, Savage, MN 55378 800.582.6480 / 952.894.6280 877.894.6918 / 952.894.6918 Fellenoord 130 5611 ZB EINDHOVEN, The Netherlands +31 (0)40 2668620 +31 (0)40 2668615 Office No.
ll.··. ···· ·t ·•··>..TM • <()I'M'. S Security Kit BDCHIEF. Our Mounts. Your Vision.
Installation Instructions for Model RPAIRSA B A D " F 1. Remove four screws A thru D. 2. Using security wrench (provided), replace screws A thru D with security screws. 3. Using security wrench (provided), remove 5/16" standard set screw (E) and replace using 5/16" security set screw. 4. Remove two screws from bottom of SLB, preferably one from each far corner. 5. Using security wrench (provided), replace screws in SLB with undercut security screws (F) from top side. 6.
Installation Instructions for Model RPM/RSM RPM SLB Thumb Nut 1. Remove two thumb screws, preferably from opposite corners, securing SLB/SSB to RPM/RSM. 2. Remove two screws, from which thumb nuts in step 2 where removed, from bottom side of SLB/SSB. 3. Using security wrench (provided), replace screws with undercut security screws (A) from top side. 4. Using security wrench and security screws (B) from All-Points Security package, secure SLB/SSB to projector.
Installation Instructions for Models RPM A, B and C and Models RSM A, B, C and D 1. If a projector is currently installed, remove two screws, preferably from opposite corners of each other, securing SLM/SSM to projector. 2. Using security wrench and security screws (A) from All-Points Security package, secure SLM/SSM to projector, or replace screws removed in step one with security screws using security wrench.