
Owner's Manual


Installation Instructions RPA Elite Series Projector Mount
11
Install Projector With Interface Bracket
1. Orient projector with interface bracket as shown in
figure 2b at left.
2. Lift projector so that screws with thumb nuts are
aligned with mounting slots in mount base.
3. Slide projector with mounting bracket onto mounting
slots in mount base until screws are seated against
the back of mounting slots. See figure 2b and 2c.
WARNING: IMPROPER INSTALLATION CAN
LEAD TO PROJECTOR FALLING RESULTING IN
SERIOUS PERSONAL INJURY OR DAMAGE TO
EQUIPMENT. Make certain mounting slots in mount
base slide under thumb screws and that screws are
seated in the back of slots.
WARNING: IMPROPER INSTALLATION CAN
LEAD TO PROJECTOR FALLING RESULTING IN
SERIOUS PERSONAL INJURY OR DAMAGE TO
EQUIPMENT. DO NOT substitute hardware. Use only
the hardware provided by the manufacturer.
1. Secure interface bracket to mount using installation
instructions and hardware provided with interface
bracket.
NOTE: Interface brackets can be installed using the
optional All-Points Security Kit from Chief.
Contact a Chief customer service
representative for additional information.
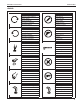
2b
2a
1
Example Only
(Interface bracket
varies dependent
on projector model)
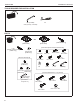
(A)
1
(B)
Example Only
(Interface bracket
varies dependent
on projector model)