SERVICE MANUAL Motor Replacement Spanish Product Description German Product Description Portuguese Product Description Italian Product Description Dutch Product Description French Product Description SL236 Motor Replacement
SL236 Motor Replacement Service Manual DISCLAIMER Milestone AV Technologies and its affiliated corporations and subsidiaries (collectively "Milestone"), intend to make this manual accurate and complete. However, Milestone makes no claim that the information contained herein covers all details, conditions or variations, nor does it provide for every possible contingency in connection with the installation or use of this product.
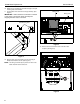
Service Manual SL236 Motor Replacement REMOVING MOTOR 1. Fully lower SL236, if possible. 2. Turn off and remove power from SL236. 3. Remove projector from SL236 following instructions included with the SL236. 4. Remove signal and power cables from projector. 5. Remove projector cradle by removing four locking nuts (two on each side) and additional washers and spacers. (See Figure 1) Remove plate Remove plate 6 x6 Figure 2 5 5 x4 Set Screws 6 Figure 1 6.
SL236 Motor Replacement Service Manual 10. Attach wire or something of equivalent strength to the joist mounting tabs on the SL236. Motor Cover 11. Connect these wires to the front of hinge assembly. (See Figure 4) Wiring cover IMPORTANT ! : Wires should be connected in minimum of two places to prevent the hinge assembly from dropping when the motor is removed. Joist Mounting Tabs 9 x6 Figure 5 13. Remove four set screws from each of the two motor couplers. (See Figure 6) Figure 4 12.
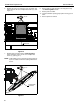
Service Manual SL236 Motor Replacement 14. Slide motor couplers toward outside of the lift.(See Figure 7) 15. Remove the four nuts and four flat washers holding the motor to the back plate of the lift. (See Figure 7) 3 16. Unplug and remove the motor. (C) x 4 17. Slide both motor couplers toward the center of the lift and remove couplers from the lift. (D) x 4 2 (B) 2 (B) x4 12 11 11 Motor coupler Motor coupler Rubber Grommets (A) Figure 8 Motor Figure 7 4. Plug in motor. 5.
SL236 Motor Replacement 6. Service Manual Replace the motor cover and wiring cover (if present) and fasten with six 8-32 x 5/16" Phillips head screws (H) . (See Figure 10) 8. Remove cable or wires attached to mounting tabs in Step 10 of Removing Motor section. 9. Restore power to SL236. 10. Verify that SL236 is operating properly when moving up and down. 6 11. Remove power from SL236. (H) x 6 Motor cover Figure 10 7.
Service Manual SL236 Motor Replacement 12. Reinstall projector cradle to SL236 lift. (See Figure 12) • Use two nylon spacers (K), two flat washers (D) and two locknuts (G) for rear lift arms. • Use two steel spacers (F), two nylon spacers (K), two flat washers (D) and two locknuts (G) for front lift arms. 13. Reinstall the projector into the SL236 following instructions included with the SL236. 14.
SL236 Motor Replacement Service Manual USA/International Europe Chief Manufacturing, a products division of Milestone AV Technologies 8800-002219 Rev00 2012 Milestone AV Technologies, a Duchossois Group Company www.chiefmfg.com 09/12 Asia Pacific A P F A P F A 6436 City West Parkway, Eden Prairie, MN 55344 800.582.6480 / 952.225.6000 877.894.6918 / 952.894.6918 Franklinstraat 14, 6003 DK Weert, Netherlands +31 (0) 495 580 852 +31 (0) 495 580 845 Office No.