
User's Manual


WM210-220-230-240S/SI Installation Instructions
26
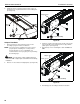
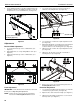
Mount Covers
1. Remove two #8-32 x 1/2" Phillips pan machine screws (F)
holding mount covers on projector arm. (See Figure 71)
2. Install two #8-32 x 1/2" button head security screws (V) into
holes on mount cover. (See Figure 71)
Figure 71
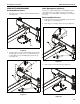
Stop Bracket
1. Remove two bolts holding stop bracket in place on
underside of short throw projector mount. (See Figure 72)
Figure 72
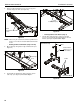
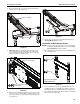
2. Install two 1/4-20 x 1/2" button head security screws (T)
through holes in stop bracket and into holes in sliding nuts.
(See Figure 73)
Figure 73
1
2
(V) x 2
(F) x 2
x 2
1
Stop bracket
2
(T) x 2
Stop
bracket
Sliding nuts
locations