
Installation instructions


VCM Installation Instructions
4
INSTALLATION
IMPORTANT ! : The following procedure assumes that
the ceiling plate/adapter (not included) has been properly
installed following instructions provided with ceiling plate/
adapter.
WARNING: FAILURE TO PROVIDE ADEQUATE
STRUCTURAL STRENGTH FOR THIS COMPONENT CAN
RESULT IN SERIOUS PERSONAL INJURY OR DAMAGE
TO EQUIPMENT! It is the installer’s responsibility to make
sure the structure to which this component is attached can
support five times the combined weight of all equipment.
Reinforce the structure as required before installing the
component.
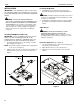
Installing VCM Mount to NPT Pipe
IMPORTANT ! : These installation instructions assume
that a 1-1/2" NPT or NPSM (Schedule 40, 0.154"
minimum thickness aluminum - ASTM B221) pipe (not
included) has been properly installed and is in place.
1. Thread the VCM mount (A) onto the existing 1-1/2" NPT
pipe until tight. (See Figure 1)
NOTE: Ensure that long edge of VCM mount is located parallel
to the screen. (See Figure 1)
2. Tighten the 5/16-18 x 3/8" set screw (B) into the VCM mount
threaded collar to prevent movement of the VCM. (See
Figure 1)
Figure 1
Installing HB Bracket
1. Install HB bracket (not included) to the projector (not
included) following instructions included with HB bracket.
CAUTION: Installing a ceiling mount requires the presence
of two persons familiar with mechanical installations. A third
assistant is recommended.
2. Install HB bracket with attached projector (not included) to
the VCM mount following instructions included with HB
bracket.
Adjustments
WARNING: MOUNTING HARDWARE IS TO BE
LOOSENED ONLY ENOUGH TO ALLOW FOR
NECESSARY MOVEMENT. Over-loosening or removal of
mounting hardware may result in personal injury or serious
damage to equipment!
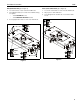
Horizontal Adjustments (See Figure 2)
1. Loosen, but do NOT remove, the four nuts holding the top
slide bracket on the VCM mount.
2. Adjust VCM mount up to 1-1/2" in any direction.
3. Tighten the nuts loosened (in Step 1) on the top slide
bracket.
Figure 2
S
C
R
E
E
N
2
NPT
pipe
(B) x 1
(A)
1
2
1
3
x 4
Top slide
bracket