Home Multimedia Center HMC-3903 User‟s Manual (Version 1.0.
Table of Contents 1. Introduction .......................................................................................................................... 4 1.1 Preface ........................................................................................................................ 4 1.2 Packing List ................................................................................................................. 5 1.3 Caution .........................................................................
7.2 Browsing Photos ....................................................................................................... 46 7.3 Browsing Movies ....................................................................................................... 47 7.4 Browsing via Network ............................................................................................... 47 8. Playlist Menu .....................................................................................................................
1. Introduction 1.1 Preface Dear Customer, Thank you very much for purchasing this brand-new Home Multimedia Center with stronger function support. In the digital era, this product is quite suitable to be a home entertainment partner. With her outstanding designed features, you can enjoy movie and music, view photos of precious moments, and record your favorite TV or movie programs to make up for your regret of not being able to enjoy them in time.
1.2 Packing List Part Quantity Player 1 Cradle 1 A/V cable 1 Y/Pb/Pr cable 1 USB cable 1 Remote Control 1 Remote Control Battery 2 AC adaptor 1 AC adaptor cable 1 User Manual 1 Quick Start Guide 1 Driver CD 1 Hard Disk Installation Guide 1 Wireless LAN USB Adapter 1 (optional) Note: The actual contents in the package might be different from the packing list in this manual.
1.3 Caution This player‟s design and manufacture has fully aware about safety. In order to safely and effectively use this player, please read the following before usage. 1.3.1 Usage cautions User should not modify this player. If commercial hard disk is being used, the environmental temperature should be within +5℃ ~ +35℃. 1.3.2 Power The player‟s power voltage: DC 12V. When using this player, please connect the supplied AC adapter or AC adapter cable to the player‟s power jack.
HDD format etc. Please backup your data. - It is suggested to do defragment after a long period of usage. - Regularly backup the data in the hard disk so that it can be recovered in the event of data corruption or loss. Our company takes no responsibility on loss of data stored on the hard disk. 1.3.7 Others When using this player, please do not let the player come into contact with water or other liquid, if water is accidentally spill on the player, please use a dry cloth to absorb the spillage.
1.4 Connection 1.4.1 Connect to Computer (1) Make sure the player is powered on; (2) Plug in the mini connector of the USB cable to this player‟s USB DEVICE port; (3) Plug in the big connector of the USB cable to Computer. 14.2 USB mass storage device (like USB Pen Drive, MP3, USB HDD etc.) Connection (1) Make sure the player is powered on; (2) Plug in the USB Pen Drive or USB HDD etc. to one of the USB HOST ports of this player.
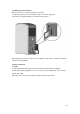
1.4.3 Memory card connection Memory card can be used by inserting to the card slot (1) Follow the picture to insert the memory card to the card slot properly; (2) Insert the card by following the arrow pointer in the picture. After properly inserted, you can press the copy button to copy all the contents in the memory card to the current partition. 1.4.4 A/V connection 1.
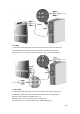
2. A/V OUT (1) Follow the picture and plug in the 3 color connector to the player‟s A/V OUT jack; (2) Follow the picture and plug in the 3 color connector to the TV‟s A/V IN jack. In this way, you can enjoy the content in the player on TV or other display devices. 3. Y/Pb/Pr OUT (1) Follow the picture and plug in the 3 color connector to the player‟s Y/Pb/Pr jack; (2) Follow the picture and plug in the 3 color connector to the TV‟s Y/Pb/Pr jack.
In this way, you can also enjoy videos, music, and photos in the player on TV. 1.4.5 Digital Audio Device connection (1) Follow the picture and plug in the Toslink connector on your optical fiber to the player‟s S/PDIF Optical jack; (2) Follow the picture and plug in the other connector on your optical fiber to the digital audio device.
1.4.6 Power connection (1) Follow the picture and connect the AC adaptor to the player‟s DC IN jack; (2) Follow the picture and plug in the AC adaptor to the power outlet. 1.4.7 Network connection Before the following steps, you need to find a network cable (Cat5, Cat5e or Cat6) for LAN connection. (1) Connect one of the crystal plugs on the cable to the player‟s RJ45 socket; (2) Connect the other crystal plug on the cable to a RJ45 LAN port on your router, switch, or hub devices.
1.5 First Time Usage 1.5.1 Firmware Installation For users who bought the player without HDD inside, and want to install the SATA HDD by himself, please see ‟11.1 Firmware Installation‟ for details. 1.5.
1.5.3 Power on/off, language control 1. Power on After connect to power, press the POWER button to turn on the player; after the player is on, the button on the front panel will light in Blue color, wait for couple of seconds to enter the system and the OK indicator will turn off. 2. Power off In playback and other interface, press the POWER button to turn off the player, when power off the player will prompt you that the system is being shut down.
2. About the Player 2.1 Remote Control All procedures in this manual can be carried out using the remote control buttons. Certain functions can also be carried out using the front panel. See the following for details on each button and its function: 1. POWER 2. DISPLAY 3. MENU 4. MUSIC 5. TV SYSTEM 6. BROWSER 7. GUIDE 8. ENTER 9. Numeric buttons 10. TIME SHIFT 11. REC 12. PLAY 13. TIMER 14. PAUSE/STEP 15. REC LIST 16. INS REPLAY 17. A-B 18. SUBTITLE 19. F1 20. SOURCE 21. AUDIO 22.
No. 1 Button Function POWER button: Press to power on/off. 2 DISPLAY button: Press to display current status. Press during playback and an onscreen display appears, showing track number and time elapsed/remaining. Press during recording and an onscreen display appears, showing the recording quality setting and time elapsed. Press during live TV and an onscreen display appears, showing the current channel number and time.
9 Numeric buttons: Press to enter channel numbers or numeric input when changing settings. 10 TIME SHIFT button: While in Video In mode, press to activate the time shift function, which allows you to pause live TV and resume the program from the point you left it. While paused, the program is recorded to the HDD or USB device, as long as space is available. Press to activate TIME SHIFT function and wait for the PLAY arrow to appear on the screen. Press and the program will be paused.
which suitable for sport program. 17 A-B button: Press to set the beginning and end points of a section to repeat. 18 SUBTITLE button: Press to activate available subtitles. 19 F1 button: Press to enter the file copy menu. 20 SOURCE button: Press to select input source. See „3.1 Selecting Video In‟ for more details. 21 AUDIO button: Press to select an audio track. 22 FAST FORWARD button: Press to fast forward the current playback. Press repeatedly to select speeds.
Press to jump to a specific point on a title. Specify the point using Title, Chapter and Time. 31 Navigational buttons: Press the arrow buttons to select menu options. 32 RETURN button: Press to return to the previous screen when navigating menus. 33 VOL+ button: Press to increase the volume. 34 VOL- button: Press to decrease the volume. 35 ZOOM button: Press to zoom in/out the image (photo or video).
2.2 Front Panel No. Name Function 1 REC indicator Indicator turns on when recording starts. 2 ERROR indicator Indicator turns on when card copy or music playback is failed, press any button to turn it off. 3 COPY indicator Indicator turns on when card copy starts. 4 MUSIC indicator Indicator turns on during music playback. 5 POWER button Press to power on/off.
2.3 Upper Panel No. Name Function 1 REC button Press to begin recording. 2 COPY button Press to copy all the contents of the card to the first FAT32 partition of the HDD. 3 MUSIC button Press the button to start playback music in the first nonempty playlist. Press the button again to switch to the next playlist and playback music. 4 ENTER button Enter/play. 5 UP button Move the highlight up. 6 LEFT button Move the highlight left. 7 DOWN button Move the highlight down.
2.4 Rear Panel 1. Air Flow hole 2. Video IN jack 3. Audio IN jack(Left Channel) 4. Video OUT jack 5. Audio OUT jack(Left Channel) 6. Y/Pb/Pr OUT jack(Component Video) 7. DC IN jack 8. USB HOST port 9. RJ45 LAN socket 10. S/PDIF Optical jack 11. Audio OUT jack(Right Channel) 12.
3. Getting Started Power on the system, and after a few seconds, the system will enter a guide menu. To enter this menu, press on the remote control too. 3.1 Selecting Video In To pre-view the video to be recorded, or have time shift function. To select an input source, press on the remote control or select Video In button on the guide menu page. 3.2 Selecting Playback A clip recorded in HDD or USB device is called a Title.
3.4 Selecting Setup To enter the setup menu, select on the remote control or select Setup button on the guide menu page. 3.5 Selecting Playlist To enter the music playlist menu, select Playlist button on the guide menu page.
4. The Title List Menu for Recorded Videos The Title List menu allows you to play and edit all saved titles. To enter the menu, press to enter Title List. To select Playback from the Guide menu will enter the Title List also. 4.1 Title List Menu Number 1 Function Description Menu Bar Press or to scroll through the menu. Here you can Play / Delete / Rename / Sort / Edit a recorded title. 2 Title Lists Here lists all recorded titles.
4.2 Playing Back Titles To play a recorded title, do the following: 1. Press and on the remote control to select the Play tab from the menu bar. 2. Press and on the remote control to select the title you wish to play. 3. Press on the remote control or the ENTER (Play) button on the front panel to play the file. 4. Press on the remote control or the CANCEL (Stop) button on the front panel to stop playback and return to the Title List menu screen. 4.
3. Press on the remote control. The name entry screen appears. 4. Use the navigation arrows to select letters and numbers. Select CAPS to toggle between uppercase and lowercase letters. Press <- to delete a letter. Press -> to insert a space. Press to input each letter or number. 5. Once you have entered the new name, select OK and press to confirm all changes. If you want to cancel the naming during the process, press 4.
Title Number Select to sort all files according to title numbers. Recording Time Select to sort all files according to the length of the recordings Title Name Select to sort all files alphabetically, according to title name. Fresh Titles Select to sort all files according to freshness (i.e. the most recent recordings), listing the most recent recording first. 4.6 Title Edit Menu Press Press and on the remote control to select the Title Edit tab from the menu bar. , and the menu appears.
thumbnail, press and press AB Erase or to select CONFIRM . Delete a specified clip in a title. Select SET A and press to mark the start for the section to be deleted. Select SET B and press to mark the end of the section to be deleted. Select CONFIRM and press to delete the section. Split Title Select a title and divide them into sections. When you reach the point at which you wish to split the track, press Merge Title to confirm. Select more than two titles and combine them into one title.
Add Chapter Mark Add a chapter mark to the selected file. A chapter mark is a marker inserted into the title. You can jump between marked sections by pressing or on the remote control. An editing screen appears. When you reach the point at which you wish to add the mark, press to confirm. Remove Remove a chapter mark that you have inserted. An Chapter Mark editing screen appears. Use the left and right navigation arrows to select the mark you wish to remove and press to delete.
4.7 Tools Press and on the remote control to select the Title Edit tab from the menu bar. Press and the menu appears. Return Select to return to the main screen. Delete All Title Select to delete all titles. 4.8 Saving Your Recorded Titles All the recorded titles are stored temporarily in a recording disc partition (UDF format) which cannot be identified by personal computers.
5. Timer Record Menu The Timer Record menu allows you to create, edit and delete recording schedules and view all schedule status and history. Press on the remote control to enter the menu. 5.1 Create a New Schedule Press and on the remote control to select the Edit tab from the menu bar. Select Add a New Schedule and press Use and . The schedule setting screen appears. on the remote control to move between fields and Press and to adjust each setting.
Free Space on the left of the screen for details of how long you can record for using each setting. This small preview window will show the current program of the select channel. Preview 5.2 Editing Schedule Press and on the remote control to select the Edit tab from the menu bar. Select the schedule you want to edit from the list and press . The schedule setting screen appears. Modify the schedule as described in „5.1 Creating a New Schedule‟. 5.
5.4 Viewing Schedule Status Press and on the remote control to select the Status tab from the menu bar. The schedule list is displayed. Select a schedule and press . Select Enable VPS, Disable VPS or Pause the selected schedule. Press to confirm. 5.5 Viewing Recording History Press and on the remote control to select the History tab from the menu bar. Here you can view a complete history of all recordings that were set.
6. Setup Menu The Setup Menu allows you to configure language, audio, video, record, network and system settings. To enter the menu, select Setup from the Guide menu or select on the remote control. 6.1 Changing Language Settings Press and Menu Language on the remote control to select the Language tab from the menu bar. Select to choose the OSD (On Screen Display) language. Press and to select the language. Press to confirm. Text Encoding Select to set text encoding.
Press and BIG5. Press to select from Unicode, Chinese GBK and to confirm. 6.2 Changing Audio Settings Press and Speaker on the remote control to select the Audio tab from the menu bar. Select to set type of speaker. Press and to select from 2CH, 5.1CH. Press to confirm. Night Mode Select to set night mode.
Press and to select from Off, On, and Comfort. Press to confirm. Select to set S/PDIF mode. S/PDIF Press and to select from Raw, and LPCM. Press to confirm. 6.3 Changing Video Settings Press and Aspect Ratio on the remote control to select the Video tab from the menu bar. Select to set aspect ratio.
Press and 4:3, or 16:9. Press to select from Pan Scan 4:3, Letter Box to confirm. Pan Scan 4:3: Display a wide picture on the entire screen and cuts off the redundant portions. Select when a standard 4:3 TV is connected. Letter Box 4:3: Display a wide picture with two black borders on the top and bottom of 4:3 screen. Select when a standard 4:3 TV is connected. 16:9: Compress the image to convert the whole image. Select when a 16:9 TV is connected. Brightness Select to set brightness levels.
Press and to adjust contrast. The new setting is previewed onscreen. Press Video Output Select to adjust video output type. Press and to set the video output type, depending on your viewing preferences. Press Video System to confirm. to confirm. Select to adjust TV system. Press and to set the TV system, depending on your viewing preferences. Press to confirm. 6.4 Changing Record Settings Press and on the remote control to select the Record tab from the menu bar.
Quality Select to set the default recording quality setting. Press and to select the quality setting you require. The highest quality setting is HQ which requires the most storage space. The other settings reduce recording quality sequentially but also require less storage space. Press Auto Chapter to confirm. Select to add chapter marks automatically at set intervals. Press and to select the interval you require.
Press and to select from HDD and USB. Press to confirm. Timeshift Device Select to set Time Shift device. Press and Press to confirm. to select from HDD, USB, and Auto. 6.5 Changing Network Settings Press and Wired Lan Setup on the remote control to select the Network tab from the menu bar. Select to set the Network Setting.
3) Please turn off your PC‟s firewall; 4) Please enable your PC‟s „Guest‟ account; 5) Please share the folders which you wish to browse on your PC, and make sure that „Everyone‟ or „Guest‟ has the right to access. Press and (MANUAL). Press to select DHCP (AUTO) or FIXED IP to confirm. DHCP DNS(AUTO) Set the DNS server IP address by auto. Press to confirm. FIX IP (MANUAL) Using Fixed IP, it is required to enter followings. IP address, Subnet Mask, Default Gateway.
Wireless Setup Please refer to the user‟s guide to wireless function in the package of Wireless LAN USB Adapter for more details about this setting. 6.6 Changing System Settings Press Time and on the remote control to select the System tab from the menu. Select to set the system time. Press and enter Manual setup.
Enter the system menu and press and to select each field and the up and down navigation arrows to adjust each setting. Press Restore Default to confirm. Select to restore factory defaults. A confirmation message appears. Select OK and press Enter to restore all settings to defaults. 6.7 Miscellaneous Press and on the remote control to select the MISC tab from the menu.
7. Browser Menu The Browser menu allows you to browse and play music, photo and movie files stored on a HDD, an external USB device, Memory Card, and Network. To enter the menu, select Browser from the Guide menu. Press and to select the device on which the media is stored. Choose from HDD, USB, CARD, NET and press . When data on HDD, USB device and Memory Card is connected or connect the system to Network, you can also browse photos, listen to music, and watch movies. 7.
the file you want to play and press Press . and a tools menu appears which enables you to add the current music to the playlists. 7.2 Browsing Photos Use and Press on the remote control to select the Photos tab. and to select the folder containing your photo files. A thumbnail strip appears at the bottom of the screen, along with a preview of the selected photo. Press and to select the photo you want to view and press . The photo will be displayed full screen. Note: 1.
rotating a photo, you can press to zoom in/out that photo. Three zoom levels are available. 7.3 Browsing Movies Use the left and right navigation arrows to select the Movies tab. Press and to select the folder that contains your movie files. A thumbnail strip appears at the bottom of the screen, and a preview of the selected movie will be played. Press and to select the movie you want to view and press . The movie will be played in full screen mode.
7.4.1 Browsing through Workgroup You can choose the workgroup which your PC belonged to from the workgroup list, find your PC name, and press to confirm. Then select the shared multimedia file that you want to browse. Note: Due to different network conditions, sometimes the workgroup might not be accessed or shown in the list. And then you need to use „My Short Cuts‟ to browse shared files. 7.4.
Press and a tools menu appears. Select Add, and Network Browser menu appears. Network Browser Select to set Net User ID, Net Password, and Specific File Server IP, which enables to browse files on NET through „My Short Cut‟. Select Net User ID and the entry screen will appear. Use the navigation arrows to select letters and numbers. See „4.4 Renaming Titles‟ for more details.
Select Net Password and the entry screen will appear. See above. Select Specific File Server IP, and use Navigational and Numeric buttons to enter IP address. Press Select your IP address and press to confirm. to confirm. Then select the shared multimedia file that you want to browse.
8. Playlist Menu The Playlist menu allows you to browse and play your favorite music in the playlists. To enter the menu, select Playlist from the Guide menu. There are up to 5 playlists. 9. File Copy Menu Press on the remote control to enter the File Copy menu, which allows you to copy files between HDD, USB devices and Network. Step 1: Select the source device and destination device.
Press and to select device. Press to cancel, and to next step. Step 2: Select the source files you want to copy. Press to select files, to cancel, and to next step. Step 3: Select the destination folder to store the above files.
Press and to select folder. Press to cancel, and to next step. Step 4: Proceed to copy selected files. Press and to select OK, press to confirm. And the copy will start.
10. NAS Function This player can be used as a NAS (Network-Attached Storage) device. It can be attached to the home network via either Ethernet or WLAN. This feature allows homes to store and retrieve large amounts of data more affordably than ever before. When the network connection is done correctly and ready for use, type: \\NAS or \\IP Address in the Run window (click Run in the start menu) or the address bar of Internet Explorer on your PC (For example, if the IP address of the player is 192.168.0.
11. Firmware Installation and Upgrade The firmware is the operating system (OS) installed on the device. 11.1 Firmware Installation If it is the first time that you are installing a SATA HDD (no matter it is a new one or an old one) into the player, please make sure you have read the following steps in advance. Step 1: Backup Data Please backup the data in the HDD before installing it into the player.
Please wait for about 10 minutes, the installation will be completed, the LED indicators will go off, and the player will be powered off automatically. Then you can press the POWER button to turn on the player and enjoy. Note: If install error or white screen occurs, please unplug the power cable and try again; No power off during installation; The USB Pen Drive is not allowed to be plugged off during installation. 11.2 Firmware Upgrade Firmware upgrades can bring new features, improvements and bug fixes.
Step 1: Prepare the USB Pen Drive Copy the 6 files into the root directory of your USB Pen Drive. Step 2: Modify ‘part.txt’ Open „part.txt‟ file in the USB Pen Drive with WordPad, and make sure to modify „option:install‟ to „option:upgrade‟. Item Option:install Description This option will perform firmware installation, which will format the whole HDD (All data on the HDD will be removed).
12. Appendixes 12.
VIDEO OUTPUT SPECIFICATION Composite Output 1 Vpp 75 Ohm Components Output Y:1 Vpp 75 Ohm Cb:0.7 Vpp 75 Ohm Cr:0.7 Vpp 75 Ohm AUDIO PERFORMANCE DA Converter 24-bit/192kHZ AD Converter 24-bit/96kHZ Signal-Noise (1kHZ) ≥ 95dB Dynamic Range ≥90dB (1kHZ) Channel ≥95dB Separation Total Harmonic Distortion (1kHZ) ≤-85dB GENERAL Power Supply AC 100~240V Power Approx. 35 W 50~60Hz Consumption Operating +5°C to +35°C (+36°F to +95°F) Temperature Operating Humidity 5% to 80% RH Hard Disk 3.
(5) It is not recommend using the USB ports in the front of your computer, trying to use the USB ports in the rear, because the USB ports in the front are often from non-powered hubs. Question 2. When I try to disconnect the USB device, I keep on getting “The device „Generic volume‟ cannot be stopped right now. Try stopping the device again later.” message, what should I do? Answer: Close any program that might be accessing data on the player, including Windows® Explorer.
(4) Click the “OK” icon. Question 7. During power on, why the TV will have a short flash, blue screen or screensaver? Answer: This is normal, when the system initialize, it will setup the corresponding parameters so it can output the correct video signal to the TV, during the initializing time, the TV will receive incorrect signals or the signals will not be stable and will cause the TV screen to flash, some TV will treat it as no signal, and will display a blue screen or screensaver. Question 8.
Answer: If you find some functions do not work properly on the player, please change system settings to the default (Refer to 6.6 for changing system settings). Question12. While playing movies in the multimedia partition, buttons like PREV, NEXT, A-B, etc. sometimes could not be used. Answer: The above functions are designed for recorded video titles and IFO (DVD) files only. 12.3 Copyrights and Trademarks Copyrights All rights reserved.