
User Manual


Table Of Contents
- Manual
- Preface
- Chapter 1: Quick Start Guide
- Chapter 2: Storage Devices, Mouse, Audio & Printer
- Chapter 3: Power Management
- Chapter 4: Drivers & Utilities
- What to Install
- Driver Installation
- Manual Driver Installation
- Updating/Reinstalling Individual Drivers
- User Account Control (Win Vista)
- Windows Security Message
- New Hardware Found
- Driver Installation Procedure
- Chipset
- Video
- Audio
- Modem
- LAN
- TouchPad
- Card Reader/ExpressCard
- Hot Key
- Intel MEI Driver
- e-SATA Support
- Optional Drivers
- Wireless LAN
- PC Camera
- 3.5G Module
- Fingerprint Reader Module
- Intel Turbo Memory Technology Driver
- Chapter 5: BIOS Utilities
- Overview
- The Power-On Self Test (POST)
- The Setup Utility
- Main Menu
- Advanced Menu
- Installed O/S (Advanced Menu)
- SATA Mode Selection (Advanced Menu)
- DFOROM (Robson) Support (Advanced Menu > SATA Mode Selection [AHCI]
- Boot-time Diagnostic Screen: (Advanced Menu)
- Legacy OS Boot: (Advanced Menu)
- Reset Configuration Data: (Advanced Menu)
- Power On Boot Beep (Advanced Menu)
- Battery Low Alarm Beep: (Advanced Menu)
- Fan Control (Advanced Menu)
- Security Menu
- Boot Menu
- Exit Menu
- Chapter 6: Upgrading The Computer
- Chapter 7: Modules
- Chapter 8: Troubleshooting
- Appendix A: Interface (Ports & Jacks)
- Appendix B: NVIDIA Video Driver Controls
- Appendix C: Specifications
- Appendix D: Windows XP Information
- DVD Regional Codes
- Windows XP Start Menu & Control Panel
- Audio Features
- Function/Hot Key Indicators
- Video Features
- NVIDIA Video Driver Controls
- Power Management Features
- Configuring the Power Button
- Battery Information
- Driver Installation
- Bluetooth Module
- Wireless LAN Module
- PC Camera Module
- 3.5G Module
- Fingerprint Reader Module
NVIDIA Video Driver Controls
B - 6 Attaching Other Displays
B
Configuring an External Display using the NVIDIA Control Panel
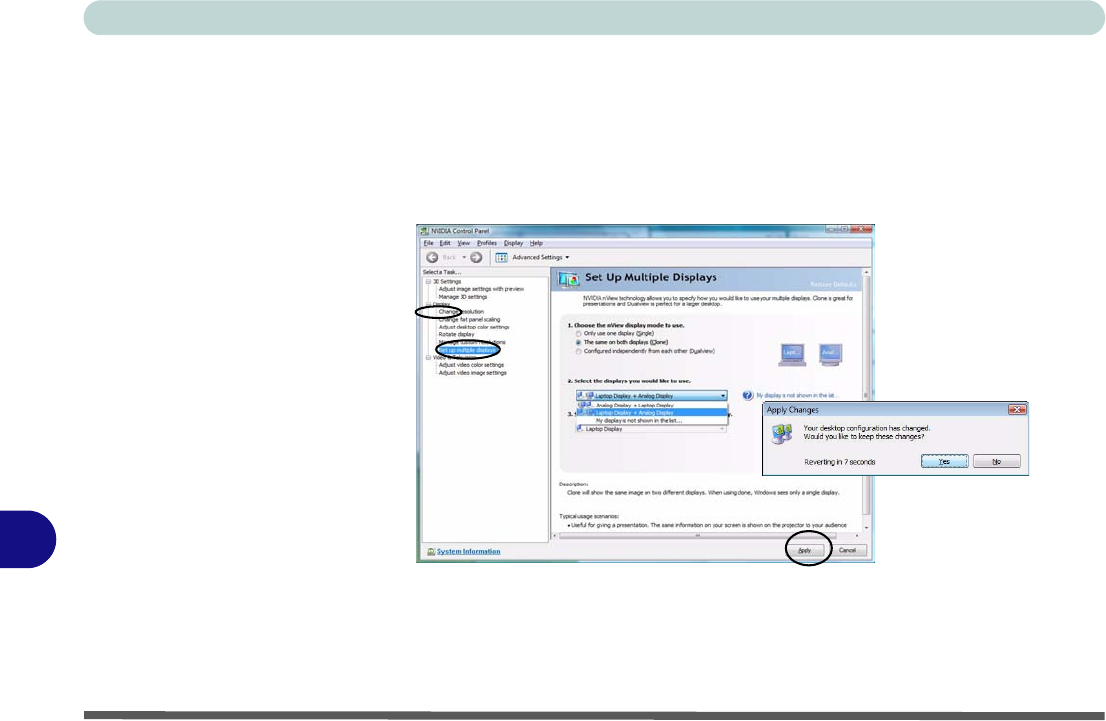
Alternatively you can use the NVIDIA control panel to configure any attached dis-
plays.
1. Attach your external display to the DVI-Out Port or HDMI-Out port, and turn it on.
2. Go to
NVIDIA Control Panel
(see
“NVIDIA Control Panel” on page B - 2
).
3. Click Display, and then click Set up multiple displays.
4. Click to select the
nView
display mode
you wish to use (see page
B - 9
).
5. Select the display(s) you want to use (if your display is not shown click “
My Display
is not shown in the list. ..
” or use the
Fn + F7
key combination), and choo se which
display is to be the primary display.
6. Click
Apply > Yes
to save the changes.
Figure B - 5
Set Up Multiple
Displays