
User Manual


Table Of Contents
- Manual
- Preface
- Chapter 1: Quick Start Guide
- Chapter 2: Storage Devices, Mouse, Audio & Printer
- Chapter 3: Power Management
- Chapter 4: Drivers & Utilities
- What to Install
- Driver Installation
- Manual Driver Installation
- Updating/Reinstalling Individual Drivers
- User Account Control (Win Vista)
- Windows Security Message
- New Hardware Found
- Driver Installation Procedure
- Chipset
- Video
- Audio
- Modem
- LAN
- TouchPad
- Card Reader/ExpressCard
- Hot Key
- Intel MEI Driver
- e-SATA Support
- Optional Drivers
- Wireless LAN
- PC Camera
- 3.5G Module
- Fingerprint Reader Module
- Intel Turbo Memory Technology Driver
- Chapter 5: BIOS Utilities
- Overview
- The Power-On Self Test (POST)
- The Setup Utility
- Main Menu
- Advanced Menu
- Installed O/S (Advanced Menu)
- SATA Mode Selection (Advanced Menu)
- DFOROM (Robson) Support (Advanced Menu > SATA Mode Selection [AHCI]
- Boot-time Diagnostic Screen: (Advanced Menu)
- Legacy OS Boot: (Advanced Menu)
- Reset Configuration Data: (Advanced Menu)
- Power On Boot Beep (Advanced Menu)
- Battery Low Alarm Beep: (Advanced Menu)
- Fan Control (Advanced Menu)
- Security Menu
- Boot Menu
- Exit Menu
- Chapter 6: Upgrading The Computer
- Chapter 7: Modules
- Chapter 8: Troubleshooting
- Appendix A: Interface (Ports & Jacks)
- Appendix B: NVIDIA Video Driver Controls
- Appendix C: Specifications
- Appendix D: Windows XP Information
- DVD Regional Codes
- Windows XP Start Menu & Control Panel
- Audio Features
- Function/Hot Key Indicators
- Video Features
- NVIDIA Video Driver Controls
- Power Management Features
- Configuring the Power Button
- Battery Information
- Driver Installation
- Bluetooth Module
- Wireless LAN Module
- PC Camera Module
- 3.5G Module
- Fingerprint Reader Module
Windows XP Information
Fingerprint Reader Module D - 47
D
User Enrollment (Application Version 2)
1. Click Start > Programs/All Programs > Protector Suite QL > User Enrollment, or double-click the taskbar
icon .
2. Click Initialize.
3. On the first run of the program you will be asked to click the button to accept the license, and then click OK.
4. Click Next and select “Enrollment to the hard disk”, and click Finish.
5. If you have not set a Windows password you will be prompted to do so (note: If you have not set a password
Protector Suite QL cannot secure access to your computer).
6. Click Next, and you will then be prompted to enter your Windows password and click Next.
7. Select either to use the fingerp rint reader alone for auth entication, or choose both the fingerprin t reader an d the
Windows password, and then click Next.
8. Click Next > Next (if you have the “Run interactive tutorial” tickbox selected you will run through the
Fingerprint Tutorial).
9. Click Next for each window of the tutorial (you can click the butto n to “skip tutorial” at any time).
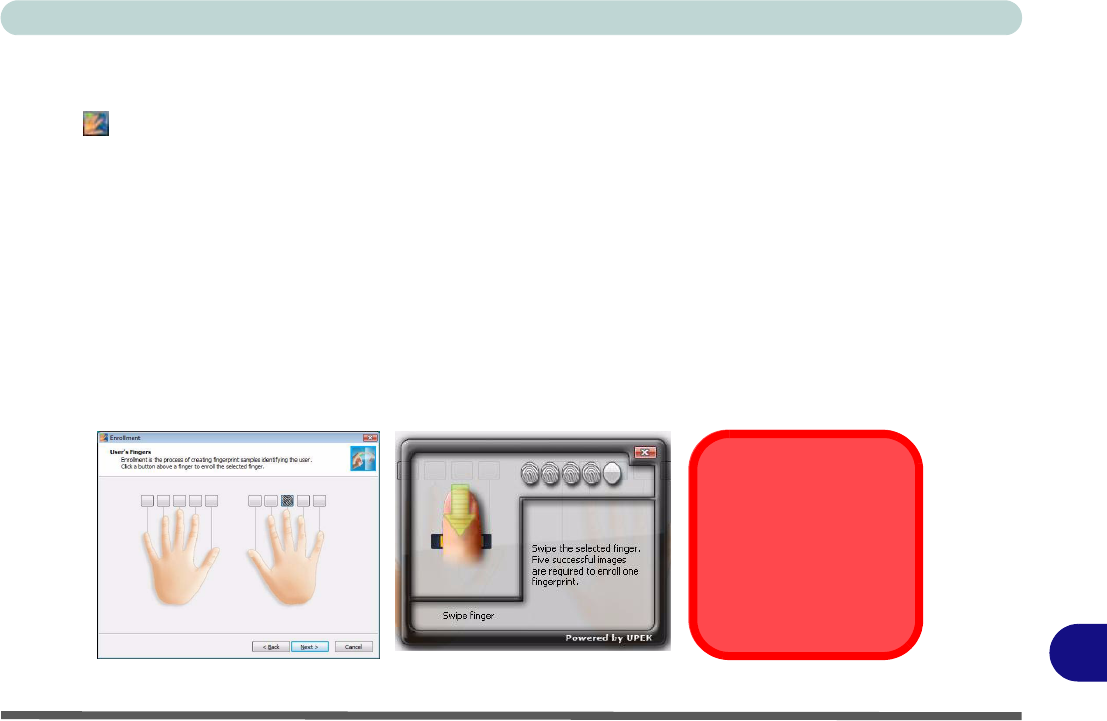
10. Click the button above any of the fingers to begin the enrollment process for that finger.
Figure D - 26 - Fingerprint Enrollment
Fingerprint
Enrollment
Note that it is strongly rec-
ommended that you enroll
more than one finger in
case of injury etc.