
Manual


Table Of Contents
- Manual
- Preface
- Chapter 1: Quick Start Guide
- Overview
- Advanced Users
- Beginners and Non-Advanced Users
- Warning Boxes
- Not Included
- System Startup
- System Software
- Model Differences
- System Map: LCD Panel Open - Model A Design I
- System Map: LCD Panel Open - Model A Design II
- System Map: LCD Panel Open - Model A Design III
- System Map: LCD Panel Open - Model B
- System Map: LCD Panel Open - Model C
- LED Indicators
- Hot Key Buttons - Model A Design I Only
- Hot Key Buttons - Model A Design III Only
- Keyboard - Model A Designs I & II
- Keyboard - Model A Design III
- Keyboard - Models B & C
- Function/Hot Key Indicators
- System Map: Front & Left Views
- System Map: Right & Rear Views
- System Map: Bottom View - Model A
- System Map: Bottom View - Model B
- System Map: Bottom View - Model C
- Windows 7 Start Menu & Control Panel
- Video Features
- Power Options
- Chapter 2: Features & Components
- Chapter 3: Power Management
- Overview
- The Power Sources
- AC/DC Adapter
- Battery
- Turning On the Computer
- Power Plans
- Power-Saving States
- Sleep
- Hibernate
- Shut down
- Configuring the Power Buttons
- Resuming Operation
- Energy Star Power Saving
- Battery Information
- Battery Power
- Conserving Battery Power
- Battery Life
- New Battery
- Recharging the Battery with the AC/DC Adapter
- Proper handling of the Battery Pack
- Battery FAQ
- Chapter 4: Drivers & Utilities
- What to Install
- Module Driver Installation
- Driver Installation
- Updating/Reinstalling Individual Drivers
- User Account Control
- Windows Security Message
- New Hardware Found
- Driver Installation Procedure
- Video (VGA)
- LAN
- CardReader
- TouchPad
- Hot Key
- Audio
- Windows Experience Index
- Optional Drivers
- PC Camera Module
- Wireless LAN Module
- 3.75G/HSPA Module
- Chapter 5: BIOS Utilities
- Overview
- The Setup Utility
- Failing the POST
- Fatal Errors
- Non-Fatal Errors
- Setup Screens
- Main Menu
- System Time & Date (Main Menu)
- SATA Port # (Main Menu)
- System/Extended Memory: (Main Menu)
- MB Series / BIOS Revision / KBC/EC firmware Revision
- Advanced Menu
- Advanced Chipset Control (Advanced Menu)
- Bluetooth Power Setting (Advanced Menu > Advanced Chipset Control)
- SATA Mode Selection (Advanced Menu)
- Legacy USB Support: (Advanced Menu)
- Boot Logo (Advanced Menu)
- Power On Boot Beep (Advanced Menu)
- Battery Low Alarm Beep: (Advanced Menu)
- Security Menu
- Set Supervisor Password (Security Menu)
- Boot Menu
- Boot Sequence (Boot Menu)
- Exit Menu
- Chapter 6: Upgrading The Computer
- Chapter 7: Modules & Options
- Overview
- PC Camera Module
- PC Camera Driver Installation
- Wireless LAN Module
- 802.11b/g/n Driver Installation (for WLAN Module)
- 802.11b/g/n Driver Installation (for WLAN & Bluetooth Combo)
- Connecting to a Wireless Network in Windows 7
- Windows Mobility Center
- Bluetooth & Wireless LAN Combo Module
- 3rd Party Bluetooth Combo Driver Installation Information
- 3rd Party Bluetooth (V3.0) Combo Driver Installation
- 3rd Party Bluetooth (V3.0) & WLAN Combo Settings
- Bluetooth Networking Setup
- Bluetooth & WLAN Combo Module Configuration
- 3rd Party Bluetooth (V4.0) Combo Driver Installation
- Standard Bluetooth Configuration in Windows 7
- 3.75G/HSPA Module
- BandLuxe HSDPA Utility
- BandLuxe HSDPA Utility Installation
- BandLuxe HSDPA - Connection Manager
- Creating a Profile
- Choosing a Profile
- Editing a Profile
- Text Messaging Service (SMS)
- Setting
- Statistics & Information
- Wireless Manager
- Wireless Manager Installation
- Wireless Manager Application
- Profiles
- Settings
- Text Messaging Service (SMS)
- SMS Utility
- Sending a Text Message
- Phonebook
- SMS Settings
- Chapter 8: Troubleshooting
- Appendix A: Interface (Ports & Jacks)
- Appendix B: AMD Video Driver Controls
- Appendix C: Specifications
AMD Video Driver Controls
B - 8 Display Devices & Options
B
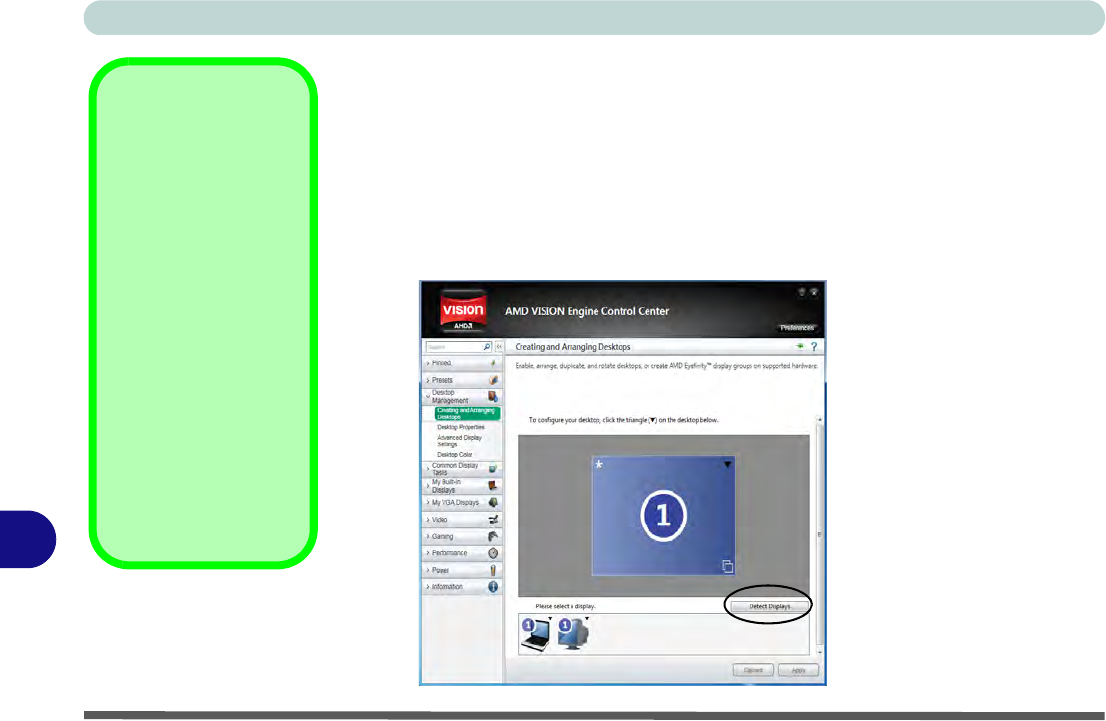
Configuring an External Display
You can use the control center to configure any attached displays.
1. Attach your external display to the external monitor port/HDMI-Out port, and turn it on.
2. Open the control center
.
3. Select Desktop Management from the menu on the left (click the arrow to expand
the menu) and click Creating and Arranging Desktops.
4. Attached displays will appear in the lower part of the screen (click Detect Displays
to find any attached displays that do not automatically appear).
Detect Displays
Click Detect Displays
(button) to automati-
cally update the at-
tached display
information.
You can set a prefer-
ence for automatic dis-
play detection in
Advanced Display
Settings (Desktop
Management). You
can choose to have at-
tached displays auto-
matically detected
when the control cen-
ter is opened, or to use
manual detection only.
Figure B - 6
Desktop
Management
Click Detect Displays
to find any attached
displays that do not
automatically appear.