Introduction to ChipPC ThinX OS Introduction to ChipPC ThinX OS Technical Brief Document Version 1.0 Ref: DL128B-1.0 1 Chip PC Technologies www.chippc.
Introduction to ChipPC ThinX OS COPYRIGHT NOTICE © 2009 Chip PC Inc., Chip PC (Israel) Ltd., Chip PC (UK) Ltd., Chip PC GmbH All rights reserved. This product and/or associated software are protected by copyright, international treaties and various patents. This manual and the software, firmware and/or hardware described in it are copyrighted.
Introduction to ChipPC ThinX OS Table of Contents TABLE OF CONTENTS ............................................................................................................................................3 CHAPTER 1 INTRODUCTION ....................................................................................................... 4 OBJECTIVES .........................................................................................................................................................
Introduction to ChipPC ThinX OS Chapter 1 Introduction Objectives The purpose of this document is to provide a general introduction to the ChipPC ThinX OS. General The ChipPC ThinX OS is a propriety operating system that was developed by ChipPC Inc. for use in its Linux based thin clients. Applicable OS Version This document is based on ThinX OS, version 1.1.0, build RL0.150802.
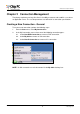
Introduction to ChipPC ThinX OS Chapter 2 Connection Management The primary requirement of any thin client is the ability to connect and establish a session to an application server. The session parameters are defined in its connection specifications. Creating a New Connection - General To create a new connection, perform the following steps: 1. From the Start menu, select My Connections. 2. In the My Connections menu select one of the following connection types: 2.1.
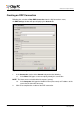
Introduction to ChipPC ThinX OS Creating an RDP Connection Following the selection of New RDP Connection from the My Connections menu, the RDP Settings window will open displaying the General tab. Figure 2 – RDP Settings > General Tab 1. In the Connection section of the General tab, perform the following: 1.1. In the Name field, type a name to uniquely identify this connection. NOTE The Name must not include blank characters (spaces). 1.2. 2. Ref: DL128B-1.
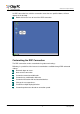
Introduction to ChipPC ThinX OS An RDP connection icon, with the connection name that was specified above, will now appear on the desktop. Double click on the icon to launch the RDP connection. Figure 3 - RDP Connection Icon Customizing the RDP Connection The RDP connection can be customized using advanced settings. Following is a partial list of the features/customizations available through RDP advanced settings: Automatic logon to server. Auto-start the connection. Customize remote Sound behavior.
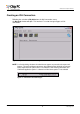
Introduction to ChipPC ThinX OS Creating an ICA Connection Following the selection of My Citrix from the My Connections menu, the My Citrix window will open. This interface is used to manage all types of ICA connections. Figure 4 – My Citrix ICA connection manager window NOTE In all of the dialog windows the check boxes appear as pressed and un-pressed buttons. The pressed button represents the selected option while the un-pressed button represents the option that is not selected.
Introduction to ChipPC ThinX OS 1 ICA Connection Types There are three types of ICA connections that are managed via the My Citrix dialog: Standard ICA Connections Connection to a Server Desktop Connection to a Published Application Xcalibur Global generated ICA connections PNAgent (includes XenDesktop connections) Selecting the connection type is performed via the My Citrix View menu: Figure 6 – The My Citrix View Menu Ref: DL128B-1.0 9 Chip PC Technologies www.chippc.
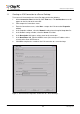
Introduction to ChipPC ThinX OS 1.1 Creating an ICA Connection to a Server Desktop To create an ICA connection to a Server Desktop, perform the following: 1. Select Connection View from the My Citrix View menu. The Connections menu will appear on the left side of the menu bar. 2. Click to open the Connections menu. 3. From the Connections menu, select New… to open the ICA connection Properties window. 4. In the Properties window, select the Network settings from the top left drop down list. 5.
Introduction to ChipPC ThinX OS 1.2 Creating an ICA Connection to a Published Application To create an ICA connection to a Published Application, perform the following: 1. Select Connection View from the ICA client View menu. The Connections menu will appear on the left side of the menu bar. 2. Click to open the Connections menu. 3. From the Connections menu, select New… to open the Properties window. 4. In the Properties window, select the Network settings from the top left drop down list. 5.
Introduction to ChipPC ThinX OS 1.3 Launching an ICA connection The newly created connection will appear in a list of ICA connections that are displayed when selecting the Connection View from the View menu in the My Citrix dialog. To launch the ICA connection, perform one of following: Select the desired connection and click the Connect button. Click the icon on the left-hand side of the desired connection. Select the desired connection and then from the Connections menu, select the Connect option.
Introduction to ChipPC ThinX OS 1.5 Creating a PNAgent Connection To create a PNAgent connection, perform the following: 1. Select PNAgent View from the My Citrix View menu. The PNAgent menu will appear on the left side of the menu bar. 2. If this is not the first time the PNAgent is configured, skip to step 5. 3. If this is the first time a PNAgent connection is configured, the PNA Configuration dialog will automatically appear.
Introduction to ChipPC ThinX OS 1.6 Launching a PNAgent connection The new PNAgent published applications will appear in a list of applications after selecting the PNAgent View from the View menu in the My Citrix dialog. To launch a PNAgent application, perform one of following: Select the desired connection and click the Connect button. Click the icon on the left-hand side of the desired connection. Select the desired connection and then from the PNAgent menu, select the Connect option.
Introduction to ChipPC ThinX OS Chapter 3 Device Configuration The ThinX device can be customized and configured to accommodate the needs of the organization and individual. To configure the ThinX device perform the following: 1. Open the Start menu and select the Settings menu. 2. From the Settings menu, select the Device option to open the LBT Configuration dialog. 3. The LBT Configuration dialog is divided into following configuration categories: 3.1. Device Settings. 3.2. Desktop and Shell. 3.
Introduction to ChipPC ThinX OS Device Settings The Device Setting category offers the following configuration areas: General Advanced Info Authentication Mouse Display Keyboard Properties Layout Properties Time Sound Network Mount Point Network ID Printers Security Plugins Licenses The following sections offer explanations regarding the common options available in the Device Settings configuration areas. Ref: DL128B-1.0 16 Chip PC Technologies www.chippc.
Introduction to ChipPC ThinX OS 1 General This configuration area provides general system information and the option to restore the device to factory-default settings. Figure 15 – General settings To restore the device to factory-default settings perform the following: 1. Click the Reset button to open the Restore Now dialog. 2. In the Restore Now dialog select both check boxes and click OK. Figure 16 – Restore Now Ref: DL128B-1.0 17 Chip PC Technologies www.chippc.
Introduction to ChipPC ThinX OS 2 Advanced Info This configuration area provides advanced system information and software version info. 3 Authentication This configuration area is used to enable and configure the IEEE 802.1x protocol (authenticated network access) for cabled networks. 4 Mouse This configuration area allows the customization of Mouse related properties. 5 Display This configuration area allows the modification of the Display related settings.
Introduction to ChipPC ThinX OS 6 Keyboard Properties This configuration area allows the customization of the Keyboard related settings. 7 Layout Properties This configuration area allows the customization of the Language related settings. The dialog offers the following options: Adjust the Switch between input locales key-combo using the dropdown list. Add a new language by clicking on the Add button and selecting the new language from the drop down list that appears.
Introduction to ChipPC ThinX OS 8 Time This configuration area allows the modification of Time related settings. The dialog offers the following options: Adjust the current date using the displayed calendar. Adjust the current time in the Current Time field. Modify the time zone by clicking on the Select ‘Time Zone’ button and selecting a value from the list in the Time Zones dialog.
Introduction to ChipPC ThinX OS 12 Network ID This configuration area allows the modification of the device’s authentication behavior when accessing windows SMB shares as well as site access via the web browser. 13 Printers This configuration area is used to manage connections to local USB printers. 14 Security This configuration area is used to modify the settings that are designed to prevent unauthorized modification of the device settings.
Introduction to ChipPC ThinX OS Desktop and Shell The Desktop and Shell category offers the following configuration areas: Desktop Settings Taskbar The following sections offer explanations regarding the common options available in the Device Settings configuration areas. 1 Desktop Settings This configuration area allows the modification of the device Desktop interface behavior and appearance.
Introduction to ChipPC ThinX OS 2 Taskbar This configuration area allows the modification of the device Taskbar interface behavior and appearance. The dialog offers the following options: Select the check box Show Network Status to add a network status icon to the taskbar notification area. Select the check box Show Process Status to add a process status icon to the taskbar notification area.
Introduction to ChipPC ThinX OS Xcalibur Settings The Xcalibur Settings category offers the following configuration areas: General Server List Locator DHCP SNMP Protocol Param The following sections offer explanations regarding the common options available in each of the Xcalibur Settings configuration areas. 1 General This configuration area allows the user to manage the behavior of the Xcalibur client.
Introduction to ChipPC ThinX OS 4 DHCP When using the DHCP protocol to obtain information about the Xcalibur Global server, this interface can be used for the following tasks: Configuring the method used to retrieve the information from the DHCP server. Display information obtained from the DHCP server. 5 SNMP This interface is used to configure the device SNMP setting.