Page i Chisholm Aurora S500 SVGA LCD Projector REFERENCE MANUAL Aurora S500
Page ii Safety Precautions WARNING: To reduce the risk of fire or electric shock, do not expose this equipment to rain or moisture. Dangerous high voltages are present inside the enclosure. Do not open the case. Refer servicing to qualified personnel only. FCC STATEMENT: This equipment has been tested and found to comply with the limits for a Class A digital device, pursuant to Part 15 of the FCC Rules.
Page iii 1. Read Owner’s Manual After unpacking this product, read the owner’s manual carefully, and follow all the operating and other instructions. 2. Power Sources This product should be operated only from the type of power source indicated on the marking label. If you are not sure of the type of power supply to your home, consult your product dealer or local power company. For products intended to operate from battery power or other sources, refer to the operating instructions. 3.
Page iv 7. Cleaning Unplug this product from the wall outlet before cleaning. Do not use liquid cleaners or aerosol cleaners. Use a damp cloth for cleaning. 8. Power-Cord Protection Power-supply cords should be routed so that they are not likely to be walked on or pinched by items placed upon or against them, paying particular attention to cords at plugs, convenience receptacles, and the point where they exit from the product. 9.
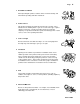
Page v 13. Mounting and Transport Do not place this product on an unstable cart, stand, tripod, bracket, or table. The product may fall, causing serious injury to a child or adult and serious damage to the product. Use only with a cart, stand, tripod, bracket, or table recommended by the manufacturer, or sold with the product. Any mounting of the product should follow the manufacturer’s instructions and should use a mounting accessory recommended by the manufacturer. 14.
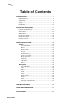
Page vi Table of Contents INTRODUCTION..................................................................... 1 Getting Started.................................................................. 3 Unpacking ......................................................................... 4 Setup ................................................................................ 6 Installation........................................................................ 12 PROJECTOR OPERATION ..................................
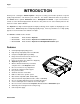
Page 1 _____________________________________________________________________________ INTRODUCTION Thank you for selecting the Aurora Projector. Our goal is to bring you innovative products of superior quality and performance. We welcome your comments. This Owner’s Manual describes the operation of the Aurora and it’s optional Annotation devices, WritingPad and PenPal.
Page 2 ______________________________________________________________________________ The Annotation option is available in two versions: 1) WritingPad and 2) PenPal.
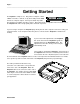
Page 3 _____________________________________________________________________________ Getting Started The Projector is simple to use. Plug it into a computer, a VCR, a DVD, a laserdisc, a camera, or any device that provides RGB, S-Video or composite output. You may also attach any audio line output that is available from those devices. W hen attached to a compatible video and audio source, the Projector will deliver a high quality video and audio experience.
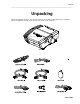
Page 4 ______________________________________________________________________________ Unpacking Unpack the shipping container. Inspect the contents to ensure that you have all the pieces identified below. If anything is missing, please contact your dealer or call us directly.
Page 5 _____________________________________________________________________________ Annotation Options PenPal WritingPad The Annotation option will be included only if you purchased a model that includes this feature. If anything is missing, contact your service representative or call the number displayed on the Projector when it is powered on. If anything is damaged, call the freight company and keep the packaging to ensure a proper claim with the freight company.
Page 6 ______________________________________________________________________________ Setup 1. Get Acquainted Familiarize yourself with the features of the Projector. Control Panel Handle Speakers IR Lens Foot Adjuster Lens Power Plug Focusing Ring Zoom Ring Connector Panel Door IR Lens Foot Adjuster 2. Power Down Turn off any equipment you intend to connect to the Projector. ON OFF 3.
Page 7 _____________________________________________________________________________ 4. Connector Panel Open the Connector Panel Door and familiarize yourself with the Connector Panel. 5. Disconnect Your Monitor The Projector uses your computer monitor port. To connect your computer, first disconnect your computer monitor. If you are using a notebook computer, identify your external monitor connector and make sure your video output is enabled (see your notebook manual). 6.
Page 8 ______________________________________________________________________________ Connecting to a PC Check that the power for the Projector and computer are off before connecting the cables. Connect the supplied PC Y RGB cable to the Projector as shown below. If you wish to use your monitor concurrently with projection, connect the short Y cable to your PC monitor. Connect the other end of the PC Y RGB cable to your PC monitor port. The supplied PC Y RGB cable may be connected to either RGB 1 or RGB 2.
Page 9 _____________________________________________________________________________ 7. Connecting a Video Device To connect a VCR, DVD, laserdisc, or other video device, use the supplied Audio/Video cables with 3 connectors at each end and attach them to the audio/video connectors of Video 1 or Video 2 and to the corresponding connectors of your video device.
Page 10 ______________________________________________________________________________ 8. Connecting an External Amplifier, Computer Mouse, or Annotation Device If you have your own audio system, you may use the Audio Out connectors of the Projector to provide a line level output to an external amplifier. If you do not want the Projector internal speakers to operate, use the Audio Menu to disable them (the Audio Menu is discussed in the following pages).
Page 11 _____________________________________________________________________________ 9. Secure Connectors Tighten all cable connector screws. 10. Connect Power Cable Connect the power cable to the Projector and plug the power cord into an outlet. 11. Power On ON Turn on the Projector Lamp by depressing the Power key on the Control Panel or depressing the Menu key on the Remote Control or optional Annotation device. Next turn on your computer and any other equipment you attached to the Projector.
Page 12 ______________________________________________________________________________ Installation General Select a room that can be darkened and using the table below, determine a Projector location that suites your screen needs. Place the Projector so that the projecting light hits the screen squarely (see TOP and SIDE VIEWS below). For ceiling mount, contact your local dealer. Adjust the distance between the lens and the screen.
Page 13 _____________________________________________________________________________ PROJECTOR OPERATION Controls and Indicators Automatic Power Management The Projector has a built-in power management system that causes it to automatically power down some of the electronics whenever the Projector is turned off. This reduces power consumption and the need to unplug the unit. Simply turn the Projector on or off as you need it, and the Projector responds accordingly.
Page 14 ______________________________________________________________________________ Power Key and LED The Power key turns the Projector Lamp on and off. To turn the Lamp on, depress the Power key. To turn the Lamp off, depress and hold the Power key until the Lamp turns off. A countdown will appear at the bottom of the projected image while the Lamp key is depressed. This countdown is used to avoid accidental power-down. The Power LED will light whenever the Projector Lamp is lit.
Page 15 _____________________________________________________________________________ For complete alignment of the image in any direction, use the Information Menu as discussed in the following pages. Volume Control Keys If the Menu key has not been pressed, the keys will allow you to adjust the volume up or down. If On-Screen Prompts are enabled in the Preferences Menu, a volume adjustment message will be displayed whenever a volume key is depressed.
Page 16 ______________________________________________________________________________ Aurora S500
Page 17 _____________________________________________________________________________ Video Menu The Video Menu allows you to make adjustments to the currently selected video source. The Projector automatically sets the recommended parameters for the video you are using; however, you may wish to make additional adjustments with the Video Menu. Any changes you make affect only the video source you are viewing.
Page 18 ______________________________________________________________________________ Red Level The Red Level is used to adjust the amount of red in the image. + Red will increase red in the image, and - Red will decrease red in the image. Use the Green Level and Blue Level controls to perfect the image color setting. The Red Level control will appear in a light gray Red Level if this control is unavailable for the source you are viewing.
Page 19 _____________________________________________________________________________ NOTE: XGA is supported only at 60 Hertz. Using the software provided with your video card, check your video card setting to ensure 60 Hertz has been selected. The Frequency Shift adjustment is used to correct vertical bands of distortion in the projected image. The easiest way to determine the need to make a frequency shift is to project a full image of repeated information such as the letter M.
Page 20 ______________________________________________________________________________ Audio Menu The Audio Menu allows you to adjust the audio attached to the video source you are viewing. Any audio changes you make are automatically saved. Press the Menu and then the Audio key and the Audio Menu to the right will be displayed. To exit the menu, press the Menu key.
Page 21 _____________________________________________________________________________ selected video source. Selecting Int enables the Projector’s internal 12-watt stereo speaker system and disables the audio output. Selecting Ext enables the Projector’s audio output for use with an external amplifier and speaker system and disables the internal speakers.
Page 22 ______________________________________________________________________________ Preferences Menu The Preferences Menu allows you to configure the Projector and the WritingPad or PenPal to your liking. If you do not have the Annotation feature or it is not connected, Notepad Color and Pen Barrel Buttons are disabled and they will appear in a light gray. Press the Menu key and then the Preferences key and the Preferences Menu to the right will be displayed. To exit the menu, press the Menu key.
Page 23 _____________________________________________________________________________ Pen Barrel Buttons allows you to choose the mode of operation for the Pen barrel buttons of the WritingPad and PenPal Annotation options. For the PenPal, selecting Custom or Std enables the lower Pen barrel button for erase when the Pencil is selected and right mouse click when the Mouse is selected. When Off is selected, the Pen barrel buttons are deactivated. This is the factory setting for PenPal when it is shipped.
Page 24 ______________________________________________________________________________ Any changes you make in Custom mode are automatically saved so that the next time you use Custom mode your last Pen tip setting and barrel button settings will be restored. If you are sharing the Projector with other users, you may wish to set Pen Barrel Buttons to Off when you are done with the Projector. The Mouse Type identifies which type of mouse you have connected to the Projector.
Page 25 _____________________________________________________________________________ The Remote Control Button 2 (Select) is a programmable button. This menu item allows you to assign one of the following four functions to Button 2. Once assigned, depressing Button 2 on the Remote Control will cause that function to be performed. Src Allows you to switch to other video sources attached to the Projector. This function behaves the same as the Source button on the Projector and the Annotation option.
Page 26 ______________________________________________________________________________ Information Menu The Information Menu allows you to view information about your current video source and gives access to diagnostic information regarding the Projector. The diagnostic information is useful to our technical support staff when diagnosing problems. Press the Menu key and then the Information key and the Information Menu to the right will be displayed. To exit the menu, press the Menu key.
Page 27 _____________________________________________________________________________ Aurora S500
Page 28 ______________________________________________________________________________ Remote Control The Remote Control provides the ability to control a presentation, your computer mouse, and the Projector. The Remote Control is operated by batteries that may be changed by removing the cover on the bottom. The unit uses infrared light to transmit your instructions to the Projector. The infrared receivers are located to the right of the lens and top-rear of the Projector.
Page 29 _____________________________________________________________________________ Pressure Pad The Pressure Pad controls the speed and direction of movement. The position of your finger or thumb on the edge of the Pressure Pad determines the direction. The pressure you apply to that position determines the speed. For very slow movement, apply light pressure. To accelerate or move at higher speeds, increase pressure.
Page 30 ______________________________________________________________________________ To click, pull the Trigger once. To double click, pull the trigger twice. To drag, ensure that the Mouse is selected (Mouse/Pointer/Volume button) then pull the trigger and hold while you move the mouse with the Pressure Pad. Right Mouse Button Button 4 controls the Right Mouse Button. As mentioned above, the mouse must be properly selected and connected for the Mouse features to operate.
Page 31 _____________________________________________________________________________ Menu Menu activates and deactivates the Projector menus. This button behaves the same as the Menu button on the Projector and on the Annotation device. Once the Menu has been activated, depressing an edge of the Pad will select a specific menu. The edges of the Pad correspond directly to the Menu items. For example, depressing the top edge of the Pad would select the Preference Menu.
Page 32 ______________________________________________________________________________ Power On/Off from the Remote Control Once the Projector has been connected to an external power source, it may be powered-up or powered down from the Control Panel on the Projector or from the Remote Control. To power-up the Projector with the Remote Control, depress any of the four numbered keys (1-4).
Page 33 _____________________________________________________________________________ ANNOTATION OPTION The Annotation option allows you to electronically write on your projected image independent of the video sources that you may have attached, control an optional mouse, and make adjustments to the Projector. The Annotation device consists of a writing Tablet that plugs directly into the Projector (Tablet connector) and a Pen. There are two types of Annotation devices: WritingPad and PenPal.
Page 34 ______________________________________________________________________________ Features of the PenPal Pen The Pen does not require batteries to operate. Once the Tablet is connected and the Projector is powered on, the Pen is active whenever it is in proximity of the Writing Area. Proximity means either end of the Pen is near the surface of the Writing Area and the Pen is not touching the surface. The Pen is very simple.
Page 35 _____________________________________________________________________________ Enable Eraser unused Pointer & Eraser Pointer, Writing & Eraser Writing Mode Enable Right Mouse Click unused Pointer & Double Left Mouse Click Pointer & Left or Right Mouse Click Mouse Mode Select unused Pointer & Select Pointer & Select Projector Control NOTE: The lower half of the rocker switch behaves as an eraser when in writing mode, a select button when in Projector control mode, and a right mouse button wh
Page 36 ______________________________________________________________________________ Mouse The Mouse provides the ability to control a mouse-based application program. The Mouse Type setting (PC or MAC) in the Preferences Menu determines which type of mouse you have selected.
Page 37 _____________________________________________________________________________ If the Pen should reach the edge of the Writing Area and the Mouse still has not reached the edge of the image, simply move the Pen to the opposite side of the Writing Area and back, keeping the Pen in proximity while you move it. NOTE: To ensure that your PC correctly identifies the Microsoft-compatible mouse, the Projector must be powered-on before your PC is powered-on.
Page 38 ______________________________________________________________________________ Source Selection Up to six (6) video sources may be connected simultaneously to the Projector (PC or Macintosh on RGB 1 and RGB 2, S-Video on Video 1 and Video 2, composite video on Video 1 and Video 2). The Projector Source button is used to switch between the connected sources. Menu Selection The PenPal Menu button provides access to the Preferences, Video, Information and Audio menus.
Page 39 _____________________________________________________________________________ WritingPad Use of the WritingPad Tablet The Tablet is used for writing on the projected image, controlling the Projector, or controlling a mouse-based application. Controlling a mouse-based application requires the proper cable or adapter and compatible mouse driver software in your computer. See the discussion on the Mouse information.
Page 40 ______________________________________________________________________________ If the Pen Barrel Buttons are set to Standard (Std) in the Preferences Menu, the lower barrel button may be used to erase small areas with the Pencil Eraser and the upper barrel button may be used to erase large areas with the Large Eraser . If the Mouse Tool is selected, the lower barrel button is a right mouse click and the upper barrel button is a double left mouse click.
Page 41 _____________________________________________________________________________ Touch Button Descriptions The Touch Buttons are divided into 8 categories: Icons, Erase, Mouse Clicks, Tools, Pads, Colors, Sizes and Projector control. Below is a detailed discussion of each of these Touch Button features. Icons The WritingPad includes three (3) libraries of twenty (20) Icons each. Icons can be placed anywhere on the projected image.
Page 42 ______________________________________________________________________________ Erase The Erase button will erase all WritingPad-generated information from the displayed image. To use Erase, depress the Pen tip on be instantly erased. and all WritingPad-generated information on the projected image will There are also three other ways to erase WritingPad-generated data. areas in Videopad and cuts holes in Notepad , and erases large areas, erases allows you to create custom erasers.
Page 43 _____________________________________________________________________________ Videopad Videopad displays your selected video source as your writing pad. To select the Videopad, simply depress the Pen tip on the Videopad button. The Videopad may be used the same as the Notepad except that the background is your selected video source. The Scissors you to erase large areas of the Videopad. Tool allows Re-Cover The Re-Cover button creates an electronic paper overlay on the Videopad.
Page 44 ______________________________________________________________________________ Scissors The Scissors Notepad allows you to erase large areas of the Videopad or to cut windows in the allowing you to view video through it. To erase with the Scissors in Videopad , depress the Pen tip on the Scissors Tool, position the center of the Scissors symbol at any corner of a rectangular area to be erased, depress the Pen tip and draw a diagonal of the area to be erased.
Page 45 _____________________________________________________________________________ The Pen Barrel Buttons must be set to STD in the Preferences Menu for the Pen barrel button mouse features to work. Right Mouse Button Double Click/Left Mouse Button Left Mouse Button To use the PC mouse, depress the Pen tip on the Mouse Tool. Position the mouse on the image by moving the Pen tip over the Writing Area while it is in proximity.
Page 46 ______________________________________________________________________________ Frame Frame allows you to create a rectangular frame for diagramming or framing areas of interest. To create a frame , select the Frame corner of the Frame Tool with the Pen tip, position the upper right-hand symbol at a corner of the frame draw a diagonal of the frame to be drawn, depress the Pen tip, , and release the Pen tip. The frame diagonal is being drawn.
Page 47 _____________________________________________________________________________ Manipulating The Frame and Objects and Box Tools create objects ( and ) that can be moved or re-sized. These operations are performed by grabbing a corner of a frame or box as described below. Any tool except Mouse may be selected. To move a frame , position the current Tool symbol inside the lower left-hand or box corner or the upper right-hand corner of the object until the hand symbol appears.
Page 48 ______________________________________________________________________________ Upper Barrel Button If Pen Barrel Buttons is STD in the Preferences Menu, depressing the upper Pen barrel button will temporarily switch the Tool to a Large Eraser and allow you to erase any WritingPad data that passes under the Large Eraser while the Pen tip is depressed. Release the Pen barrel button and the Pen tip will restore the last used Tool.
Page 49 _____________________________________________________________________________ Colors Eight (8) colors and highlight are available with a Tool or Icon. Touching a Color button selects that color for use with the selected Tool or Icon until another Color button is touched. Each Pad retains its last used Color; therefore, switching Pads will automatically restore the selected Color.
Page 50 ______________________________________________________________________________ Medium Medium allows you to draw or erase a medium line (3 pixels plus an outline). To select Medium, depress the Pen tip on the Medium Size. Large Large allows you to draw or erase a thick line (4 pixels plus an outline). To select Large, depress the Pen tip on the Large Size. Bold Bold allows you to draw or erase a bold line (6 pixels plus an outline). To select Bold, depress the Pen tip on the Bold Size.
Page 51 _____________________________________________________________________________ Source Selection Up to six (6) video sources may be connected simultaneously to the Projector (PC or Macintosh on RGB 1 and RGB 2, S-Video on Video 1 and Video 2, composite video on Video 1 and Video 2). The Source button allows you to sequentially switch between connected sources. If Video 1 or Video 2 has both a composite and S-Video connected, Source will select them individually.
Page 52 ______________________________________________________________________________ TROUBLESHOOTING On the following pages is a list of problems and probable causes. If your problem can be identified from the list, check the probable causes for a solution. If you continue to have trouble resolving your problem, contact our customer support group at the number displayed on the Projector at power-up or the number on the back of this Owner’s Manual.
Page 53 _____________________________________________________________________________ Fan failure message • The Projector constantly checks for proper operation of the fan. If a fan failure occurs, the fan failure message will appear. To clear a fan failure message condition, depress the Source key on the Projector. To avoid damage to the LCD or the Lamp, discontinue the use of the Projector until the fan can be serviced. Check for objects stuck in the fan.
Page 54 ______________________________________________________________________________ Split image or partial image • Image alignment needed; use the left, right, up and down keys the Information Menu selected. • Incompatible video signal from computer. Visible bright or dark spots • An inactive subpixel may appear as a bright or dark spot on the display. The Projector may contain as many as 20 inactive subpixels or 0.002% of a total of 921,600 subpixels. Source LED is red • Video signal has been lost.
Page 55 _____________________________________________________________________________ CARE AND MAINTENANCE Storage and Transportation Store and transport the system at temperatures between 0o and 140oF (-17o to 60oC). Avoid storage in automobiles during seasonal temperature extremes. Automobile interior temperatures can exceed 160oF o o o (71 C) in summer and drop to -40 F (-40 C) in winter.
Page 56 ______________________________________________________________________________ Service Information The system is designed for long, dependable service. However, should your equipment fail, contact us at the number displayed on the Projector when it is first powered on or at the number printed on the back cover of this Owner’s Manual. When returning equipment for service, be sure to use its original shipping container and insure the shipment against loss or damage due to shipping.
Page 57 _____________________________________________________________________________ Lamp Replacement CAUTION: The Lamp is made of glass and is very fragile. Do not touch the Lamp with your bare hands and do not jolt or damage it. Do not use an exhausted Lamp as it may burst and cause fire, injuries, or damage to the Projector. If a Lamp bursts, pull out the power plug and ask your dealer to replace the Lamp. Fragments of glass may cause injury or damage the Projector. The Lamp has a life of 2,000 hours.
Page 58 ______________________________________________________________________________ Replacing the WritingPad Pen Tip If you purchased the Annotation option and the stylus of the Pen becomes worn, it may be replaced. To replace the Pen tip, grasp the tip and pull straight out as shown to the right. Insert the new tip and press firmly into place. Contact your sales representative or call the number that is displayed on the Projector at power-up for information on Pen tips.
Page 59 _____________________________________________________________________________ Monitor Interference If you are experiencing monitor interference with your WritingPad Tablet, you can reduce the interference by changing the frequency your Pen uses. To change the Pen frequency, press both side buttons and the Pen tip simultaneously and hold for approximately three seconds. To return to the default frequency, repeat the above process.
Page 60 ______________________________________________________________________________ ACCESSORIES Item Model Description WritingPad 1260 The electronic Tablet and Pen writing accessory. PenPal 1244 Electronic Tablet and Pen writing accessory. Tablet Extension Cable 1903 25-foot extension cable for the WritingPad Tablet. Mac Mouse Adapter 1907 An adapter for using the WritingPad as a Macintosh mouse.
910 Campisi Way Campbell, CA 95008 United States of America Tel: (408)559-1111 Aurora S500 Fax: (408)559-0444 info@chisholm.com Copyright 1997 111497-87000062-02 Rev A support@chisholm.com www.chisholm.