Chord Electronics Product Communication | English The Pumphouse, Farleigh Lane, East Farleigh, Kent, ME16 9NB, Great Britain. +44 (0) 1622 721444 info@chordelectronics.co.uk chordelectronics.co.uk DAVE Manual - V.1.
Chord Electronics DAVE | Manual _ Contents 0.0 1.0 Safety instructions 03 2.0 Warranty 08 1.1 1.2 1.3 1.4 04 05 06 2.1 2.2 09 Introduction Protection against liquids & heat Dismantling & radio frequency interference Connecting your equipment Getting to know DAVE The front panel The rear panel The remote control 5.0 How to navigate the menus 5.1 5.2 The screen & navigating the menu Sample rate 11 4.0 Setting up DAVE 12 13 14 15 4.1 Placement 17 4.
Chord Electronics DAVE | Manual _ Safety instructions 1.0 3 // 35 1.0 1.1 Introduction 1.2 Protection against liquids & heat 1.3 Dismantling & radio frequency interference 1.
1.1 1.2 Chord Electronics DAVE | Manual _ Introduction DAVE is an incredibly powerful and versatile digital-to-analogue convertor preamplifier and headphone amplifier. Before operation, we strongly advise you read this user manual thoroughly. We also recommend that you store this user manual, along with your original receipt of purchase, in a safe place should you require assistance in the future. 4 // 35 1.1 Introduction Protection against liquids & heat 1.3 1.
1.1 1.2 Chord Electronics DAVE | Manual _ Protection against liquids & heat 1.2 DAVE is not protected against liquids of any kind. Never place containers of liquid on DAVE. Never allow DAVE to come into contact with moisture or liquids; doing so could result in electrocution or damage to DAVE’s internal circuitry. DAVE has internal thermal protection which will shut down the unit in the event of excessive temperatures being reached.
1.1 1.2 Chord Electronics DAVE | Manual _ Dismantling & radio frequency interference There are no userserviceable components within DAVE or its power supply. Dangerous voltages/ currents exist within DAVE and its power supply, posing a severe risk of electrocution and/or fire. Never attempt to open, dismantle or apply internal thirdparty devices to it or insert anything other than the listed interconnects or headphone adapters within this user manual.
1.1 1.2 Chord Electronics DAVE | Manual _ Connecting your equipment Before connecting DAVE to any third-party equipment, consult the manufacturer’s user guide to confirm compatibility. When connecting DAVE to any equipment, make sure that all devices are off, including DAVE. Once connected, switch all equipment on starting with the source and ending with the amplification. Initially, operate DAVE on its lowest volume setting, gently increasing to a comfortable listening level.
Chord Electronics DAVE | Manual _ Warranty 2.0 8 // 35 2.0 2.1 Warranty period & registering your purchase 2.
2.1 Chord Electronics DAVE | Manual _ Warranty period & registering your purchase At point of sale, Chord Electronics Ltd. provides DAVE with a comprehensive five-year warranty* which covers defects in materials and workmanship through fair wear and tear. The warranty will be void if any other PSU other than that supplied is used. *The warranty is transferable with proof of purchase, however, warranty on ex-demonstration units begins from the retailer‘s date of purchase.
2.1 Chord Electronics DAVE | Manual _ Making a claim & warranty exclusions In the unlikely event of a claim, your first point of contact should be your supplying dealer. If this is not possible, you must provide Chord Electronics with the details of the claim, including your original proof of purchase and serial number, in order to validate the nature of the repair. Upon receipt, Chord Electronics will make an assessment within 30 days and provide a reasonable solution.
Chord Electronics DAVE | Manual _ Getting to know DAVE 3.0 11 // 35 3.0 3.1 Getting to know DAVE 3.2 The front panel 3.3 The top panel 3.4 The rear panel 3.
3.1 3.2 Chord Electronics DAVE | Manual _ Getting to know DAVE DAVE is an extraordinarily powerful leading-edge DAC/ preamplifier/headphone amplifier, featuring multi-awardwinning FPGA technology. To get the very best out of the device for many years to come, we recommend familiarising yourself with this user manual. 12 // 35 3.1 Getting to know DAVE The front panel 3.3 3.4 3.
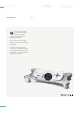
3.1 3.2 Chord Electronics DAVE | Manual _ The front panel Whilst an IR remote control is supplied, the front panel of DAVE is the main user interface and can entirely control all userconfigurable options, inputs and volume. Getting to know DAVE The front panel 3.3 3.4 3.5 The top panel The rear panel The remote control 3.2 DAVE features a single headphone output available on the front of the device. This can accommodate headphones up to 800 Ω without the need for an additional headphone amplifier.
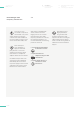
3.1 3.2 Chord Electronics DAVE | Manual _ The rear panel Getting to know DAVE The front panel 3.3 3.4 3.5 The top panel The rear panel The remote control 3.4 The rear panel offers a comprehensive connectivity suite, featuring both standard connections and those which are used with other Chord Electronics devices. When installing cables, you must make sure that they securely click into place, especially the optical input.
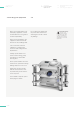
3.1 3.2 Chord Electronics DAVE | Manual _ The remote control Getting to know DAVE The front panel 3.3 3.4 3.5 The top panel The rear panel The remote control 3.5 For convenience, a branded infra-red remote control is included with DAVE. The remote will operate up to a distance of 10 metres (with clear line-of-sight) to the infra-red receiver within DAVE, which is located above the LCD screen.
Chord Electronics DAVE | Manual _ Setting up DAVE 4.0 16 // 35 4.0 4.1 Placement 4.2 Connecting your source to DAVE 4.3 Connecting a BLU MK II or Hugo M Scaler to DAVE 4.4 Connecting a preamplifier/amplifier to DAVE 4.
4.1 4.2 Chord Electronics DAVE | Manual _ Placement Whilst DAVE will operate normally on top of a rack or side table, it is recommended that the device is allowed to ‘breathe’. Allocating 10cm of space around the device to convection-cool during operation is advised. As the infra-red remote control requires a direct line of sight to the viewing portal, avoid placing objects on top of DAVE or putting it within enclosures. 17 // 35 4.3 4.
4.1 4.2 Chord Electronics DAVE | Manual _ Connecting your source to DAVE DAVE has a selection of different inputs and you can connect several sources at once if you wish. Please note that if you are using the USB input with a Mac/Linux device, you will not need a driver, but if you are connecting a Windows device, it will need a driver from the DAVE section of our website: chordelectronics.co.uk/product/ dave 4.3 4.
4.1 4.2 Chord Electronics DAVE | Manual _ Connecting a BLU MK II or Hugo M Scaler to DAVE If you intend to use BLU MK II or Hugo M Scaler with DAVE, you should use the dual BNC cables provided to connect the two devices. You must also connect your source inputs to the BLU MKII or M Scaler and not DAVE. Using the dual BNC cables; 1) Connect the outputs of BLU MKII or Hugo M Scaler to the dual BNC inputs on DAVE. Please pay close attention to the numbering on the units.
4.1 4.2 Chord Electronics DAVE | Manual _ 4.3 Connecting a preamplifier/ amplifier to DAVE To connect DAVE to a preamp, integrated or power amp, you should connect the outputs of DAVE to the inputs of your preamp, integrated or power amp; 1) Locate the outputs on the back of the unit shown below. 2) Paying close attention to the left and right channels, insert the cables in to DAVE. 3) Ensure the cables click into the connectors securely.
4.1 4.2 Chord Electronics DAVE | Manual _ 4.3 Powering DAVE POWER ON SEQUENCE: Once set up with cables, use the supplied power cable to connect DAVE. To turn DAVE on, locate the large power switch on the back of the device. It may take 15 seconds for DAVE to complete a safety check. During this stage, music playback will not be possible and mute will be displayed. 21 // 35 Placement Connecting your source to DAVE Connecting a BLU MK II or Hugo M Scaler to DAVE 4.4 4.
Chord Electronics DAVE | Manual _ How to navigate the menus 5.0 22 // 35 5.0 5.1 The screen & navigating the menu 5.
5.1 Chord Electronics DAVE | Manual _ The screen & navigating the menu DISPLAY SETTING AND THE SCREEN GOING BLACK: When you make a new selection via the menu, DAVE needs to write this to its internal memory. This will cause the display to temporarily show a black screen. For darker environments, bright displays may present a challenge, therefore, DAVE offers four different menu display settings. Find this listed under Display in the menu.
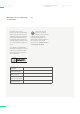
5.1 Chord Electronics DAVE | Manual _ Sample rate The screen & navigating the menu 5.2 SAMPLE RATE INDICATOR: During playback, the sample rate will be indicated on the screen. DAVE is capable of playing files up to 768 kHz/32-bit and DSD 512. See the table below for full details: USB* 44.1 kHz to 768 kHz 16-bit to 32-bit – DSD 64 to DSD 256 (DoP interface), 16-bit to 32-bit - DSD 64 to DSD 512 (native*** USB interface) BNC/Coax input 44.
Chord Electronics DAVE | Manual _ Playback modes 6.0 25 // 35 6.0 6.1 Playback modes 6.2 Headphone mode 6.3 Preamplification mode 6.
6.1 6.2 Chord Electronics DAVE | Manual _ Playback modes Headphone mode 6.3 6.4 Preamplification mode DAC mode 6.1 Playback modes DAVE has three userselectable modes tailored to the intended operation of the device: Headphone mode, Preamplification mode and DAC mode. Each mode will be displayed at the bottom of the screen on the right-hand side. When headphones are disconnected, it is possible to navigate between Preamplification mode or DAC mode by holding down the right and left menu buttons.
6.1 6.2 Chord Electronics DAVE | Manual _ Headphone mode Playback modes Headphone mode 6.3 6.4 Preamplification mode DAC mode 6.2 When DAVE detects that headphones have been inserted into the 6.35mm frontpanel connector, it will enter Headphone mode, which is for headphone-listening only. DAVE will identify the headphones and display Headphone in the bottom right-hand side of the screen.
6.1 6.2 Chord Electronics DAVE | Manual _ Preamplification mode 6.3 6.4 Preamplification mode DAC mode 6.3 WARNING: For the protection of your hearing and equipment, please do not navigate between the Preamp and DAC modes or have music playing without disconnecting DAVE from any other device or a source Providing headphones are not connected to DAVE, Preamplification mode can be manually engaged. Select Preamplification mode by holding down the right and left buttons for two seconds.
6.1 6.2 Chord Electronics DAVE | Manual _ DAC mode With headphones disconnected, DAC mode is selectable. Select DAC mode by holding down the right and left buttons for two seconds. As the output level is fixed within DAC mode, the volume dial (and remote control volume) will no longer respond. DAC mode can be employed when used within a conventional audio system, where an external preamplifier is present. When this mode is selected, a 3 V unbalanced and 6 V balanced RMS line-level signal will be present.
Chord Electronics DAVE | Manual _ Special features 7.0 7.1 DSD and PCM mode 7.2 Crossfeed 7.3 Settings memory & galvanic isolation 7.4 7.
7.1 7.2 Chord Electronics DAVE | Manual _ DSD and PCM mode DAVE has two decoding options specifically tailored for PCM or DSD playback. You can play both PCM and DSD music using either mode, but each one is specifically optimised for a particular format. In order to cycle between each mode please highlight the segment, typically by pressing the down button and then either press the left or right button for two seconds. PCM+ - Use this for PCM playback up to 768 KHz.
7.1 7.2 Chord Electronics DAVE | Manual _ Crossfeed CROSSFEED: Crossfeed is a form of digital processing that blends the left and right channels of a stereo recording to achieve a speaker-like presentation during headphone listening. This option is only available in Headphone mode. DAVE has four available modes of crossfeed, shown as Crossfeed on the display: Crossfeed 0: No crossfeed. Crossfeed 1: Minimal crossfeed. Crossfeed 2: Moderate crossfeed. Crossfeed 3: Broad crossfeed. 32 // 35 7.
7.1 7.2 Chord Electronics DAVE | Manual _ Settings memory & galvanic isolation SETTINGS MEMORY: DAVE remembers previous settings, including volume, even when powered down (or with the power supply removed). You do not have to perform any special actions. 33 // 35 DSD and PCM mode Crossfeed 7.3 GALVANIC ISOLATION: Galvanic isolation involves isolating the power rails of the data USB input, allowing for greater sonic performance. DAVE features a Class 2 Type-B USB input with this protection.
7.1 7.2 Chord Electronics DAVE | Manual _ Display messages DSD and PCM mode Crossfeed 7.4 During use of DAVE, you may encounter a number of on-screen display messages. Please use the table below to discover their meanings. PCM Set to PCM mode DSD Set to DSD mode Phase Neg Negative output phase Phase Pos Positive output phase Display 1-3 3 menu viewing options Display 4 Message mode - will turn off DAVE screen after 30 seconds Positive and inverted phase is for system matching.