Chord Electronics Product Communication | English The Pumphouse, Farleigh Lane, East Farleigh, Kent, ME16 9NB. Great Britain. +44 (0) 1622 721 444 info@chordelectronics.co.uk chordelectronics.co.uk Hugo M Scaler Manual - V.1.
Chord Electronics Hugo M Scaler | Manual _ Contents 0.0 1.0 Safety instructions 03 2.0 Warranty 08 1.1 1.2 1.3 1.4 04 05 06 2.1 2.2 09 Introduction Protection against liquids & heat Dismantling & Radio frequency interference Connecting your equipment Getting to know Hugo M Scaler & drivers The front panel The top panel The rear panel The remote control 5.0 How to navigate the menus 5.1 5.2 5.3 5.4 5.5 5.
Chord Electronics Hugo M Scaler | Manual _ Safety instructions 1.0 3 // 33 1.0 1.1 Introduction 1.2 Protection against liquids & heat 1.3 Dismantling & Radio Frequency interference 1.
1.1 1.2 Chord Electronics Hugo M Scaler | Manual _ Introduction Hugo M Scaler is a device that converts your sources to 705.6 or 768 kHz 24-bit PCM and achieves reconstruction of the original analogue signal in the ADC to a better than 16-bit accuracy under all conditions. Before operation, we strongly advise you read this user manual thoroughly. We also recommend that you store this user manual, along with your original receipt of purchase, in a safe place should you require assistance in the future.
1.1 1.2 Chord Electronics Hugo M Scaler | Manual _ Protection against liquids & heat The Hugo M Scaler is not protected against liquids of any kind. Never place containers of liquid on Hugo M Scaler. Never allow Hugo M Scaler to come into contact with moisture or liquids; doing so could result in electrocution or damage to the Hugo M Scaler’s internal circuitry.
1.1 1.2 Chord Electronics Hugo M Scaler | Manual _ Dismantling & radio frequency interference There are no userserviceable components within the Hugo M Scaler or its power supply. Dangerous voltages/currents exist within the Hugo M Scaler and its power supply, posing a severe risk of electrocution and/or fire. 6 // 33 1.3 1.4 Dismantling & radio frequency interference Connecting your equipment 1.
1.1 1.2 Chord Electronics Hugo M Scaler | Manual _ Connecting your equipment Before connecting the Hugo M Scaler to any equipment, consult the manufacturer’s user guide to confirm compatibility. When connecting the Hugo M Scaler to any equipment, make sure that all devices are off, including the Hugo M Scaler. Once connected, switch all equipment on starting with the source and ending with the amplification.
Chord Electronics Hugo M Scaler | Manual _ Warranty 2.0 8 // 33 2.0 2.1 Warranty period & registering your purchase 2.
2.1 Chord Electronics Hugo M Scaler | Manual _ Warranty period & registering your purchase At point of sale, Chord Electronics Ltd. provides Hugo M Scaler with a comprehensive three-year warranty* which covers defects in materials and workmanship through fair wear and tear. The warranty will be void if any other PSU other than that supplied is used. *The warranty is transferable with proof of purchase, however, warranty on ex-demonstration units begins from the retailer‘s date of purchase.
2.1 Chord Electronics Hugo M Scaler | Manual _ Making a claim & warranty exclusions In the unlikely event of a claim, you must provide Chord Electronics with the details of the claim, including your original proof of purchase and serial number in order to validate the nature of the repair. Upon receipt, Chord Electronics will make an assessment within 30 days and provide a reasonable solution.
Chord Electronics Hugo M Scaler | Manual _ Getting to know Hugo M Scaler 3.0 11 // 33 3.0 3.1 Getting to know Hugo M Scaler & drivers 3.2 The front panel 3.3 The top panel 3.4 The rear panel 3.
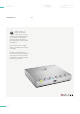
3.1 Chord Electronics Hugo M Scaler | Manual _ Getting to know Hugo M Scaler & drivers The Hugo M Scaler is a highly advanced standalone upscaler capable of redefining sound quality from digital audio. The Hugo M Scaler uses the world’s most advanced filter technology to upscale standard 44.1kHz digital audio up to 705.6kHz (16x CD’s 44.
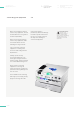
3.1 Chord Electronics Hugo M Scaler | Manual _ 3.2 The front panel The top panel The rear panel The remote control 3.2 Whilst an IR remote control is supplied, the front panel of the Hugo M Scaler is the main user interface and can entirely control all user-configurable options and inputs. Video mode Off/On/Automatic VIDEO The middle of the front panel contains a black acrylic infrared signal window.
3.1 Chord Electronics Hugo M Scaler | Manual _ The top panel 3.2 Getting to know Hugo M Scaler 3.3 & drivers 3.4 The front panel 3.5 3.3 The top panel of the Hugo M Scaler does not provide any visual feedback, with the exception of the buttons labelled within the previously annotated front panel. You may view the internal plate via the porthole looking glass which protects the sensitive internal circuitry from radio frequency (RF) interference.
3.1 Chord Electronics Hugo M Scaler | Manual _ Getting to know Hugo M Scaler 3.3 & drivers 3.4 The front panel 3.5 3.2 The rear panel The top panel The rear panel The remote control 3.4 The rear panel houses the device’s wide-ranging connectivity, inputs and outputs. The Hugo M Scaler also features a dual-data output, for optimum use with selected Chord Electronics’ DACs. When installing any cable, you must make sure that they securly click into place, especially optical.
3.1 Chord Electronics Hugo M Scaler | Manual _ The remote control 3.2 Getting to know Hugo M Scaler 3.3 & drivers 3.4 The front panel 3.5 The top panel The rear panel The remote control 3.5 The middle of the front panel contains a black acrylic infrared signal window. If you intend to use the remote control with the Hugo M Scaler it is recommended that clear line of sight is available between the remote control device and the signal window.
Chord Electronics Hugo M Scaler | Manual _ Setting up Hugo M Scaler 4.0 17 // 33 4.0 4.1 Placement 4.2 Connecting an input to Hugo M Scaler & input selection 4.3 Connecting Hugo M Scaler to Hugo TT 2 4.4 Connecting Hugo M Scaler to another DAC 4.
4.1 4.2 Chord Electronics Hugo M Scaler | Manual _ Placement Whilst the Hugo M Scaler operates normally within a stack including the Hugo TT 2 and TToby, it is recommended that you allow the device to breathe. Allocating 10cm of space around it to convection-cool during operation is advised. If possible, do not place the unit(s) inside a cabinet. As the infra-red remote control requires a direct line of sight to the viewing portal, please avoid placing objects in front of either device. 18 // 33 4.
4.1 4.2 Chord Electronics Hugo M Scaler | Manual _ Connecting an input to Hugo M Scaler & input selection You must connect your sources digital output to one of the Hugo M Scaler inputs, for example, computer via USB or CD transport via BNC, Hugo M Scaler’s output can then be connected to a DAC. Placement Connecting an input to Hugo M Scaler & input selection 4.2 Ensure you have selected the correct ‘input‘ on the front panel of the Hugo M Scaler or select purple which is ‘automatic‘.
4.1 4.2 Chord Electronics Hugo M Scaler | Manual _ Connecting Hugo M Scaler to Hugo TT 2 4.
4.1 4.2 Chord Electronics Hugo M Scaler | Manual _ Connecting Hugo M Scaler to another DAC 1) Turn off both the Hugo M Scaler and any connected equipment 2) Locate the S/PDIF output connector or the Optical output and successfully connect to the corresponding input on the chosen DAC 3) Turn on all equipment and plug power into the Hugo M Scaler OPT OUT S/PDIF 21 // 33 4.3 4.4 4.5 Connecting Hugo M Scaler to Hugo TT 2 Connecting Hugo M Scaler to another DAC Output sample rate settings 4.
4.1 4.2 Chord Electronics Hugo M Scaler | Manual _ Output sample rate settings Placement Connecting an input to Hugo M Scaler & input selection 88.2 - 96 kHz 176.4 - 192 kHz 352.8 - 384 kHz 705.6 - 768 kHz 22 // 33 OP SR COLOUR 4.5 Key Improvement No improvement The maximum achieved upsampling will depend entirely on your source input sample rate. 44.1 - 48 kHz 4.4 Connecting Hugo M Scaler to Hugo TT 2 Connecting Hugo M Scaler to another DAC Output sample rate settings 4.
Chord Electronics Hugo M Scaler | Manual _ How to navigate the menus 5.0 23 // 33 5.0 5.1 Basic navigation 5.2 Video mode 5.3 Viewing the incoming sample rate 5.4 Selecting your upsample rate 5.5 Video mode 5.
5.1 5.2 5.3 Chord Electronics Hugo M Scaler | Manual _ Basic navigation Basic navigation Selecting your input Viewing the incoming sample rate 5.4 5.5 5.6 Selecting your upsample rate Video mode DX buttons 5.1 With each press of the Hugo M Scaler’s available buttons, you will cycle through the available options; no further interaction is required to make the section active: it automatically engages.
5.1 5.2 5.3 Chord Electronics Hugo M Scaler | Manual _ Selecting your input Basic navigation Selecting your input Viewing the incoming sample rate 5.4 5.5 5.6 Selecting your upsample rate Video mode DX buttons 5.2 Press the input button to select the source you require. The colour changes depending on input selected, see diagram below. If you are using dual data, when you select BNC 1 the Hugo M Scaler will automatically switch on both outputs to dual data mode.
5.1 5.2 5.3 Chord Electronics Hugo M Scaler | Manual _ Viewing the incoming sample rate When an input is selected and audio is being played back, the sample rate will be indicated via the DX OP button. Hugo M Scaler supports incoming sample rates from 44.1 kHz to 768 kHz - 16-bit to 32-bit. You can refer to the illuminated colours DX OP button below and their associated sample rates. 44.1 48 26 // 33 88.2 Basic navigation Selecting your input Viewing the incoming sample rate 5.4 5.5 5.
5.1 5.2 5.3 Chord Electronics Hugo M Scaler | Manual _ Selecting your upsample rate Basic navigation Selecting your input Viewing the incoming sample rate 5.4 You must select the corresponding colour for the upsample rate best suited for your system. Select this by pressing the OP SR (Output sample rate) button. No upsampling 27 // 33 Medium High Max 5.4 5.5 5.
5.1 5.2 5.3 Chord Electronics Hugo M Scaler | Manual _ Video mode The Hugo M Scaler is a highly flexible standalone upscaler that is not only designed to be used with your music collection, but also to get the best audio quality from video devices. You can playback video via a computer, laptop, server or a Blu-ray player to get the best audio quality from video soundtracks.
5.1 5.2 5.3 Chord Electronics Hugo M Scaler | Manual _ DX buttons Basic navigation Selecting your input Viewing the incoming sample rate 5.6 The last two buttons on the Hugo M Scaler unit (DX OP, DX down, DX up) are not to be used as of yet, they have been implemented for a future product that will pair with the Hugo M Scaler. Please leave them off. VIDEO 29 // 33 INPUT OP SR DX OP DX DX 5.4 5.5 5.
Chord Electronics Hugo M Scaler | Manual _ Special features 6.0 30 // 33 6.0 6.1 Dimming the brightness 6.
6.1 6.2 Chord Electronics Hugo M Scaler | Manual _ Dimming the brightness To cycle between low and high brightness levels, simply press ‘DX V’ and ‘DX /\’ simultaneously. 31 // 33 6.
6.1 6.2 Chord Electronics Hugo M Scaler | Manual _ Galvanic isolation Galvanic isolation involves isolating the power rails of the data USB input, allowing for greater sonic performance. The Hugo M Scaler features a Class 2 Type-B USB input with this protection. Galvanic isolation also features on the dual-BNC outputs. No special attention or cables are required to allow the Hugo M Scaler to function in this mode. However, the usual USB +5V rail will need to be present. 32 // 33 6.