
Operator`s manual


7: Operating the SLC Xenon Console
CHRISTIE DIGITAL SYSTEMS 6-5
August 7, 2003
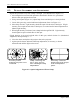
6.4. TILT ADJUSTMENT
The SLC Console is optionally equipped with a jackscrew for easy tilt adjustment. It is
located in the bottom rear of the console, and is accessible from either side. (See Item 16 in
Figure 4-2.)
1. Loosen all four (4) hold-down bolts. (See Item 7 in Figure 4-1.)
2. Turn jackscrew using 3/4-inch wrench or ratchet. Turn jackscrew clockwise to tilt
console downward. Turn jackscrew counterclockwise to tilt console upward.
3. After reaching correct tilt angle, securely tighten all four hold-down bolts.
6.5. REPLACING THE LAMP
In accordance with safety precautions, always be certain that the lamp has cooled for at least
10 minutes before replacing it.
WARNING
Authorized protective clothing must be worn when replacing lamp.
6.5.1. REMOVING THE L AMP
Christie recommends that lamps be replaced before running time exceeds 120% of warranted
lifetime. Check running time using elapsed time indicator on control panel (Item 3 in Figure
6-1).
1. Loosen set screws on positive and negative lamp connectors.
2. Unscrew lamp and remove from reflector. Immediately put protective cover on lamp.
3. Record hours that lamp has been used.
Record the elapsed time reading for the old lamp when installing a new lamp.
6.5.2. INSTALLING A N EW L AMP
Install the new Xenon lamp according to the directions in Section 5.2.
6.5.3. D
EFECTIVE LAMPS
Defective lamps under warranty are to be returned to the dealer who provided the lamp in
their protective cover and proper packing. They must be returned to Christie. The Warranty
Claim Forms supplied with the lamp must be filled out completely. All portions of the failed
lamp including electrodes must accompany the lamp to aid Christie in evaluating the defect.