
Instruction manual


Installation and Setup
CP2215 Quick Start Guide 6
020-101295-01 Rev. 2 (05-2014)
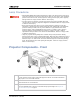
3. Tighten the mounting arm until it fits tightly on the ball joint.
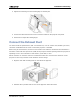
4. Connect the cable from the TPC to the connector located on the projector rear panel.
5. Tilt the TPC to adjust the viewing angle.
Connect the Exhaust Duct
You must install the optional duct (P/N: 119-103105-xx) if an air volume of 9,000 BTU (per hour)
cannot be ventilated from the room in which the projector is installed.
When using an external duct, the duct must include a heat extractor and blower that maintains a
minimum of 450 cubic feet per minute (CFM) at the projector exhaust opening when the projector is
operating at 25°C at an elevation of 914 meters (3,000 feet) or less.
Add an extractor or a booster if there is insufficient airflow. Do not mount the extractor on the
projector as this may introduce some vibration into the image.
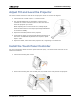
1. Align the duct with mounting holes on the side of the projector.
2. Hold the duct in position and secure it to the projector with 4 M5 screws.