
User`s manual


Section 3: Operation
User’s Manual 3-33.
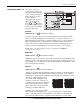
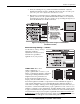
Simulation 3D — SUBMENU OF ADVANCED IMAGE SETTINGS
Use the options in the Simulation 3D
menu to make the timing adjustments
necessary for realistic simulation and
3D images.
NOTES: 1) Available in Mirage
projectors only. 2) For complete 3D
application notes, refer to the
separate Using 3D in Mirage
manual
provided with the Mirage projector.
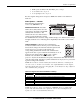
FRAME DELAY MONITOR — This slidebar monitors the latency between input and
output. For best results, the bar width and value should remain fairly constant,
indicating that timing of input and output frames is locked; the Frame Delay Monitor
value should stay within 5-10 lines or so of the Frame Delay setting. If a frame is lost
or “dropped”, the bar will move suddenly and the values will change, indicating that
the frame input is no longer equal to the output.
NOTE: See separate Using 3D in Mirage manual provided for more information.
FRAME DELAY — Set the number of lines delayed between the input signal and its
appearance on screen, keeping in mind that projector processing always adds one
frame of delay to the frame delay setting. For applications such as simulation, where
the feeling of “real time” image response is a priority, a minimum setting is usually
preferable. For projectors capable of 3D (stereographic) applications where alternating
left-right frames must be synchronized with the corresponding L/R shutters in 3D
glasses, a total frame delay setting of two (or multiple of two) may be more useful. If
set too high or low, frame locking will not be possible—most sources require
approximately 50 lines of delay to ensure frame locking.
NOTE: See separate Using 3D in Mirage
manual provided for more information.
DARK INTERVAL — Adjust Dark Interval to artificially increase the amount of dark
time between displayed frames for stereographic 3D images. Higher settings provide
more time for shutters in 3D glasses to open/close, ensuring that each eye sees the full
display intended for it. Symptoms of cross-talk and/or color artifacts can indicate need
for adjustment. The Dark Interval range of adjustment depends on the vertical
frequency of your source—the higher the frequency, the smaller the range.
NOTE: See separate Using 3D in Mirage
manual provided for more information.
3D STEREO SYNC LOCKING — This option defines 1) whether or not the incoming
stereographic 3D signal locks to the vertical sync output so that signals are
synchronized, and 2) whether or not the 3D frames must be inverted, i.e. swapped left-
with-right. The correct setting ensures that the projector’s 3D display of left/right
frames is synchronized with the rest of the 3D system components so that left/right
image data is seen by the intended eye. Select the option corresponding to your 3D
source connections and timing, and use only if the Mirage 3D Stereo Sync Cable is
connected between the projector’s GPIO port and a server. Keep this adjustment OFF
(default) when you are not using the Mirage 3D Stereo Sync Cable.
Figure 3.16.