
User manual


Section 3: Operation
Roadie HD+35K User Manual 3-59
020-100340-02 Rev. 1 (01-2010)
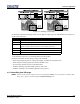
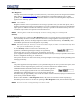
Figure 3-35 Define Lamp Cable Length
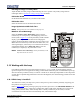
3.10.3 Turning the Lamp ON/OFF
NOTE: Refer to Section 3.2.6 Keypad and Standard IR Remote Functions for more information.
Lamp ON
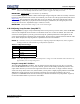
1. With the projection head and ballast connected to each other, and the breaker/power switch ON, press
MENU. The LCD Status Display at the rear of the projector shows a "Lamp Size" of 2000, 3000, 4500 or
6000 watts, depending on its last setting. Factory default=6000. Use
LEFT ARROW or RIGHT ARROW to select
the lamp that is currently installed. This should also appear on the Lamp Installed label located on the
lamp door.
NOTE: A lamp password is required to change lamp type/size, unless the "Enable Password" service option has
been turned OFF. Refer to
Figure 3-33.
2. Turn the projection head and lamp ON by pressing the POWER key on either the projector's built-in
keypad or standard IR remote.
3. For subsequent power-ups of this lamp, press the
POWER key. There is no need to reset the lamp size until
a different-sized lamp is installed.
NOTE: Refer to Section 3.2.6 Keypad and Standard IR Remote Functions for more information.
Lamp OFF
1. Press the POWER key on either the projector's built-in keypad or standard IR remote.
2. WAIT for fans to continue running for 10 minutes to cool the lamp.
3. Proceed with full shutdown of the system, if desired.
1.
2.
3.
4.
5.
6.
7.
8.
9.
0.
Lamp Hours
Lamp S/N
Lamp Message
Lamp Limit
Lamp Mode
Power
Lamp History
Change Lamp
Cable Length (m)
LampLOC
Intensity
Reserved
Lamp
0
1234
1000
Power
3545
15
1246
6 ½ ft. = 2 m
25 ft. = 7.5 m
50 ft. = 15 m
100 ft. = 30 m
Metric / Imperial Conversion
#ft.
3.28
= #meters
Lamp Ballast (7kW)
Up to 100 ft. Cables
*
*